Loading...
Loading...
Loading...
Loading...
Loading...
Loading...
Loading...
Loading...
Loading...
Loading...
Loading...
Loading...
Loading...
Loading...
Loading...
Loading...
Loading...
Loading...
Loading...
Loading...
Loading...
Loading...
Loading...
Loading...
Loading...
Loading...
Loading...
Loading...
Loading...
Loading...
Loading...
Loading...
Loading...
Loading...
Loading...
When operating in a different default currency from the channel(s) you are selling your products through, realtime currency exchange rates will be used by default. If however you define explicit per-currency prices in your Shopify store these can be synced and used through our Contextual Pricing feature. Please notify the channel(s) you are connected to if you wish to have this feature enabled for your store.
If you get the error “Provided store URL is invalid or could not be found.” when connecting a Shopify store, the first thing to do is double check that you have the correct URL provided.
Go to the Store Admin Page
Click on Settings
Click on Domains
Check for multiple domains listed here, if there is more than one, this is likely the cause of the above error
Select the URL that says “Redirects to …” and use this one (include https://) and you should be able to complete onboarding
When syncing your product data, Shopify will combine the available inventories from all for each . The available quantity of a variant will be the aggregate of all available quantities across your locations. If you only utilize a single location this will not be an issue, and may not be an issue even when you operate multiple locations if you can fulfill from each one.
If you do however require that inventory is only synced from specific locations this can be accomodated. Please let your channel account representative know that you have this requirement and the inventory location filter will be applied to your account.
This guide is intended for Shopify merchants who are connecting their store to Violet through a Shopify Custom App. During this process, the merchant will create a Custom App in their Shopify dashboard and then provide the generated credentials to Violet through the Violet Connect onboarding tool. The merchant will retain full control of the created Custom App and can modify or remove it at any time from within their Shopify dashboard. Total time for completion is around 5 minutes.
You must have a minimum Shopify plan of Basic to be able to connect with Violet.
From your Shopify dashboard navigate to Settings → Apps and sales channels → Develop Apps.
Click the green Create an app button.
In the modal that appears, enter an app name (ex. Violet) and select the user in your system who should be the owner of this app. Typically this is the default selected user.
From the App development view click on the Configuration tab.
Click Configure or Edit in the Admin API integration section.
The following Admin access scopes are the minimum required for Violet to perform all necessary functions against your store. If any additional scopes are required by certain channels within Violet, these will be communicated to you when you enable the channel.
write_customers and read_customers - used to add new customers when perform non-guest checkouts.
read_discounts - used to understand the combination policies of your discounts.
write_draft_orders and read_draft_orders - used to populate and submit orders into your system.
read_fulfillments - used to read and communicate order fulfillment statuses to the channel.
read_inventory - used to read inventory data related to your products.
read_locations - used to read inventory location data related to your products.
write_merchant_managed_fulfillment_orders - used to alert you when an order placed through Violet requires additional review before being fulfilled. This can be useful in mitigating fraud.
write_orders and read_orders - used to update and read orders previously submitted by Violet into your system.
read_price_rules - used to understand the pricing rules related to your discounts.
read_products - used to read your product catalog.
read_shipping - used to understand your shipping policies.
read_markets - used to understand the regions you ship to.
Optional Admin API Scopes
read_legal_policies - used to understand your refund and return policies.
read_returns - used to discover when a Violet sourced order has been returned.
Click Configure or Edit in the Storefront API integration section.
unauthenticated_write_checkouts - used to create carts without being subjected to Shopify's rate limits.
unauthenticated_read_product_listings - used to read basic product data when creating carts without being subjected to Shopify's rate limits.
unauthenticated_read_product_inventory - used to read product inventory data when creating carts without being subjected to Shopify's rate limits.
From the app view click API credentials then click Install App
Access Token
This token is used to authenticate requests made by Violet when interacting with your store. Important: this value can only be viewed once. It’s recommended that you copy and paste it into a temporary location until you finish the Violet onboarding process. If you lose this value before completing the Violet onboarding process you must uninstall the create app and start over.
API Key
This key is used in combination with the API Secret Key to verify and authenticate certain actions or events.
API Secret Key
This key is used in combination with the API Key to verify and authenticate certain actions or events.
Storefront API Access Token (Optional)
An optional key used for authenticating requests to the Storefront API once you've enabled Storefront API access.
Pass the Private access token generated into Violet Connect's Storefront API Access Token field
Once your app is fully configured, it’s time to return to the Violet Connect onboarding tool and enter the following credentials created in the previous steps:
Access Token
API Key
API Secret Key
Once entered, click the Next button to validate the credentials and complete the connection between your store and Violet. If the credentials are invalid you should check for any spaces or other copy/paste errors and try again.
Upon success you will be redirected back to the channel who first sent you to Violet.
When a Merchant creates a new store in Shopify, the default configuration is as follows:
2 Markets
US; Domestic: Active
Rest Of World; International: Inactive
1 Location; Inventory Storage
This typically corresponds to the address you have added to your Shopify store profile.
Default General Shipping Profile
Automatically linked to all products
Shipping Zone for all Markets
Shipping Zones tied to all Locations
Configuring Your Store for Regional Shipping
To make your products available for shipping to customers in a specific region, it's essential to ensure that the following settings are configured correctly:
Market
To create a Shipping Zone for your customer's address, you must first have an active Market. Please note that it may take approximately 15 minutes for changes in market status (Active/Inactive) to be recognized in the checkout process.
Shipping Profile
You need to create a Shipping Profile to house your Shipping Zones.
Shipping Zone
You must create a Shipping Zone to which you can attach Shipping Rates.
Product-Shipping Zone Association
To display available Shipping Methods during checkout, each product you wish to sell must be associated with a Shipping Zone. Please note that each product can only be linked to one Shipping Profile.
Shipping Zone Rate
Inventory Location
The presence of inventory in the Location attached to your Shipping Zone is not a requirement. As long as there is inventory in any location, your products can be checked out.
Product-Market Association
It's not mandatory to associate your product with a specific market to make it available for checkout through the Violet API.
Location Priority
Shipping Zones with Default Shipping Rates


When creating coupon codes in your BigCommerce dashboard for use in Violet you will want to create true Coupon Codes and not Promotions. Promotions are intended for use in your BigCommerce storefront and cannot be applied to carts through the BigCommerce API at this time.
Welcome to Violet's comprehensive merchant documentation center. Whether you're just getting started or need help managing your existing integration, you'll find everything you need to successfully connect your store and maximize your cross-platform selling potential.
If you're here because a channel partner invited you to connect your store, you're in the right place. Violet makes it easy to expand your reach by selling through multiple channels while maintaining control of your inventory, pricing, and customer relationships.
Start Here:
If you've already completed onboarding and need help managing your integration, jump straight to:
Choose your e-commerce platform to get started with a step-by-step integration guide:
- API key generation and webhook setup
- Store API configuration
- OAuth application setup
- API credentials and webhook configuration
Note: Each platform guide includes platform-specific requirements, step-by-step setup instructions, and troubleshooting tips.
Violet Connect is our streamlined merchant onboarding process that walks you through connecting your store in just a few minutes.
Access to your e-commerce platform's admin dashboard
Administrator permissions to create API credentials
Email address for account creation
Banking information for payout setup (if using Violet Payments)
Platform Selection - Choose your e-commerce platform
Store URL Entry - Provide your store's URL
Credential Generation - Follow platform-specific guide to create API credentials
Credential Input - Enter credentials in Violet Connect
Once connected, you'll receive an email with:
Login credentials for your Merchant Dashboard
Summary of your connection settings
Next steps for managing your integration
Your Merchant Dashboard is your central hub for managing all aspects of your Violet integration.
Access:
Overview
View connected store information
See all connected channels
Manage commission rates by channel
Monitor connection health
Orders (Bags)
View all orders placed through Violet
Track order status and fulfillment
Filter by channel, date, or status
Export order data
Catalog (Offers)
View all synced products
Publish/unpublish products by channel
Filter by availability, status, and tags
Manage product visibility
Payouts
Review payout history and status
Track distributions across orders
Manage payout account settings
View commission earnings by channel
Communication
Messages: Direct communication with channels
Notifications: System alerts and updates
Commission History: Track rate changes over time
Order Placement - Customer places order through channel
Order Sync - Order appears in your e-commerce platform
Fulfillment - You fulfill the order as normal
Status Updates - Violet tracks fulfillment status
Shopify
When canceling orders, always select "Refund Payments NOW"
Inventory syncs from all locations by default
Currency conversion uses real-time rates unless presentment currencies are configured
BigCommerce
Refunds show as "offline" - this is expected behavior
Use Coupon Codes (not Promotions) for discount integration
Multi-currency pricing supported through contextual pricing
Salesforce Commerce Cloud
Orders require special customer group (VIOLET_API)
Payment method configuration needed (VIOLET_API)
Refund notifications may require engineering integration
"Store URL Invalid" Error
Shopify: Check for multiple domains in Settings → Domains, use the primary domain
All Platforms: Ensure URL includes https:// protocol
Verification: URL should match what appears in your admin dashboard
Credential Validation Failures
Double-check for copy/paste errors and extra spaces
Ensure all required scopes/permissions are enabled
Verify credentials haven't expired or been regenerated
Check that API quotas haven't been exceeded
Missing Shipping Rates
Configure shipping zones for all target markets
Ensure products have weight/dimensions configured
Verify shipping methods are enabled for your regions
Check for location-based shipping restrictions
Shopify
Minimum Plan: Requires Shopify Basic or higher
API Notices: Ignore Shopify API deprecation notices - Violet handles updates
Inventory Sync: Contact support if you need location-specific inventory filtering
BigCommerce
Offline Refunds: Expected behavior for Violet orders
Coupon Issues: Use Coupon Codes, not Promotions
Currency: Enable presentment currencies for multi-currency support
WooCommerce
Plugin Issues: Ensure WordPress/WooCommerce versions are current
Hosting: Verify hosting provider allows external API connections
Permissions: Check file permissions if plugin installation fails
Default: Real-time currency conversion
Enhanced: Presentment currency pricing (requires setup)
Configuration: Contact your channel partner to enable
Single Location: Automatic inventory sync
Multiple Locations: Combined inventory by default, filtering available
Real-time Updates: Inventory changes sync automatically
Flexible Rates: Set different rates per channel
Rate Changes: Update anytime through dashboard
History Tracking: Full audit trail of rate changes
Locking: Channels can lock rates via API if pre-negotiated
Platform Guides: Step-by-step integration instructions
Dashboard Guide: Complete merchant dashboard walkthrough
API Documentation: Technical reference for developers
FAQ Section: Answers to common questions
Channel Partner: Your primary point of contact for business questions, technical issues and platform-specific help
Merchant Dashboard: Use Messages tab to communicate with channels
Documentation: AI-powered search (Ctrl/Cmd + K)
For urgent technical issues affecting order processing:
Contact your channel partner immediately
Check Violet status page for system-wide issues
Use Merchant Dashboard to temporarily unpublish affected products
Monitor order queue for processing delays
Choose your platform from the integration guides above
Follow the step-by-step guide for your platform
Complete Violet Connect onboarding with your credentials
Test your integration with a sample order
Bookmark your Merchant Dashboard for easy access
Review your commission rates across all channels
Set up order notifications to stay informed
Explore catalog management to optimize product visibility
Connect additional channels through the same process
Optimize your product data for better discoverability
Monitor performance metrics in your dashboard
Consider advanced features like presentment currencies
This documentation is continuously updated. For the latest information and new platform integrations, check back regularly or contact your channel partner.
This guide is intended for SpreeCommerce merchants who are connecting their store to Violet. During this process, the merchant will create a new oAuth application in their Spree dashboard and then provide the generated credentials to Violet through the Violet Connect onboarding tool. The merchant will retain full control of the created oAuth application and can modify or remove it at any time from within their Spree dashboard. Total time for completion is around 3 minutes.
From the left navigation sidebar of your Spree dashboard navigate to Apps → oAuth Applications.
Quick Solutions
Account Issues: Check your Stripe Express dashboard for verification status
Missing Payouts: Verify your bank account details in payout settings
Commission Questions: Review your commission rates in the Merchant Dashboard
In the upper right corner click the New oAuth application button.
Enter a Name for the new application that will remind you of the reason for creating this key. This can be as simple as "Violet" or the name of the channel you are connecting to.
In the Scopes field enter admin write.
Click the Create button. Your application will now be created.
The Client ID and Client Secret for the newly created application will now be revealed. Copy these values and keep them available for Step 2 of this guide.
Once you have your Client ID and Client Secret, it’s time to return to the Violet Connect onboarding tool and enter the follow credentials created in the previous steps:
When prompted for your store URL, enter the full URL including the protocol. Example - https://yourstore.com.
Enter your Client ID obtained in the previous steps in the "Client ID" field.
Enter your Client Secret obtained in the previous steps in the "Client Secret" field.
Once entered, click the Connect button to validate the credentials and complete the connection between your store and Violet. If the credentials are invalid you should check for any spaces or other copy/paste errors and try again.
📞 Technical Issues: Contact your channel partner for account setup problems
💬 Business Questions: Reach out to your channel partner for commission discussions
📧 Stripe Issues: Use your Stripe Express dashboard for payment-related questions
Ecwid - App installation and token generation
Wix - Business Solutions integration
Squarespace - Commerce API setup
Shoprenter - API Credentials setup
Payout Setup - Connect your bank account via Stripe (if applicable)
Commission Rate - Set your agreed-upon commission rate
Completion - Get redirected back to your channel partner
Payout - Commission is calculated and paid out
Explore your Merchant Dashboard to familiarize yourself with the tools
~5 minutes
Custom App creation, comprehensive API access
~5 minutes
Store-level API account, native coupon support
~5 minutes
Plugin installation, WordPress integration
~20 minutes
OCAPI + SCAPI configuration, customer groups
~15 minutes
API user creation, scope configuration
~20 minutes
Project-level API client setup
This guide is intended for Shoprenter merchants who are connecting their store to Violet. During this process, the merchant will obtain the API credentials in their Shoprenter dashboard and then provide the generated credentials to Violet through the Violet Connect onboarding tool. Total time for completion is around 5 minutes.
Within your Shoprenter site admin dashboard navigate to the Settings page using the left sidebar navigation.
From the Settings page, click API User in the API settings block.
If no credentials exist yet you will need to create new ones and save them.
Ensure that the API Status is set to Authorized.
Once you have your API credentials it’s time to return to the Violet Connect onboarding tool and enter them in their relevant fields:
Enter your API url in the ”Store URL” field.
Provide your Username in the API Username field.
Provide your Password in the API Password field.
Once entered, click the Connect button to validate the credentials and complete the connection between your store and Violet. If the credentials are invalid you should check for any spaces or other copy/paste errors and try again.
Upon success you will be redirected back to the channel who first sent you to Violet.
To uninstall the Violet extension perform the following steps.
Disable the Violet extension:
php bin/magento module:disable Violet_VioletConnect --clear-static-content
Remove the Violet extension from Composer:\
If installed from Magento Marketplace: composer remove violet/violetconnect
If installed from Packagist: composer remove violetio/magento2
Run Setup Upgrade to reflect the removal of the extension:
php bin/magento setup:upgrade
Reploy the static content:
php bin/magento setup:static-content:deploy -f
Flush the Magento cache:
php bin/magento cache:flush
From the merchants system, canceling a Violet Order is the same as canceling a traditional order.
When a merchant chooses to not accept and fulfill an order they must cancel it from within their existing system (commerce platform). If an order is not canceled and is left unfulfilled it will likely result in a chargeback from the cardholder. If a shopper requests order cancelation from a merchant before the order has been fulfilled the merchant can cancel it from within their system and Violet will be made aware of the cancelation automatically.
As a part of the standard Violet e-commerce integration, Violet subscribes to webhook notifications for cancelations, processing each when they are received. Once the merchant has marked the order as canceled, Violet will process that cancelation, reversing all funds transferred to the merchant and channel and returning the funds to the shopper's payment method. Funds should appear on the shopper's card within 5-10 business days.
Certain e-commerce platforms have special limitations and considerations that impact and alter the basic Violet cancelation flow.
A Shopify merchant must create a refund in their Shopify admin before canceling the order. Without first performing this step the cardholders transaction may not be reversed.
An Ecwid merchant must set the Payment Status to Cancelled or Refunded. Simply setting the Fulfillment Status to Delivery Canceled is not suficient.
Channels (Apps) also have the ability to cancel an order that they originated if that order has not yet been fulfilled. When a channel cancels an order it will be marked as canceled in the merchants existing system (commerce platform). Any transactions will be reversed, so the fincancial status of the order will reflect that it has been refunded. Common reasons for a channel to perform this action are shopper fraud or a merchant not fulfilling an order.
This guide is intended for Vendo merchants who are connecting their store to Violet. During this process, the merchant will create a new oAuth application in their Vendo dashboard and then provide the generated credentials to Violet through the Violet Connect onboarding tool. The merchant will retain full control of the created oAuth application and can modify or remove it at any time from within their Vendo dashboard. Total time for completion is around 3 minutes.
Within your Vendo admin dashboard navigate to your store settings page. This can be done by clicking on your store name in the upper left corner of the dashboard and then selecting Settings.
From the store settings page navigate to the Developers tab.
In the upper right corner click the New API Key button.
Enter a Name for the new application that will remind you of the reason for creating this key. This can be as simple as "Violet" or the name of the channel you are connecting to.
In the Scopes field enter admin write.
Click the Create button. Your application will now be created.
The Client ID and Client Secret for the newly created application will now be revealed. Copy these values and keep them available for Step 2 of this guide.
Once you have your Client ID and Client Secret, it’s time to return to the Violet Connect onboarding tool and enter the follow credentials created in the previous steps:
When prompted for your store URL, enter your Vendo store URL including the protocol. Example - https://[yourstore].getvendo.com.
Enter your Client ID obtained in the previous steps in the "Client ID" field.
Enter your Client Secret obtained in the previous steps in the "Client Secret" field.
Once entered, click the Connect button to validate the credentials and complete the connection between your store and Violet. If the credentials are invalid you should check for any spaces or other copy/paste errors and try again.
Upon success you will be redirected back to the channel who first sent you to Violet.
When operating in a different default currency from the channel(s) you are selling your products through, realtime currency exchange rates will be used by default. If however you define explicit per-currency prices in your BigCommerce store these can be synced and used through our Contextual Pricing feature. Please notify the channel(s) you are connected to if you wish to have this feature enabled for your store.
When refunding a Violet-sourced order in your BigCommerce dashboard you will see a notice informing you that the refund will be processed "offline" if you continue. This is OK as the payment was processed outside of your BigCommerce store, which BigCommerce calls "offline". When you create the refund in BigCommerce, Violet will automatically be made aware of the refund by BigCommerce and will then refund the shoppers payment.
This guide is intended for BigCommerce merchants who are connecting their store to Violet. During this process, the merchant will create a Store-level API account in their BigCommerce dashboard and then provide the generated credentials to Violet through the Violet Connect onboarding tool. The merchant will retain full control of the created Store-level API account and can modify or remove it at any time from within the BigCommerce dashboard.Total time for completion is around 5 minutes.
From your BigCommerce dashboard navigate to Settings → API → Store-level API accounts.
Click the blue Create API account button.
In the modal that appears, enter an account name (ex. Violet)
The following OAuth scopes are the minimum required for Violet to perform all necessary functions with your store.
Customers modify - used to add new customers when performing non-guest checkouts.
Information & settings read-only - used to read the store profile for plan type, supported currencies, and measurement units.
Orders modify - used to update and read orders previously submitted by Violet into your system.
Products read-only - used to read your product catalog.
Carts modify - used to create carts for checkout.
Checkouts modify - used to checkout carts.
Click Save at the bottom of the 'Create account' page.
You will be presented with a modal showing generated BigCommerce API credentials. Important: these values can only be viewed once. It’s recommended that you copy and paste it into a temporary location until you finish the Violet onboarding process. If you lose these values before completing the Violet onboarding process you must start-over with a new Store-level API account.
Client ID
This key is used to identify Violet as the origin of any API requests made against your BigCommerce store.
Client secret
This key is used to verify the signatures of any data sent from your BigCommerce store to Violet.
Access token
This key is used to authenticate any API requests made by Violet against your BigCommerce store.
Once you have generated the API credentials, it’s time to return to the Violet Connect onboarding tool and enter the following credentials created in the previous steps:
Client ID
Client secret
Access Token
Once entered, click the Next button to validate the credentials and complete the connection between your store and Violet. If the credentials are invalid you should check for any spaces or other copy/paste errors and try again.
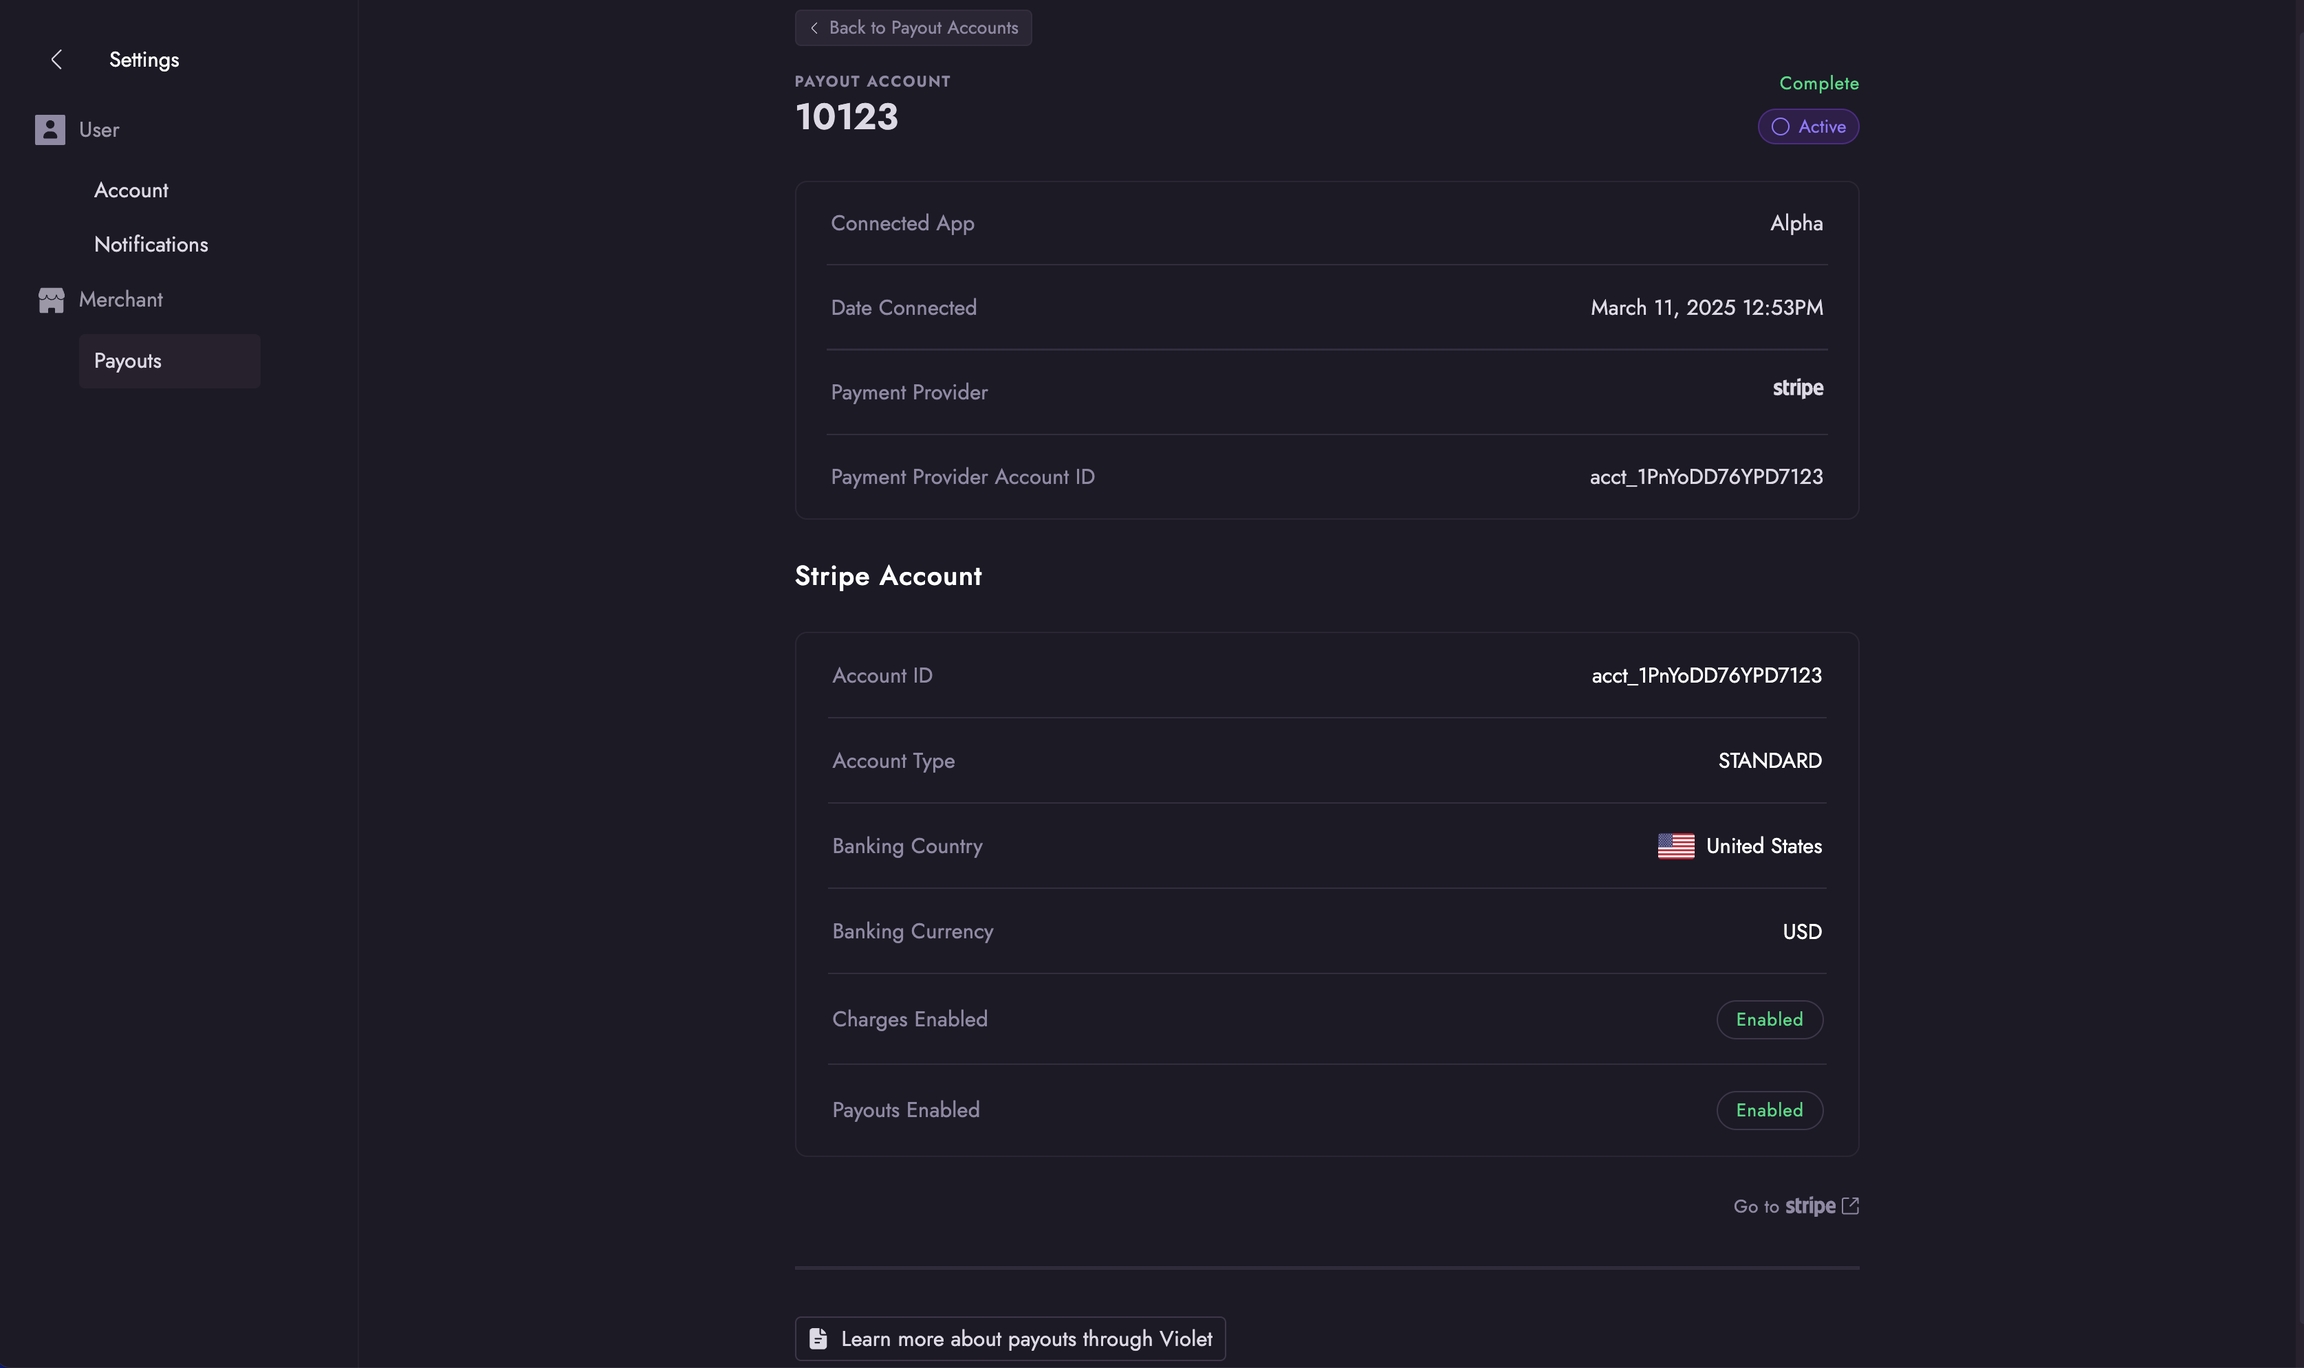
Once you've successfully connected your store to various apps, you can view and manage your payout accounts in the Merchant Dashboard. Each app connection requires its own dedicated payout account. This ensures clear separation of payments and proper routing of funds for each integration.
The Merchant Dashboard lets you manage payouts for each connected app individually at https://merchant.violet.io/settings/payouts. Here you'll find a list of all connected apps with their payout accounts, including prompts to set up accounts for new connections. You can also access payout accounts for previously connected apps, even if they're currently disconnected.
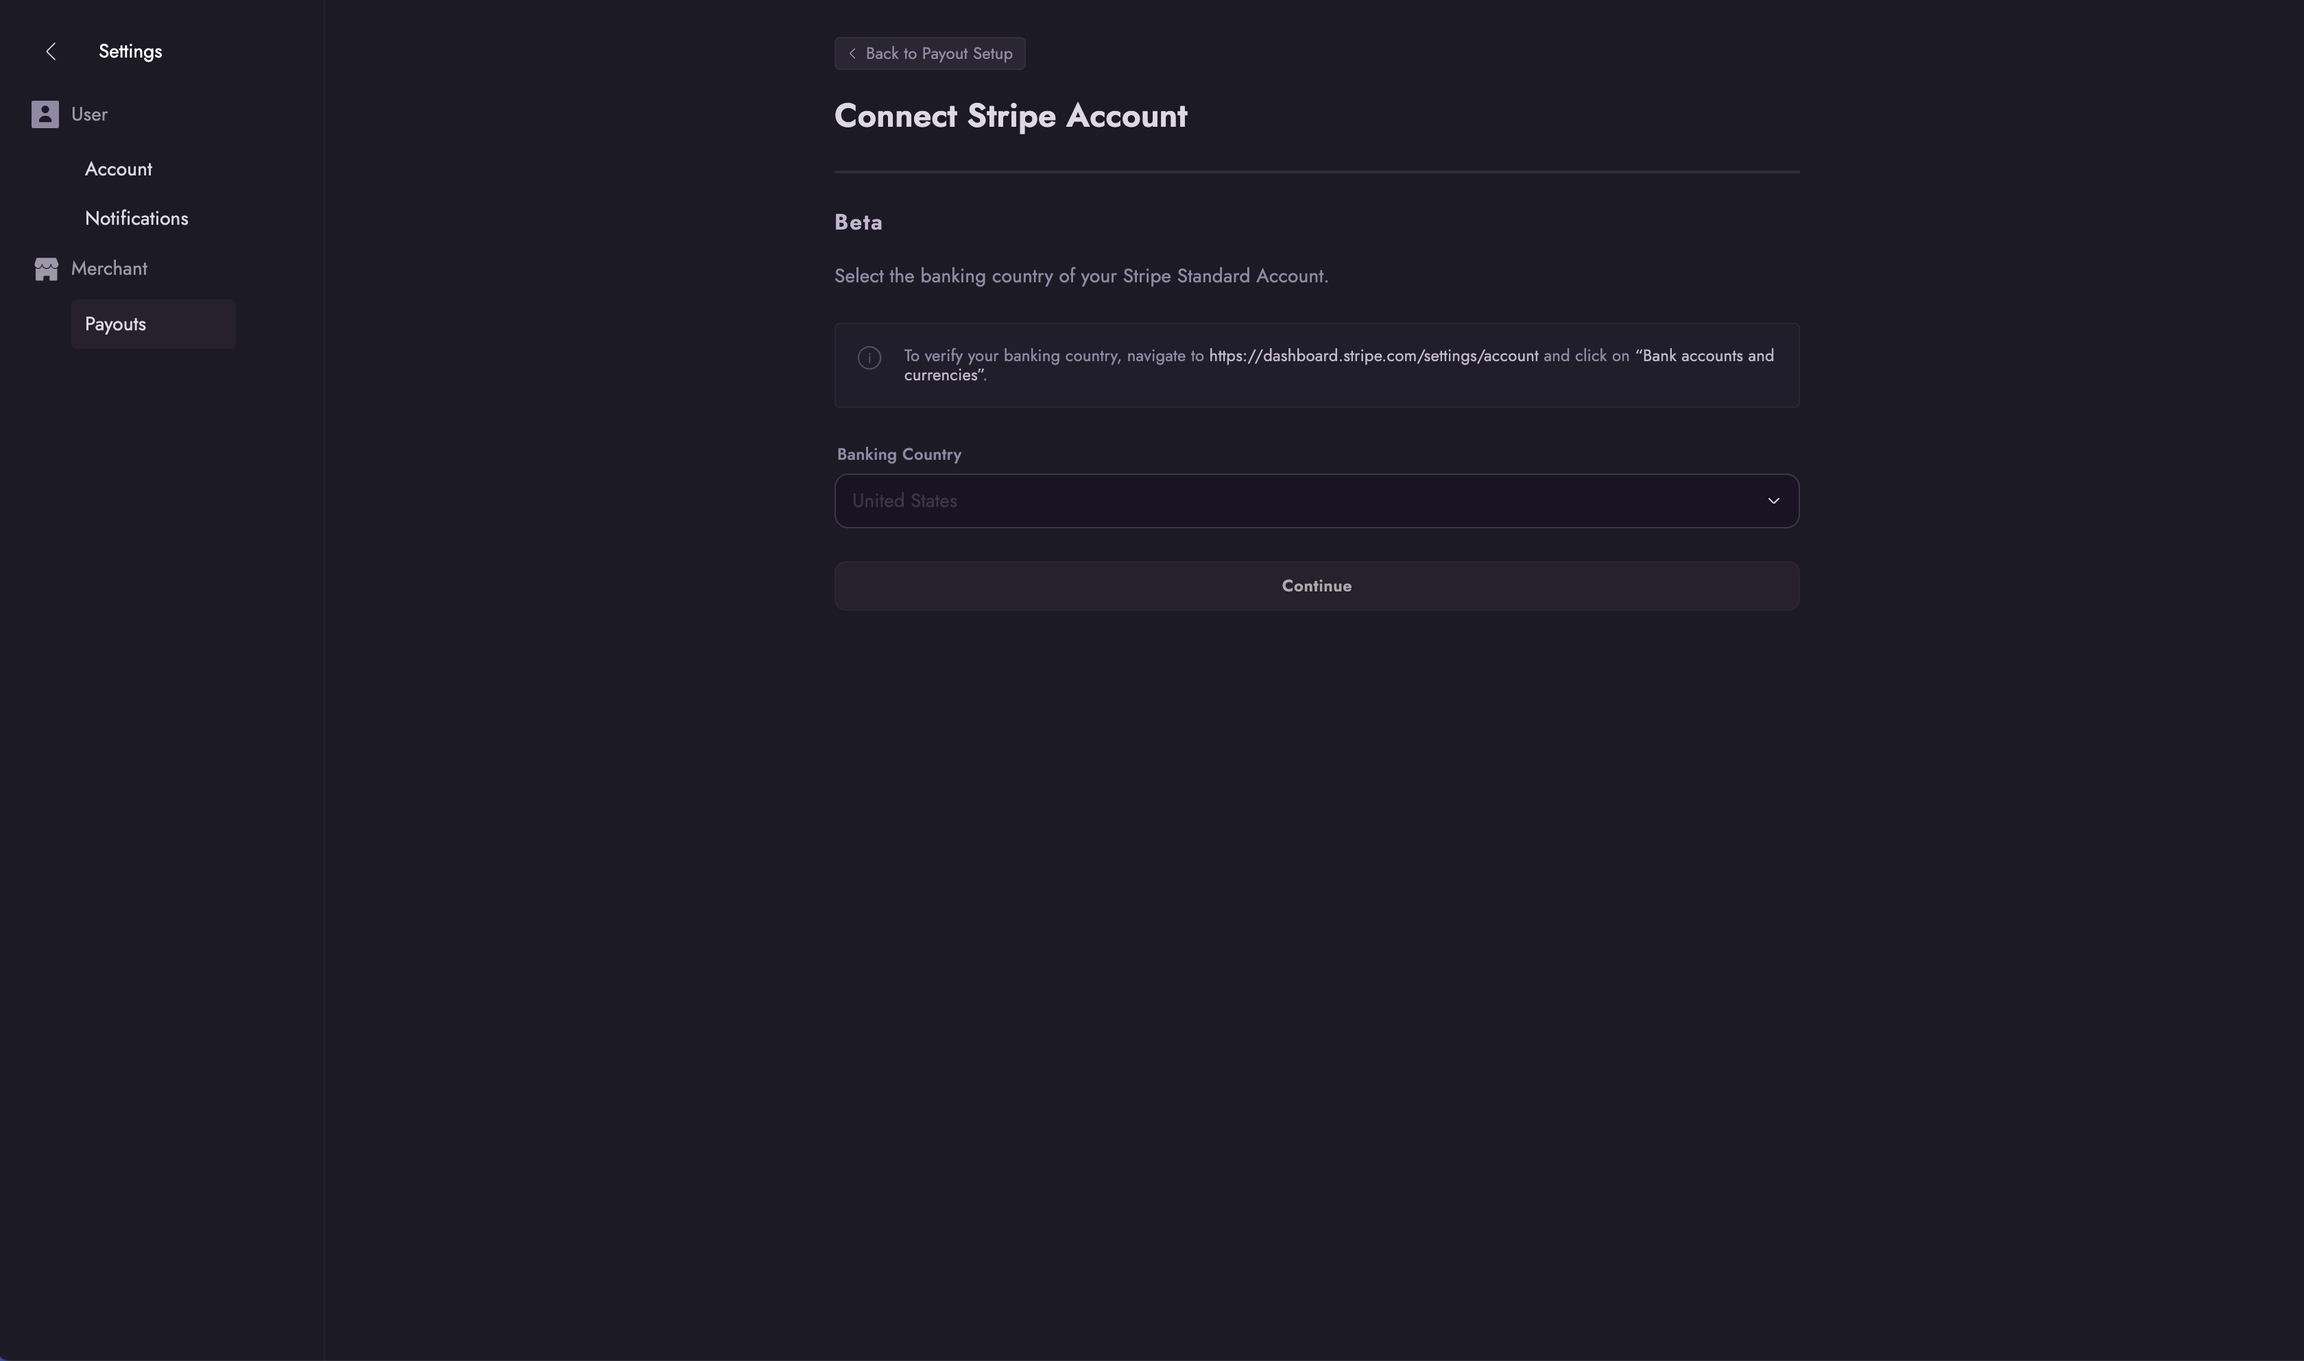
Many apps use their own Stripe payment platforms, requiring a direct payout account setup through their system. When setting up these accounts, you'll first need to select your banking country. After this initial step, you'll be redirected to Stripe to complete the onboarding process. For more information on setup options, see our guide on . Once complete, you will have a working Stripe payout account connected to the app's payment platform that can receive payouts.
If you need to migrate between different types of Stripe accounts, you can do so in the merchant dashboard. For more information, see our guide on .
This guide is intended for CommerceTools merchants who are connecting their store to Violet. During this process, the merchant will create a new API Client in their CommerceTools dashboard and then provide the generated credentials to Violet through the Violet Connect onboarding tool. The merchant will retain full control of the created API Client and can remove it at any time from within their CommerceTools dashboard. Total time for completion is around 3 minutes.
Within your CommerceTools admin dashboard navigate to the Developer settings page. This can be done by activating the Settings section in the left sidebar and clicking Developer settings.
From the Developer settings page click the Create new API client button. This button is generally located in the upper right corner of the page.
Enter a Name for the new API Client that will remind you of the reason for creating this client. This can be as simple as “Violet” or the name of the channel you are connecting to.
In the Scopes section check ensure that each of the following boxes is checked.
Click the Create API client button. Your API Client will now be created.
The Client ID and Client Secret for the newly created application will now be revealed. Copy these values and keep them available for Step 2 of this guide. Once you close the screen with the credentials you will no longer be able to see them again.
Once you have your Client ID and Client Secret, it’s time to return to the Violet Connect onboarding tool and enter the follow credentials created in the previous steps:
When prompted for your store URL, enter the URL of the storefront, including the protocol, that is powered by your CommerceTools backend. Example - https://yourstore.com.
Enter your Client ID obtained in the previous steps in the ”Client ID” field.
Enter your Client Secret obtained in the previous steps in the ”Client Secret
Once entered, click the Connect button to validate the credentials and complete the connection between your store and Violet. If the credentials are invalid you should check for any spaces or other copy/paste errors and try again.
Upon success you will be redirected back to the channel who first sent you to Violet.
This guide is intended for Squarespace merchants who are connecting their store to Violet. During this process, the merchant will create a new API Key in their Squarespace dashboard and then provide the generated credentials to Violet through the Violet Connect onboarding tool. The merchant will retain full control of the created API Key and can remove it at any time from within their Squareapace dashboard. Total time for completion is around 5 minutes.
Within your Squarespace site admin dashboard navigate to the Settings page using the left sidebar navigation.
From the Settings page, expand the Developer Tools section in the left sidebar and click on Developer API Keys.
Click the Generate Key button on the Developer API Keys page. A modal will now open.
Enter a Key Name for the new API Key that will remind you of the reason for creating this client. This can be as simple as “Violet” or the name of the channel you are connecting to.
In the Permissions section ensure that each of the following boxes are checked.
Products → Read Only
Inventory → Read Only
Click the Generate Key button in the upper right corner of the modal. Your API Key will now be created.
The modal will refresh and display your new API Key. Copy this token and keep it available for Step 2 of this guide. Once you close the screen with the key you will no longer be able to retreive the key.
Once you have your API Key, it’s time to return to the Violet Connect onboarding tool and enter the following credentials created in the previous steps:
When prompted for your store URL, enter the full URL including the protocol. Example - https://example.com.
Enter your API Key obtained in the previous steps in the ”API Key” field.
Once entered, click the Connect button to validate the credentials and complete the connection between your store and Violet. If the credentials are invalid you should check for any spaces or other copy/paste errors and try again.
Upon success you will be redirected back to the channel who first sent you to Violet.
This guide is intended for Ecwid merchants who are connecting their store to Violet. During the connection process, the merchant will install the Violet app through their Ecwid dashboard. Upon completion Ecwid will automatically provide Violet with the access keys required to sync with the merchants store. Total time for completion is around 2 minutes.
A merchant must have a minimum Ecwid plan of Venture to be able to connect with Violet.
This guide is intended for Swell merchants who are connecting their store to Violet. During this process, the merchant will create a Secret Key in the Swell dashboard and then provide the generated credentials to Violet through the Violet Connect onboarding tool. The merchant will retain full control of the created Secret Key and can modify or remove it at any time from within their Swell dashboard. Total time for completion is around 3 minutes.
From the navigation sidebar of your Swell dashboard navigate to Developer → API Keys.
Orders → Read and Write (Orders permission is only required if the channel you are connecting to requires it.)
Locate the section labeled Secret Keys and click the Add secret key button.
In the modal that opens, enter a description for the key that will remind you of the reason for creating this key. This can be as simple as "Violet" or the name of the channel you are connecting to.
Click the Create Key button. Your key will now be created.
Once created, you will need to click the small reveal icon to obtain the full key.
On this same page, under section labeled API Access locate and obtain your Store ID.
Once you have your Store ID and Secret Key, it’s time to return to the Violet Connect onboarding tool and enter the follow credentials created in the previous steps:
When prompted for your store URL, enter the full URL including the protocol. Example - https://example.com.
Enter your Store ID obtained in the previous steps in the "Store ID" field.
Enter your Secret Key obtained in the previous steps in the "Secret Key" field.
Once entered, click the Connect button to validate the credentials and complete the connection between your store and Violet. If the credentials are invalid you should check for any spaces or other copy/paste errors and try again.
Upon success you will be redirected back to the channel who first sent you to Violet.
Express Dashboard
Full Stripe Dashboard
Best For
New merchants
Existing Stripe users
Cross-border
✅ Supported
❌ Limited
Onboarding
Violet-hosted
Self-managed
Setup Complexity
🟢 Simple
🟡 Moderate
Dashboard Access
Order Placed → Commission Calculated → Stripe Processing → Bank Transfer
     ↓              ↓                       ↓               ↓
Instant Instant 2-3 Days 1-2 DaysEnter your **Project Key** in the “Project Key” field.
Select the Region your CommerceTools instance operates in. Available options are:
North America (Google Cloud)
North America (AWS)
Europe (Google Cloud)
Europe (AWS)
Australia (Google Cloud)
Enter the URL that includes product page path in the “Product Path URL” field. This is the part of the URL that precedes the individual page of each product in your store. As an example, if you sell a product called “Purple Shirt” that is located at https://yourstore.com/products/purple-shirt your product path URL would be https://yourstore.com/products. This is the value you would enter in this field.
From Violet Connect select Ecwid as your platform.
Click Continue. You will be redirected to Ecwid.
Click the Accept button to accept the required access scopes.
The Violet app will now be installed and the embedded app experience will load. You are now successfully connected to Violet.
Upon success you will be redirected back to the channel who first sent you to Violet.
As there is no concept of refunds in the Ecwid API, Violet is unable to be notified of refunds or access any refund data. As a temporary workaround, you will need to perform one of the following steps.
Option 1: Mark Order as Cancelled
This option requires the least amount of effort. Simply mark any Violet orders as cancelled when the order is refunded and Violet will treat it as a refund.
Option 2: Notify Violet of Refunds This option will likely require the involvement of your engineering team. When a refund occurs, you will need to send information about the refund to Violet so that it can process the refund accordingly. If you choose this option, the integration documentation will be shared with you by Violet or the channel that onboarded you.
In the situation where the merchant does not manage their own store but works with a management agency, here is the configuration information to pass on to the agency:
Webhook URL: https://api.violet.io/v1/sync/external/events/ecwid
Webhooks Topics:
Order (updated, deleted)
Product (created, updated, deleted)
Store profile (updated, subscription plan updated)
Application (subscription status updated, uninstalled)
Scopes:
read_store_profile
read_store_limits
read_catalog
read_orders
update_orders
create_orders
read_customers
create_customers
read_discount_coupons
Merchants must have 3rd party cookies enabled and any ad-blockers or browser shields in their browser disabled when using Ecwid. It is recommended that these actions are taken before they begin the connection process.


If you're a merchant, to receive payments for orders placed through Violet, you’ll need to connect a bank account via Stripe. Connected apps leverage Stripe Connect to make the onboarding process seamless. You can either create a Stripe Connect Express account specifically for handling transactions through your connected app's payment platform or link your existing Stripe Standard account via OAuth.
A Stripe Express account is a fast and easy way to set up payouts. Companies like DoorDash, Lyft, and Shopify use Stripe Express for their payment processes. With this setup, you can:
Quickly onboard with streamlined KYC (Know Your Customer) verification.
Manage your payout schedule directly from Stripe.
Keep all sensitive data securely stored within Stripe.
This account is dedicated to handling your payouts from Violet and cannot be used for external transactions. On the Stripe dashboard, they can click on the transactions tab to see payments from Violet as well Stripe Payouts to their bank account. They can filter by date and export the data to CSV.
If you already have a Stripe Standard account, you can link it to receive payouts from Violet directly into the same account you use for your other business transactions. However, there are some limitations:
Your linked Stripe Standard account will provide platform visibility into all transactions, even those unrelated to Violet.
Once connected, it cannot be linked to another platform account.
Standard accounts have additional restrictions for cross-border transactions. The banking country must match the country of Violet’s Stripe platform account.
If you are an international merchant connecting to a US-based platform, a
For more details, visit the .
If you choose to link an existing Stripe Standard account:
You’ll be redirected to Stripe to select the account you want to connect.
Ensure you're logged into the correct Stripe account before selecting it.
After linking, you’ll be returned to Violet, and your account will be ready to receive payouts.
If you don’t already have a Stripe account, you can create a new Stripe Express account:
Choose "I don’t have a Stripe account."
Select the country where your bank account is located (this may differ from your business location).
Complete the Stripe KYC process.
Once finished, you’ll be redirected back to Violet.
If your country is not listed, Stripe does not currently support payouts to that location. Check the page for more details.
Refunding a Violet Order is the same as any other order
When a customer contacts a merchant wishing for a refund on an order that was placed through Violet, the merchant will be able to easily service that request without leaving their ecommerce platform. All that is required is to follow the standard refund process for an order in your ecommerce platform, with the end goal of changing the state of that order to "refunded". Violet will take it from there.
As a part of the standard Violet e-commerce integration, Violet subscribes to webhook notifications for refunds, processing each when they are received. So once the merchant has marked the order as refunded, Violet will process that refund, reversing all funds transferred to the merchant and channel and returning the funds to the shopper's payment method. Funds should appear on the shopper's card within 5-10 business days.
Certain e-commerce platforms have special limitations and considerations that impact and alter the basic Violet returns and refund flow.
Beyond the usual process for this platform has special limitations and considerations that need to be kept in mind when interacting with orders from Violet:
While Shopify supports the normal Violet Refund process there is one very important call out for when you are canceling a Violet order.
In the cancellation dialogue (seen below) you must select Refund Payments NOW. This option is typically selected by default but this must be selected as
that is what triggers the normal Violet Refund process to make sure your shopper is properly refunded when an order is canceled.
Note the "Manual" link indicating that no funds will actually be transferred from you to the shopper directly. Violet will take care of this as part of the normal flow seen
See the below diagram for how Violet handles the refund and return flows
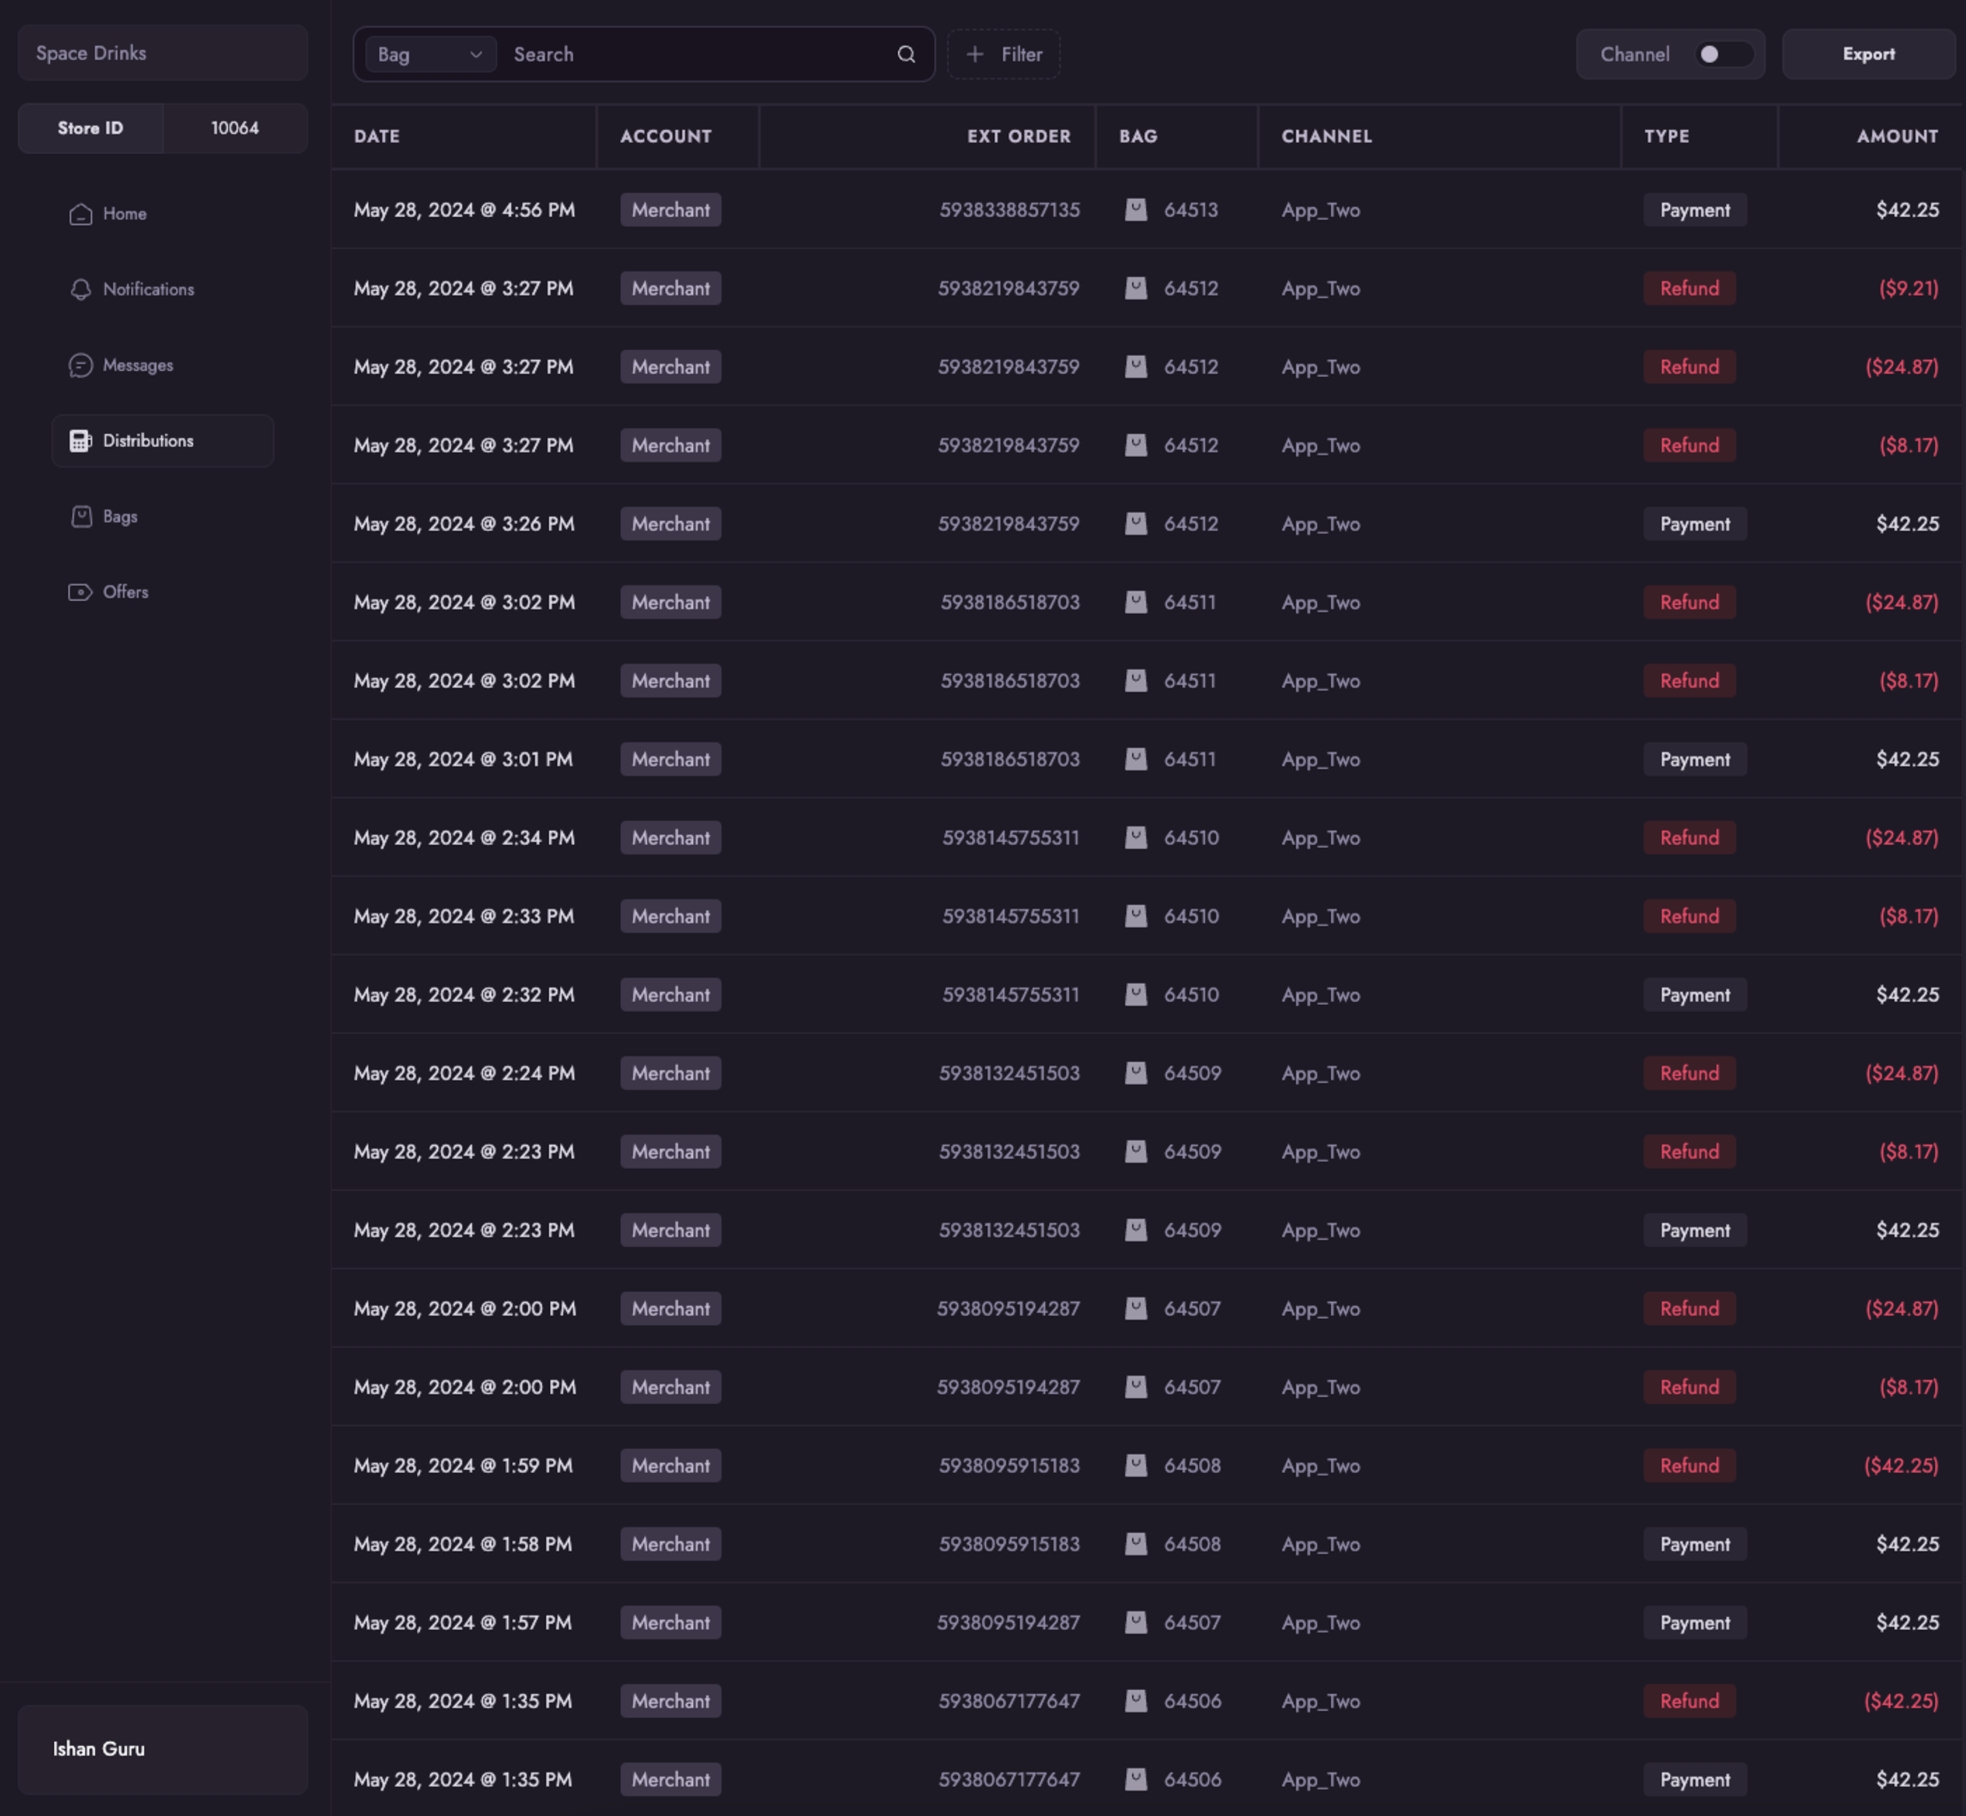
The Merchant Dashboard allows you to view all Payout and Distribution details for orders placed through Violet on your connected Sales Channels. A "Distribution" represents the funds transferred to your bank account for each order, along with a breakdown of any associated fees. Additionally, Violet generates a Distribution for the Sales Channel related to your order, so you can see the final breakdown of how funds were split and where they were transferred for each specific order.
A Payout to your bank account is an aggregate of all Distributions across a given time period, usually each business day, that is triggered automatically by Stripe.
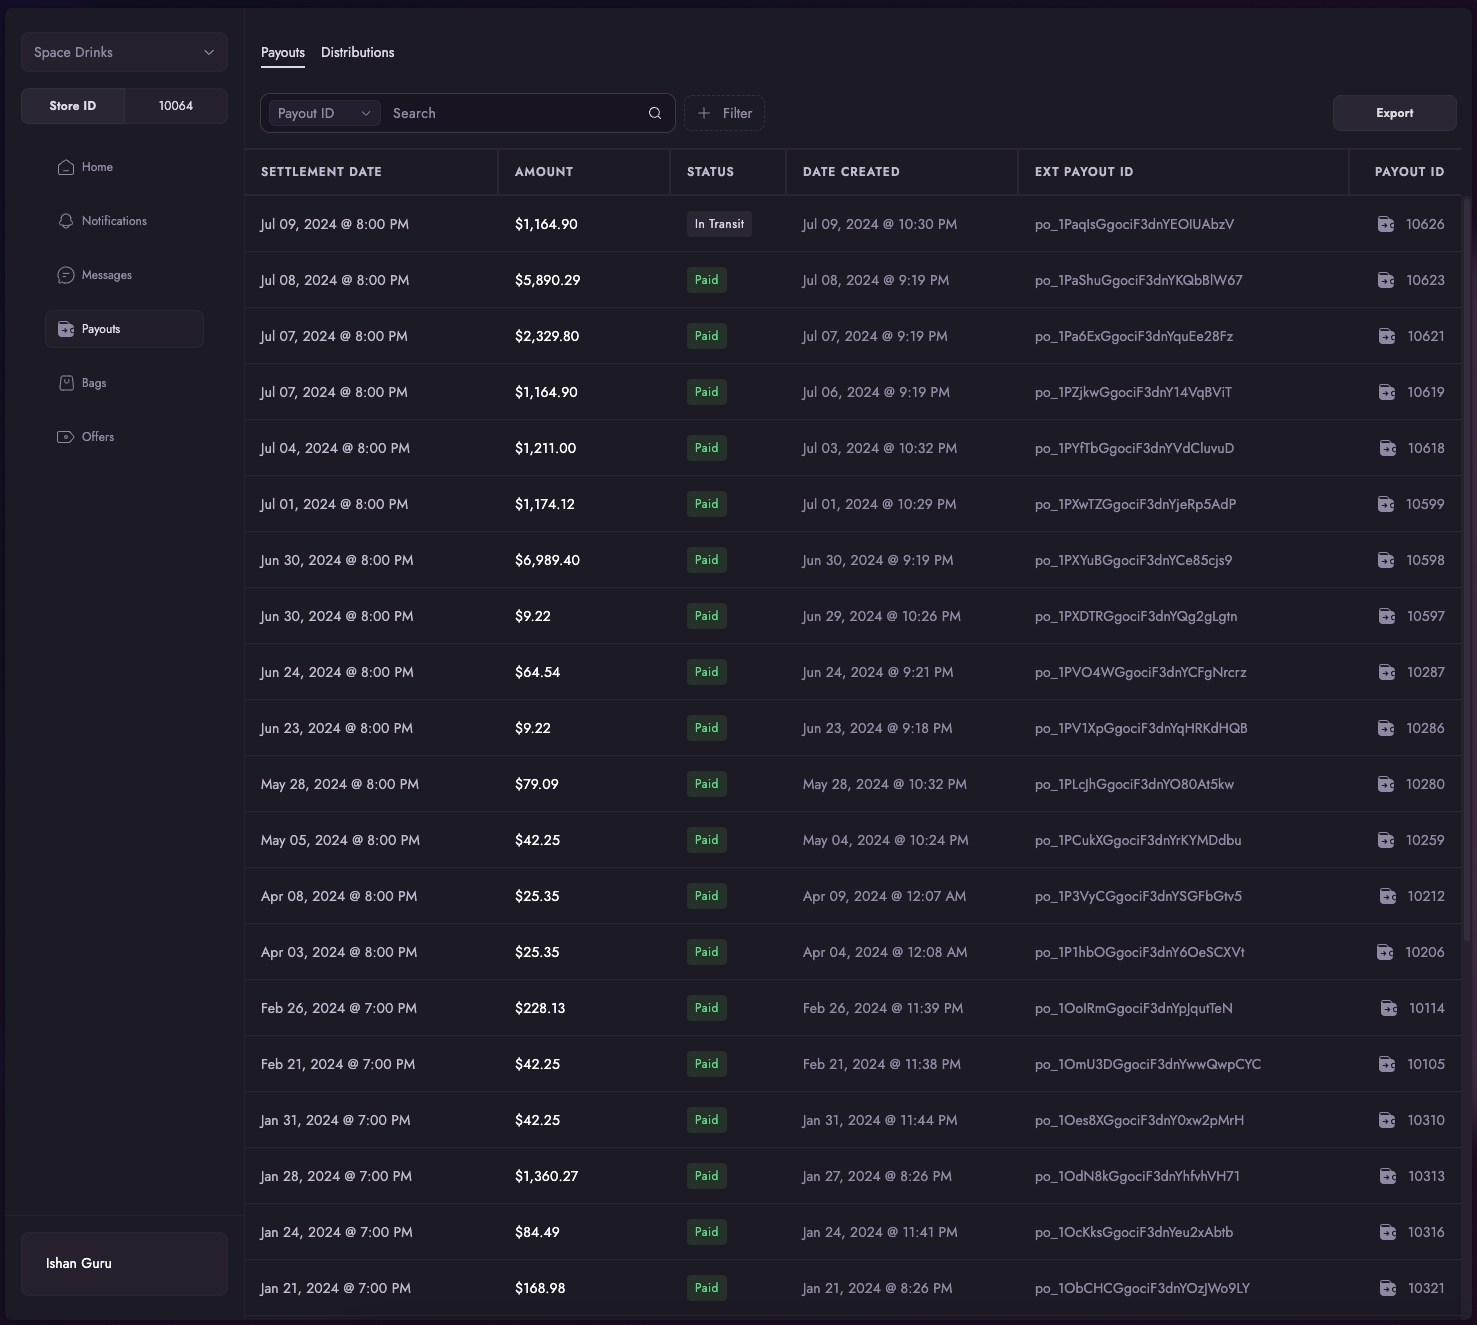
You can view a list of all your payouts by navigating to the Payouts dashboard.
On the default payouts page, you'll see a "Ext Payout" field which will map to the ID of your payout in your payment provider. You can use this along with the Violet Payout ID ("Payout ID") to map all related distributions to your payout amount.
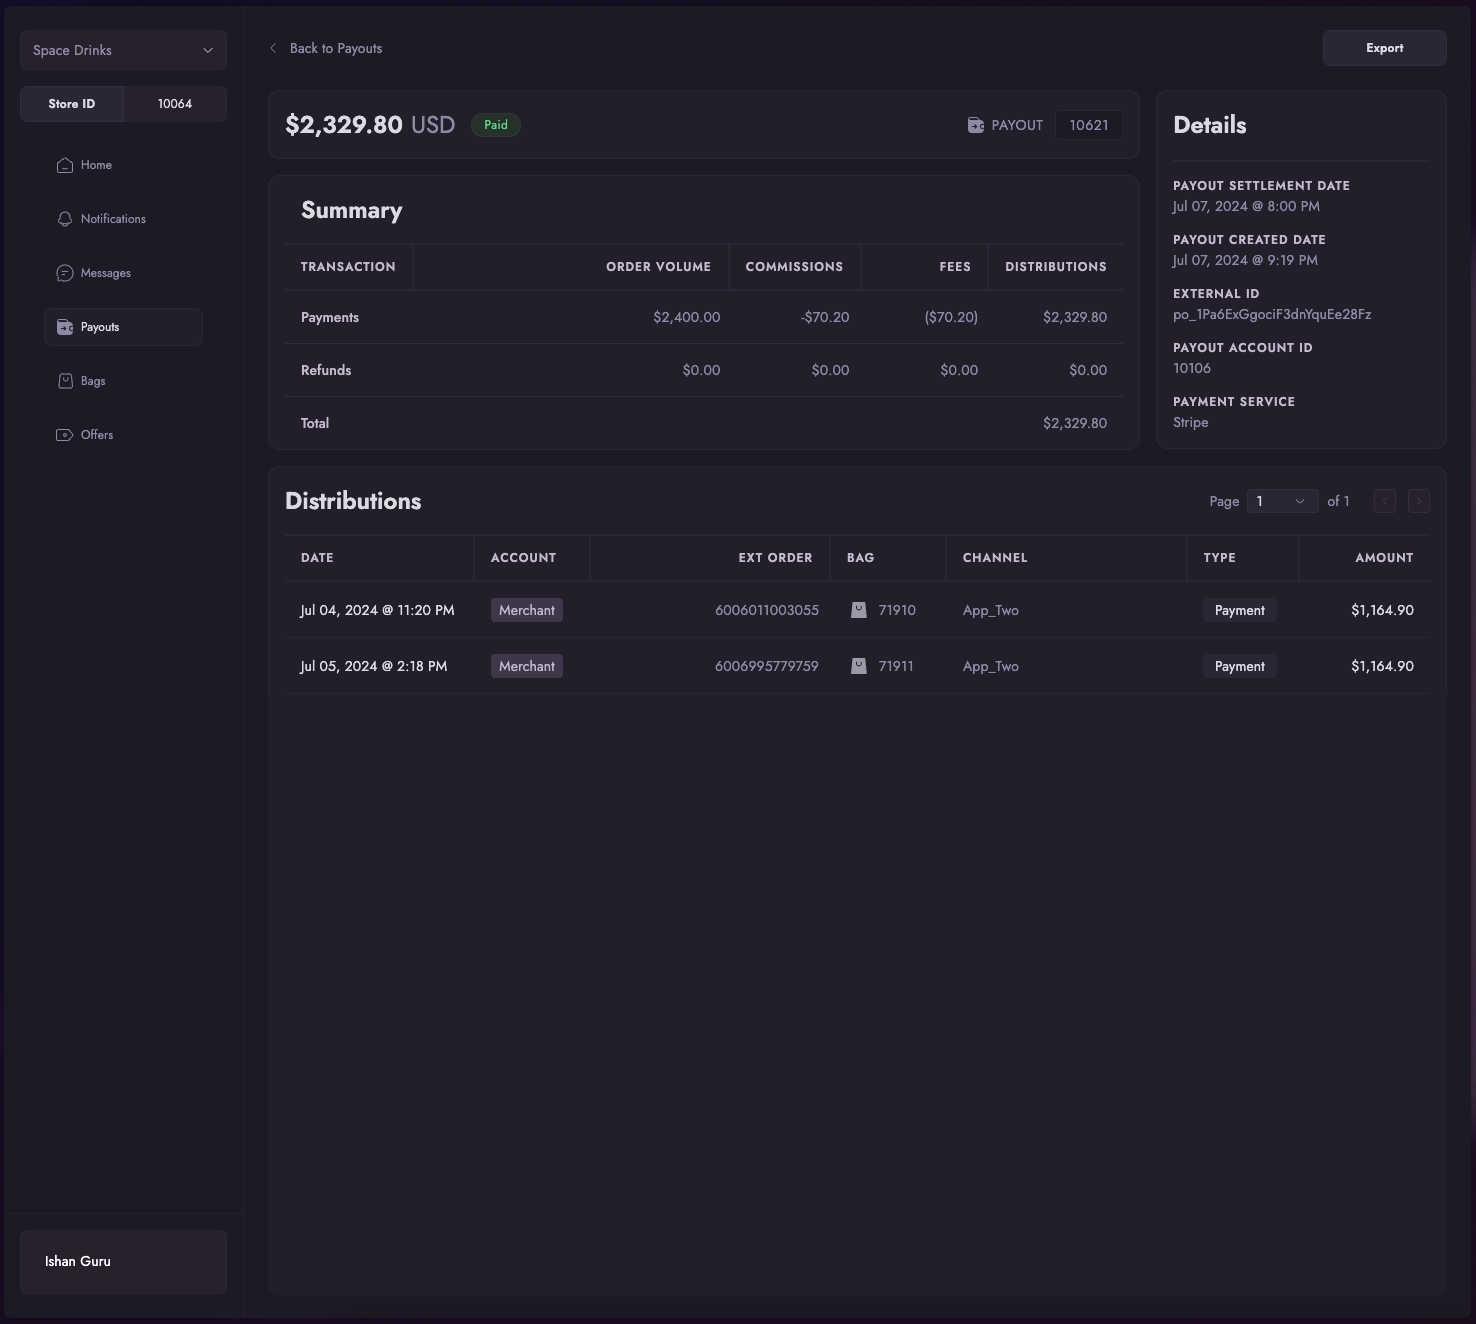
You can click into a payout and see a summary of order volume, payments, refunds, and distributions relevant to your payout. You'll also be able to see related distributions and export the payout with its related distributions in this view.
The is available in the tab next to Payouts.
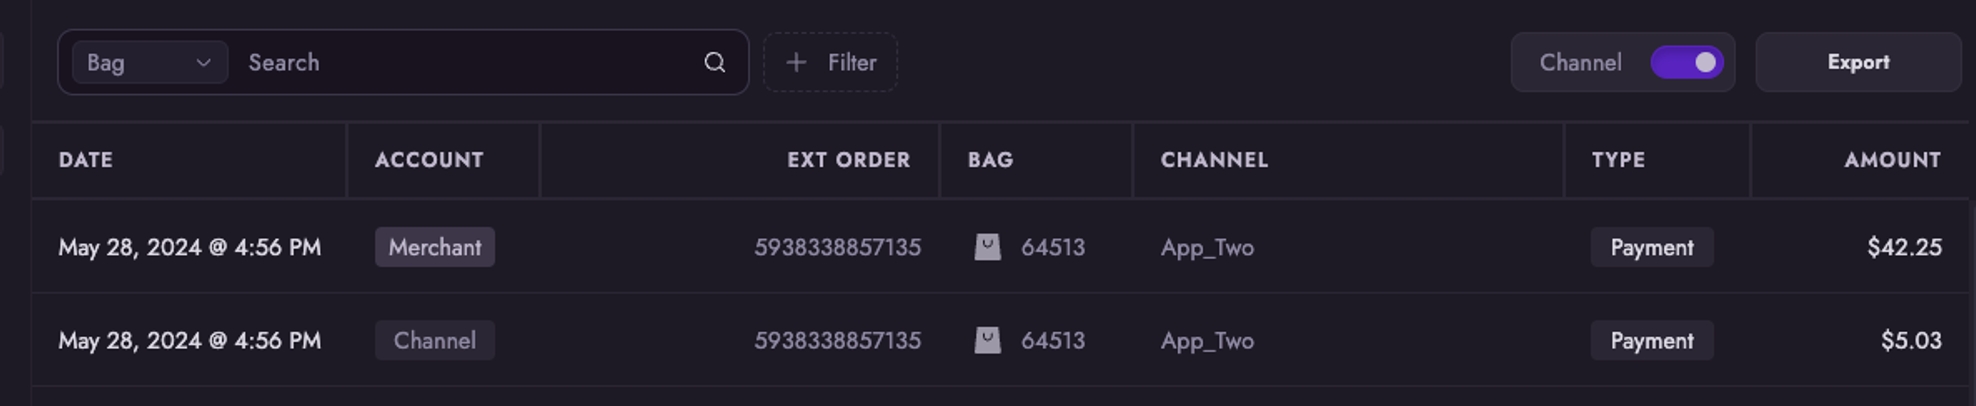
By default, you'll be able to see the following:
The “Ext Order” is the ID of the Order in your e-commerce store. You can use this ID to easily map between the Distribution in Violet to the Order placed in your system. The “Amount” column is the total amount you receive for this specific Order.
Flipping on the “Channel” toggle, will let you see see the related Distributions made to Sales Channels for the same Order. This is usually their commission amount for the Order, minus any payment provider fees that the Channel pays. If the commission you give to a Channel does not cover the payment processor fees, you will see them on your Distribution record.
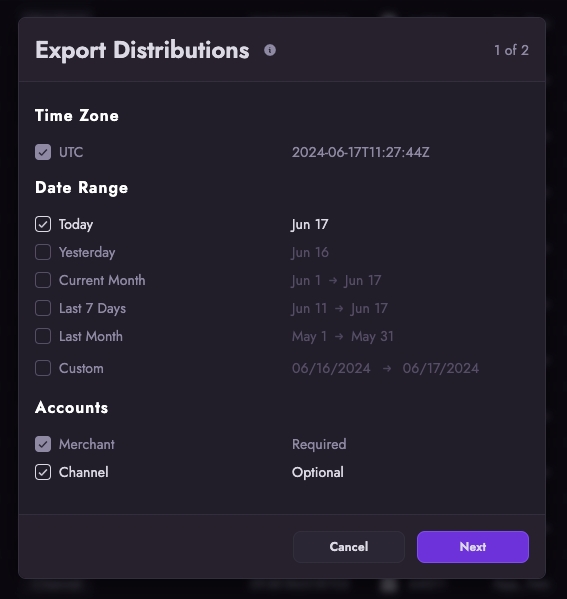
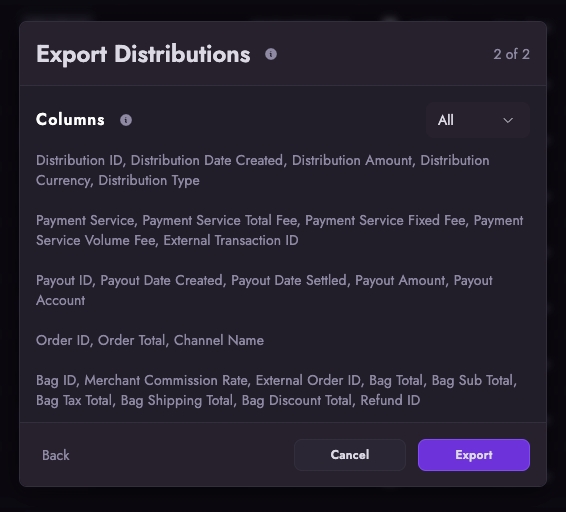
You can also download Distribution reports as CSV files that let you view more information and do reconciliation in a spreadsheet manager. To download a Distributions report, click on “Export” and follow the prompts.
To learn more about each column, you can click .
Each Distribution that is associated to a Payout to your bank contains a Payout ID. From the example below, you can see all Distributions related to Payout ID 10280 , which correspond to a payout of $79.09 to your bank account, settled on 18th June 2024. As seen below, Refunds are also included when calculating the breakdown of a Payout.
This guide is intended for WooCommerce merchants who are connecting their store to Violet. During this process, the merchant will install and configure the Violet plugin through their WooCommerce dashboard and then generate and provide credentials to Violet through the Violet Connect onboarding tool. Total time for completion is around 5 minutes.
Violet requires that the WooCommerce API functions in the way described by the . If another 3rd party plugin is installed that breaks the WooCommerce API it is the merchants responsibility to remove or update that plugin.
This guide is intended for Wix merchants who are connecting their store to Violet. During this process, the merchant will create a new API Key in their Wix dashboard and then provide the generated credentials to Violet through the Violet Connect onboarding tool. The merchant will retain full control of the created API Key and can remove it at any time from within their Wix dashboard. Total time for completion is around 3 minutes.
Within your Wix admin dashboard navigate to the Account Settings page. This can be done by clicking on your profile image in the upper right corner of the Wix dashboard and then selecting
You can monitor your account status and payouts in Violet to ensure everything is set up correctly.
For the WooCommerce REST API to function correctly ensure that your Permalink structure is Post name. This can be configured by navigating to Settings → Permalinks in your WordPress admin dashboard.
From Violet Connect download the Violet Plugin for WooCommerce.
In a separate tab, open the admin dashboard of the Wordpress site where your WooCommerce store is hosted.
From the left sidebar, click Plugins.
Click the Add New button next to the Plugins title at the top of the page.
Click the Upload Plugin button next to the Add Plugins title at the top of the page.
Click Choose File and select the violet-connect.zip file that you downloaded in the first step.
Click Install Now.
Once the plugin has finished installing, click the Activate Plugin button.
Locate the Violet plugin in the list of installed plugins on the Plugins page.
Navigate to the plugin configuration screen by clicking the Settings link associated with the Violet plugin.
From the list of available shipping extensions select the extension utilized by your store and click Save. If you do not see an extension listed for your shipping solution please reach out to your account administrator to request it.
From the left sidebar, hover over WooCommerce then click Settings from the slide out menu.
Click the Advanced tab.
Click the REST API link just beneath the tabs.
Click the Add Key button.
Enter a description value that helps you recognize these as the Violet keys.
Select a user with an admin role.
Select Read/Write for the permissions type.
Click the Generate API Key button. Your API keys will be generated and should be saved for the next step.
Store URL This is the fully formed URL to where you have WooCommerce installed. If you provide any other URL the credentials will be rejected until the correct one is provided.
Consumer Key This key is used in combination with the Consumer Secret to verify and authenticate certain actions or events.
Consumer Secret This key is used in combination with the Consumer Key to verify and authenticate certain actions or events.
Once entered, click the Connect button to validate the credentials and complete the connection between your store and Violet. If the credentials are invalid you should check for any spaces or other copy/paste errors and try again.Upon success you will be redirected back to the channel who first sent you to Violet.
Account SettingsFrom the Account Settings page click on Api Keys from left sidebar. This page link is generally the last option in the left sidebar menu.
Click the Generate API Key in the upper right corner of the API Keys page.
Enter a Name for the new API Key that will remind you of the reason for creating this client. This can be as simple as “Violet” or the name of the channel you are connecting to.
In the Scopes section ensure that each of the following boxes are checked.
Basic permissions → Get Sites List
All account permissions → Manage Sites
All site permissions → Wix Stores
All site permissions → Wix Currencies
All site permissions → Business Info
Click the Save & Close button. Your API Key will now be created.
A modal will appear with your API Key. Copy this token and keep it available for Step 2 of this guide. Once you close the screen with the key you will no longer be able to see it again.
Once you close the API Key screen you will be returned to the API Keys page that lists your tokens. On the right side of this screen you will find the Account ID section. Copy the Account ID and keep it available for Step 2 of this guide.
Next go to the Home screen of your Wix Dashboard. This can be done by clicking on the Wix logo in the upper left corner of the Wix Dashboard.
Once you are on the Home screen, the URL in your browser will contain your Site ID between /dashboard/ and /home. In this example URL, https://manage.wix.com/dashboard/83749f16-12a9-2109-913e-ed6fed5c7e4d/home, 83799f16-12a9-4803-963e-ed6fed6c7e4d is the Site ID. Copy this value and keep it available for Step 2 of this guide.
Once you have your Client ID and Client Secret, it’s time to return to the Violet Connect onboarding tool and enter the follow credentials created in the previous steps:
Enter your API Key obtained in the previous steps in the ”API Key” field.
Enter your Account ID obtained in the previous steps in the ”Account ID” field.
Enter your Site ID obtained in the previous steps in the “Site ID” field.
Once entered, click the Connect button to validate the credentials and complete the connection between your store and Violet. If the credentials are invalid you should check for any spaces or other copy/paste errors and try again.
Upon success you will be redirected back to the channel who first sent you to Violet.
Custom text fields are not supported at this time as Violet is not able to verify that any freeform text entered by a shopper will meet your requirements. For this reason, any products with mandatory custom text fields will be marked as unavailable for purchase. We recommend that you use native Wix variants/options when possible, especially if your custom text fields are limited to a set of possible values.

This guide walks through how to set up and manage your Stripe payout accounts in Violet. You can create multiple payout accounts and switch between them—one per app at any time.
Payment history and Distribution records for past transactions will continue to point to the old account. New transactions will be tied to the active account. All payout records, past and present, remain visible in your Violet dashboard.
Each app (or sales channel) you’re connected to in Violet has its own dedicated payout account. This account determines where earnings from that app are sent.
You can have multiple payout accounts per app, but only one can be marked as Active at a time.
The active payout account is the one that will receive all new earnings from sales through that specific app. If you have multiple payout accounts connected, only the one marked as “Active” will be used for payouts.
There are a few common reasons you may want to switch your active payout account:
You want to switch from a personal Stripe account to a business Stripe account
You need to change banking details and prefer creating a new account
Your sales channel requires a specific Stripe account type (Express or Standard)
You've had issues with your current Stripe account and want to start fresh
Inactive accounts remain linked to your merchant profile and can be reactivated later if they still meet Stripe’s verification requirements.
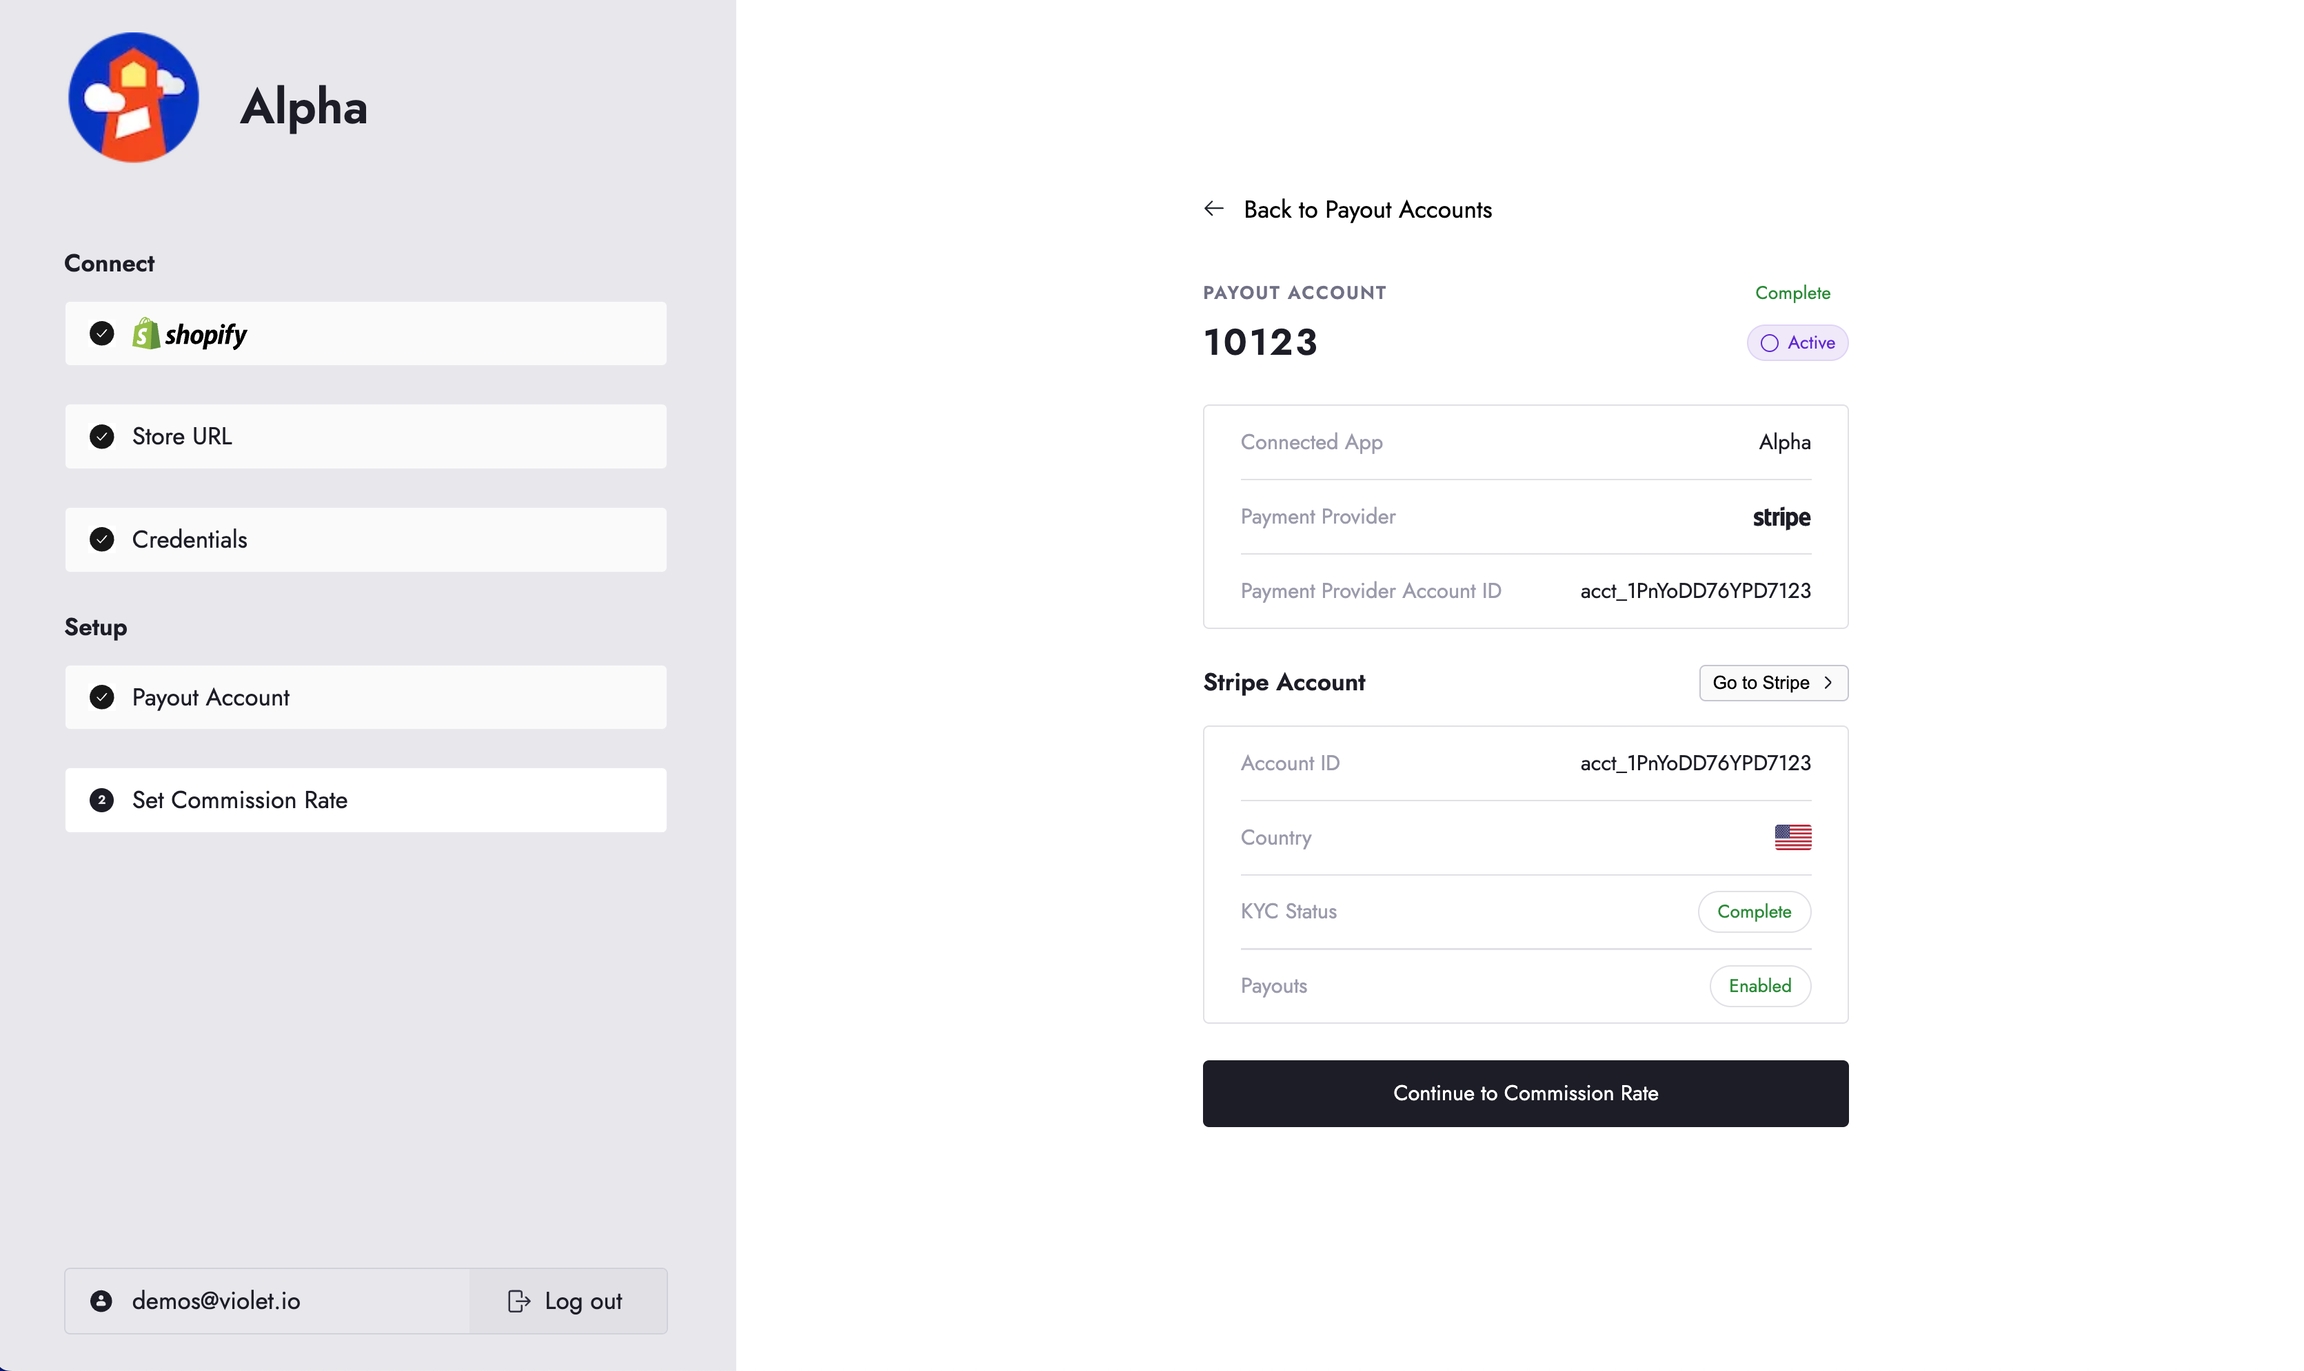
To connect a new Stripe payout account, ensure you are connected to at least one app. Then, follow these steps:
Go to the Merchant Dashboard.
Navigate to Payout Account Settings.
Navigate to the app you'd like to configure a payout account for.
If no account exists, you’ll see a prompt to create one. If an account already exists, you’ll see an option to Create Account beneath your existing payout accounts.
Add a New Payout Account
Click Create New Payout Account in the relevant app section.
Choose between Stripe Express or Stripe Standard.
Selecting "Already have a Stripe Account?" will let you connect an existing Stripe Standard account, while selecting "Don't have a Stripe Account?" will let you create a new Stripe Connect Express account.
Note: Some apps may not support Stripe Standard. If unavailable, you will only have the option to create a Stripe Express account.
Complete the Stripe onboarding flow (you’ll be redirected).
Once you return, the payout account will be created and visible in your dashboard.
If this is your first account for the app, it will be marked Active
Otherwise, it will be added as Inactive until you activate it manually
Complete KYC in Stripe
All new payout accounts must meet Stripe’s Know-Your-Customer (KYC) requirements before they can be activated.
Click Go to Stripe next to the new account
Provide all required information in Stripe’s onboarding flow
Switch to a Different Payout Account
Once your new account has completed KYC, you can activate it to replace your current payout account:
Click into the Inactive account
Review the account’s details and confirm KYC is marked Complete
You can perform the same steps in Violet Connect once on the payments setup step to switch to a new payout account for a specific app connection.
Refunds are always processed from the account that originally received the payout.
If an order is refunded after you’ve switched accounts, Violet will attempt to reverse the payout from the original Stripe account
This applies only during the remorse period (default: 30 days after the order date)
If the original account has been closed or disconnected from Stripe, the refund may fail


Getting paid through Violet is straightforward and secure. We use Stripe Connect to handle all payout processing, ensuring you receive your earnings reliably while maintaining full transparency over your transactions.
First-time setup:
Complete merchant onboarding through Violet Connect
Set up your Stripe payout account during onboarding
Complete KYC verification with Stripe
Start receiving automatic payouts
First-time payout account configuration
What you'll learn:
How to create your Stripe Express account during onboarding
KYC verification requirements and process
Choosing between Express vs. Standard Stripe accounts
Account activation and verification steps
Complete account management and monitoring
What you'll learn:
Accessing your payout settings and history
Viewing transaction details and distributions
Exporting payout data for accounting
Managing multiple payout accounts per channel
🎯 Best for: Ongoing account management and financial tracking
How money flows through the Violet system
What you'll learn:
The difference between payouts and distributions
How commission rates affect your earnings
Payout timing and processing schedules
Refund and chargeback handling
Advanced account management and switching
What you'll learn:
When and why to create additional payout accounts
Switching between personal and business Stripe accounts
Managing multiple accounts per sales channel
Handling account transitions and historical data
Advanced Feature: Only needed when switching accounts or managing multiple channels
Account Issues: Check your Stripe Express dashboard for verification status
Missing Payouts: Verify your bank account details in payout settings
Commission Questions: Review your commission rates in the Merchant Dashboard
📞 Technical Issues: Contact your channel partner for account setup problems
💬 Business Questions: Reach out to your channel partner for commission discussions
📧 Stripe Issues: Use your Stripe Express dashboard for payment-related questions
💜 Ready to get started? Most merchants complete payout setup in under 10 minutes during onboarding.
If you are a channel testing the merchant dashboard in sandbox, go to https://merchant.violet.dev Click here for more information
The Violet Merchant Dashboard lets your merchants review the state of their connection to Violet Channels, view Orders placed through the system, and configure their payments.
Merchants onboard through Violet Connect, which is an onboarding process tailored to your Channel. Once the onboarding process is complete, they can sign into the Merchant Dashboard for an Overview of the orders placed through their integration with Violet; change their commission rates; or update payout accounts.
Enter the same email address used during Violet Connect onboarding.
There are three main sections to the Merchant Dashboard:
Overview (Home)
Notifications
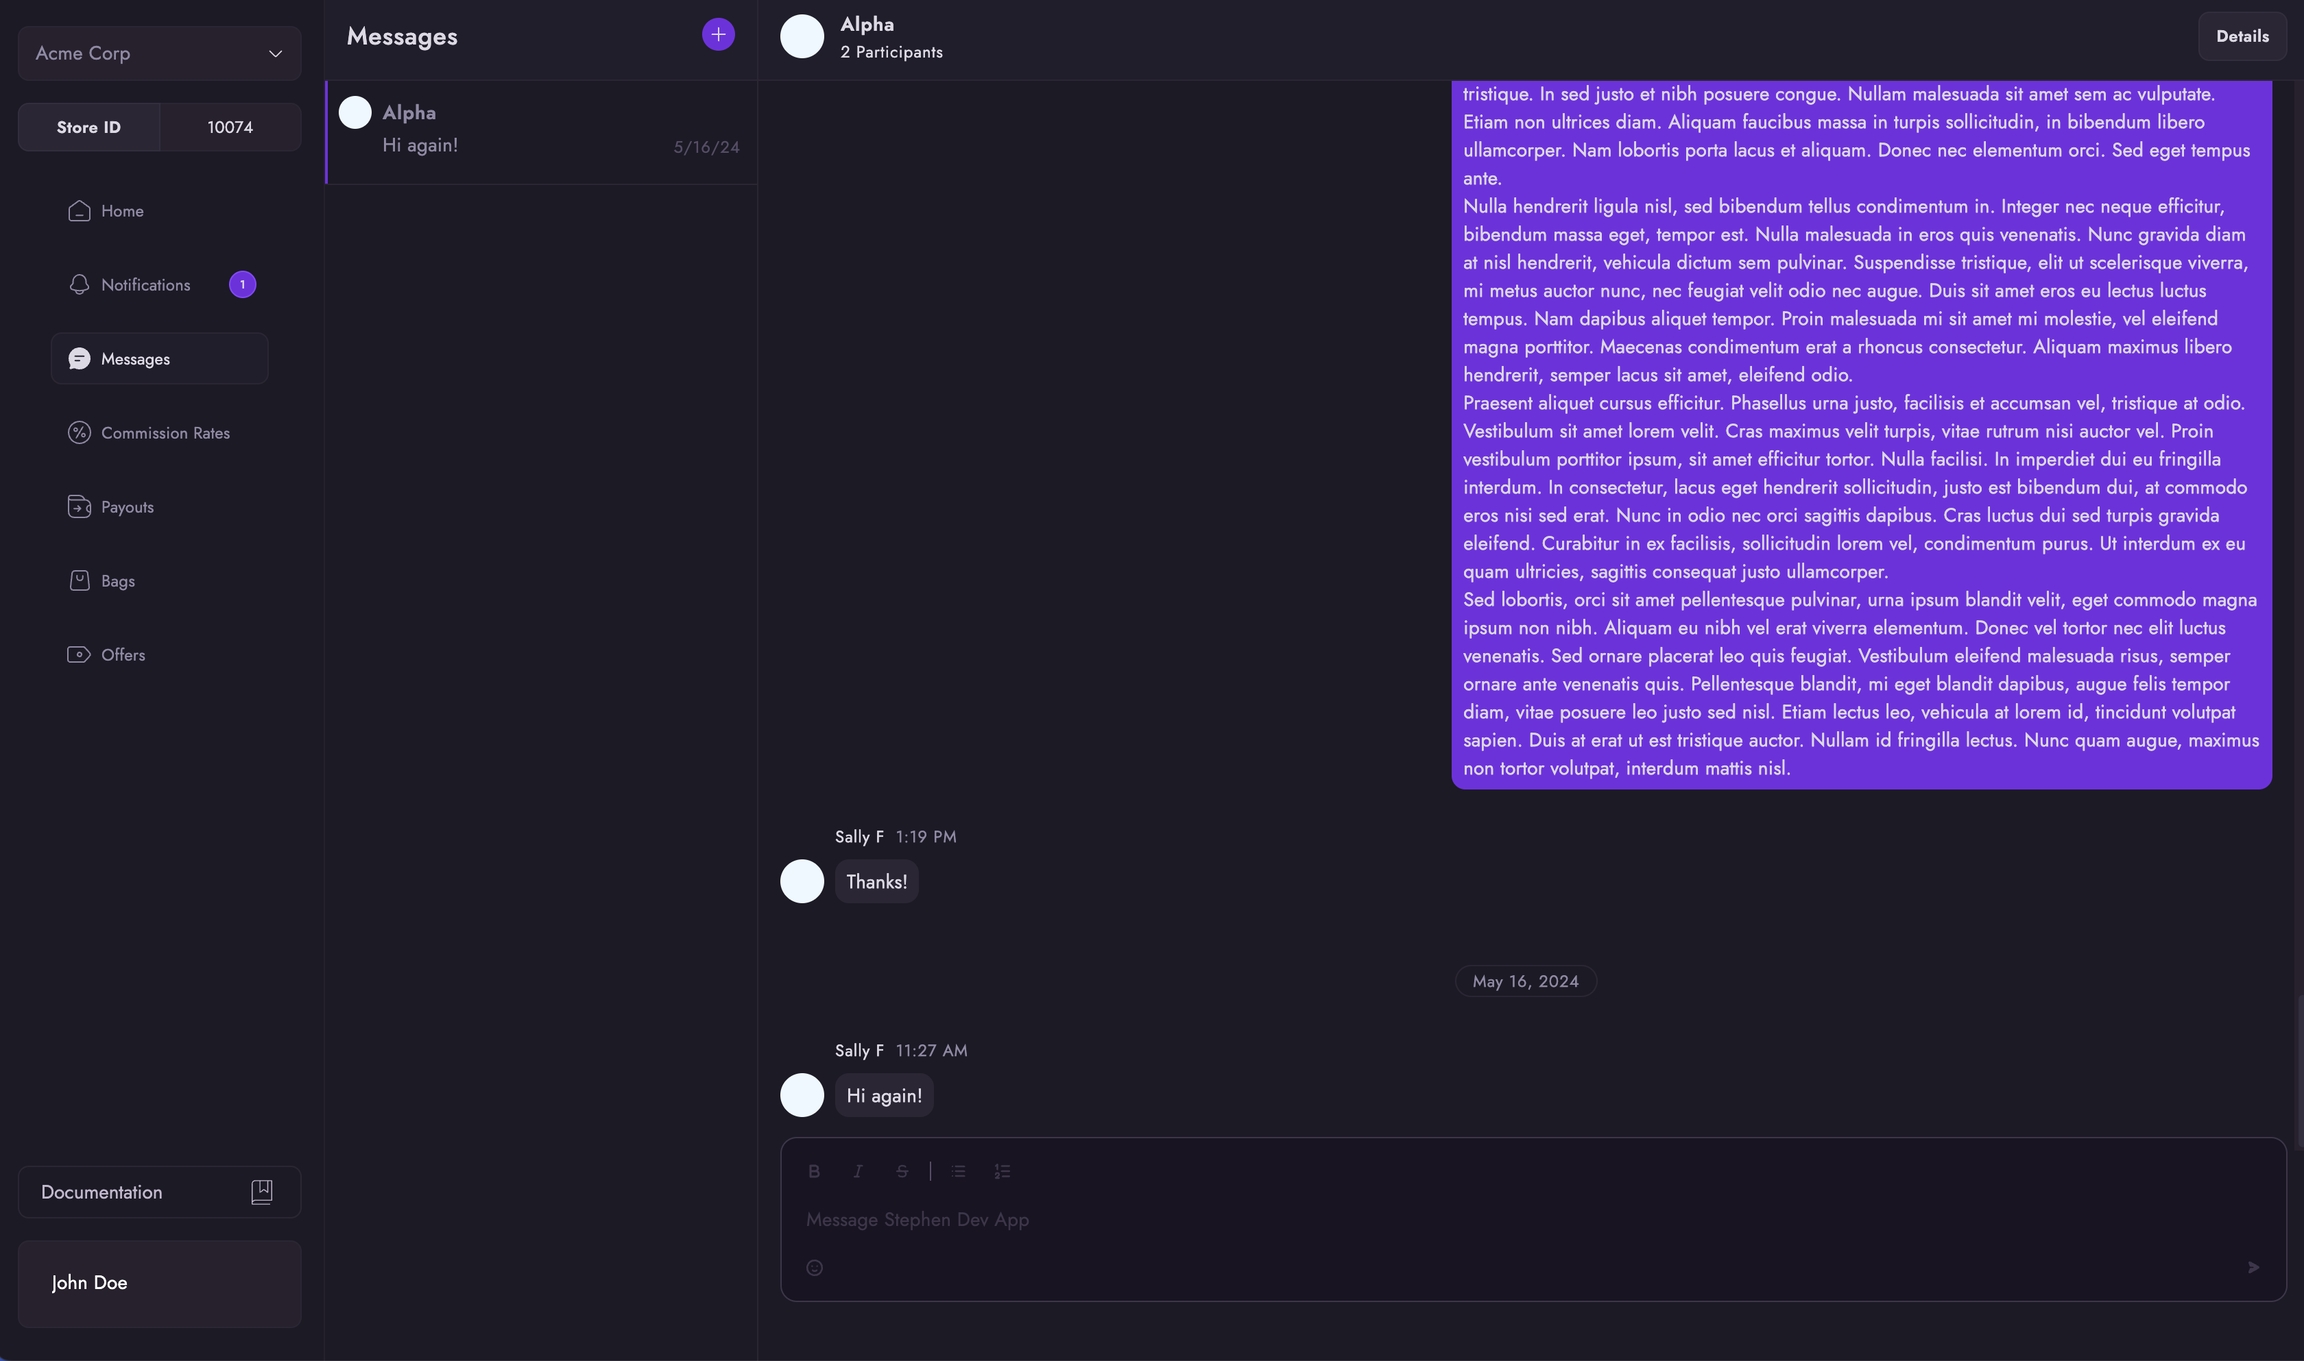
Messages
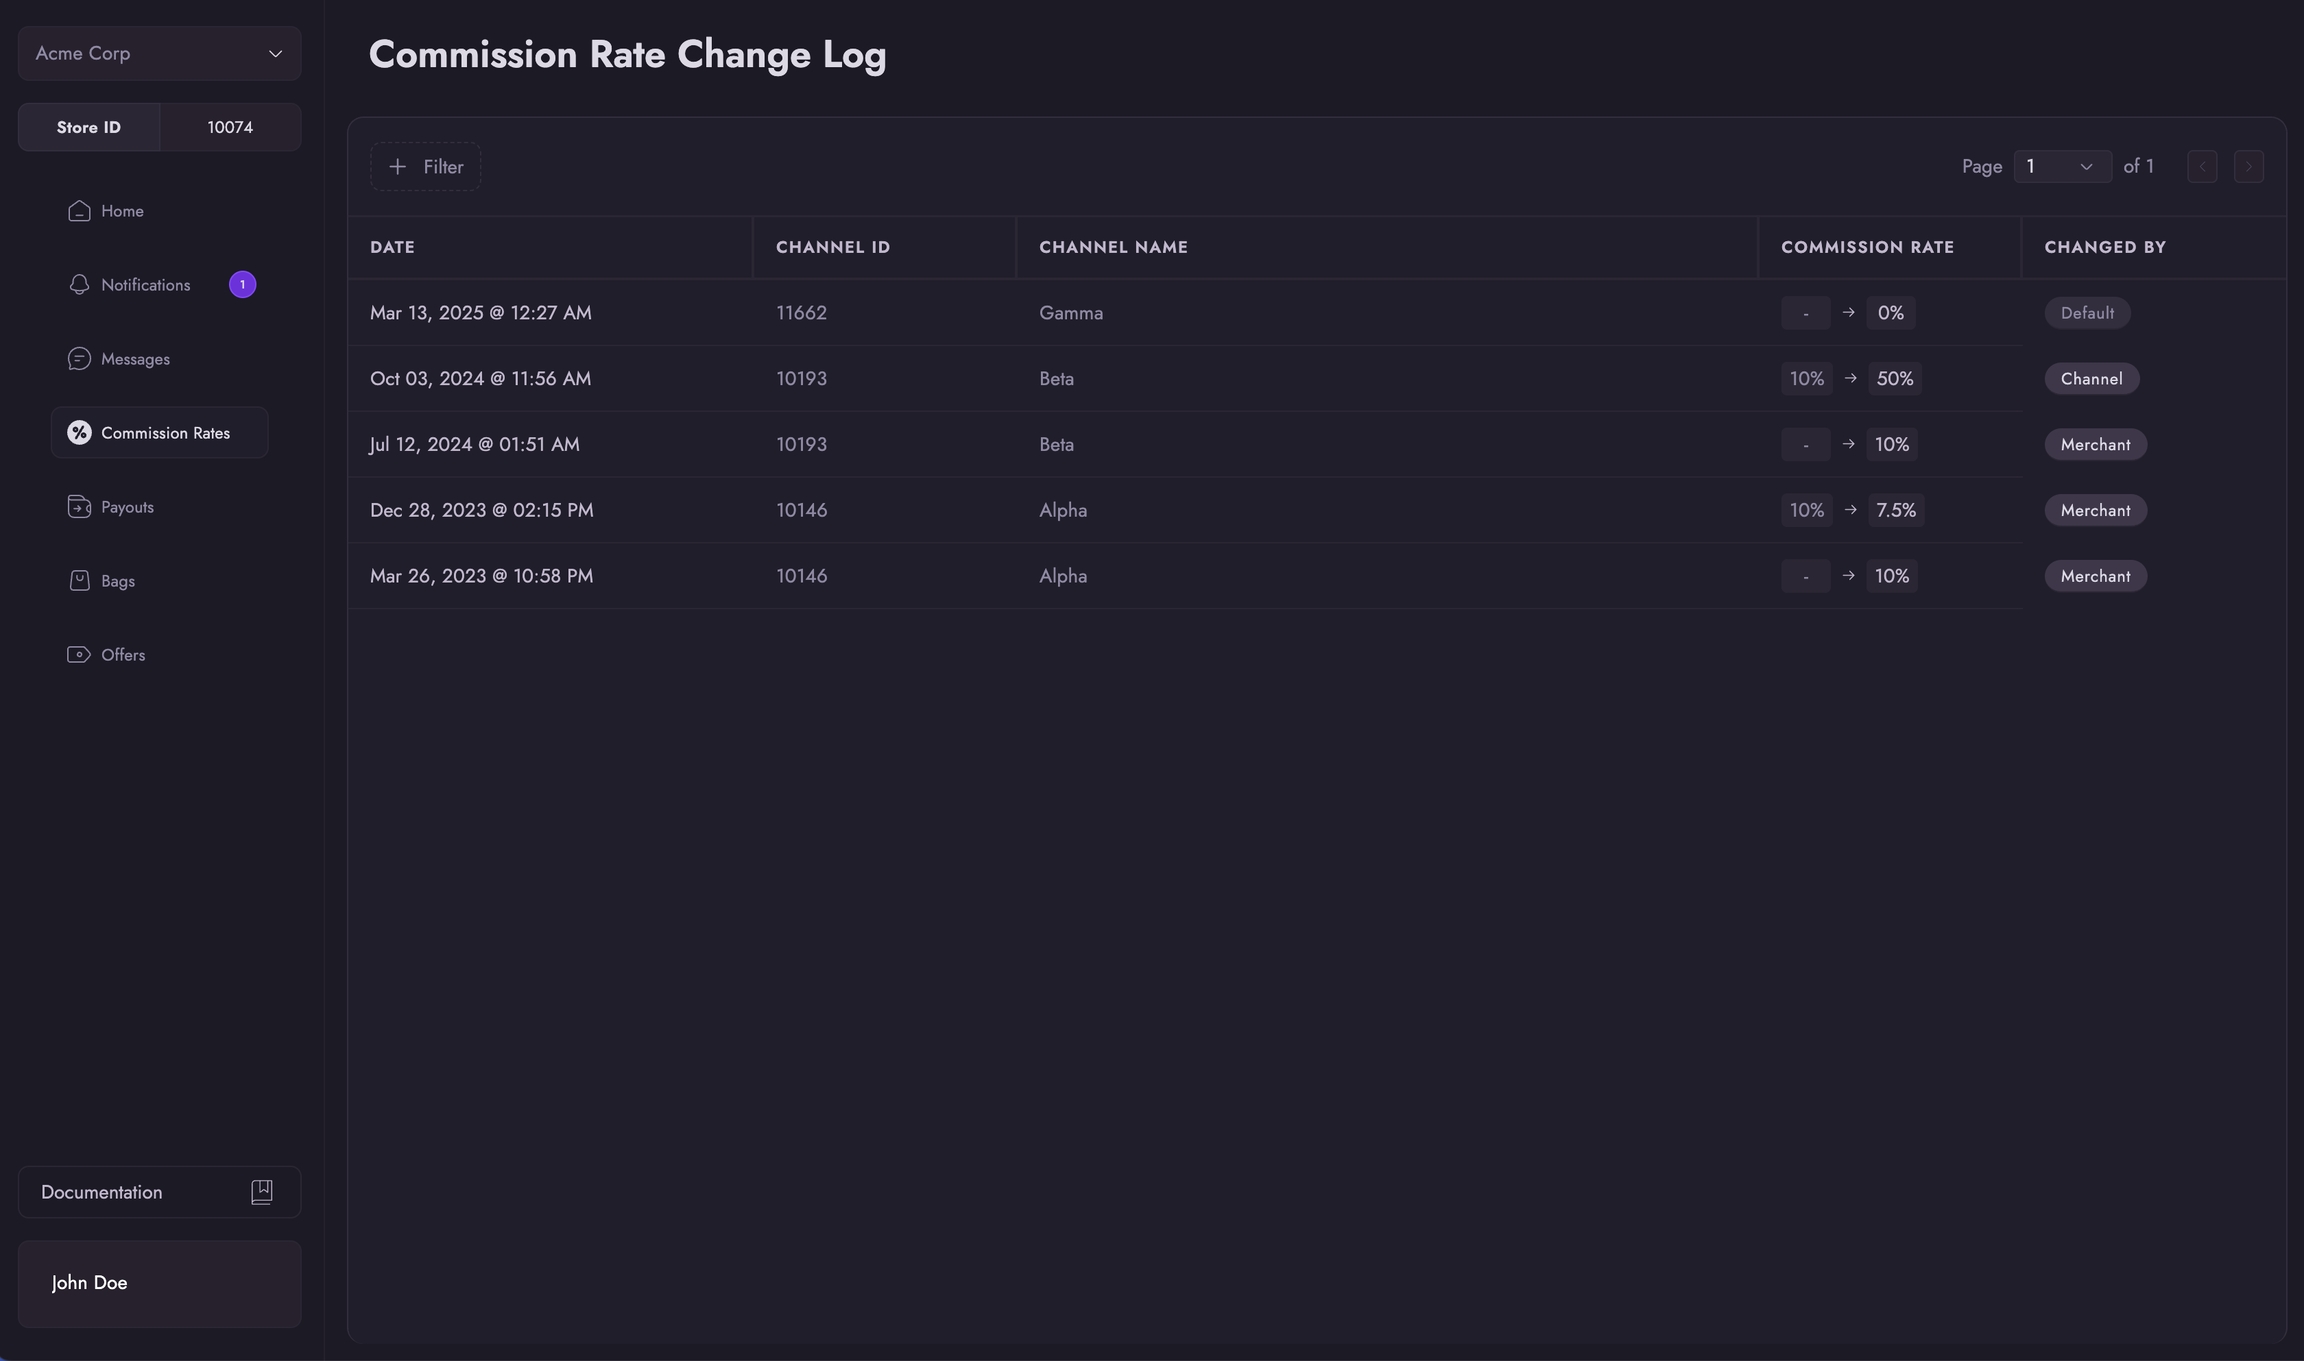
Commission Rates
The Overview page is where they can see see information about their connected store, all the Channels they are connected to, and control their commission rates.
The Notifications page is where merchants can manage all the notifications that they have received such as from completed report notifications and commission rate updates.
The Messages tab enables direct communication with your connected channels. From here, you can initiate and manage conversations with channels in real-time.
The Commission Rates tab displays historical commission rate changes for the merchant's connected apps. You can: - View a chronological log of all rate changes - Filter changes by specific channels
The Payouts page is merchants can see all the financial transactions related to their orders. Each payout entry includes: - A detailed summary of the transaction - Related distribution records - Transaction status and timeline - They can also access a dedicated Distributions tab for a more comprehensive view of money earned across orders.
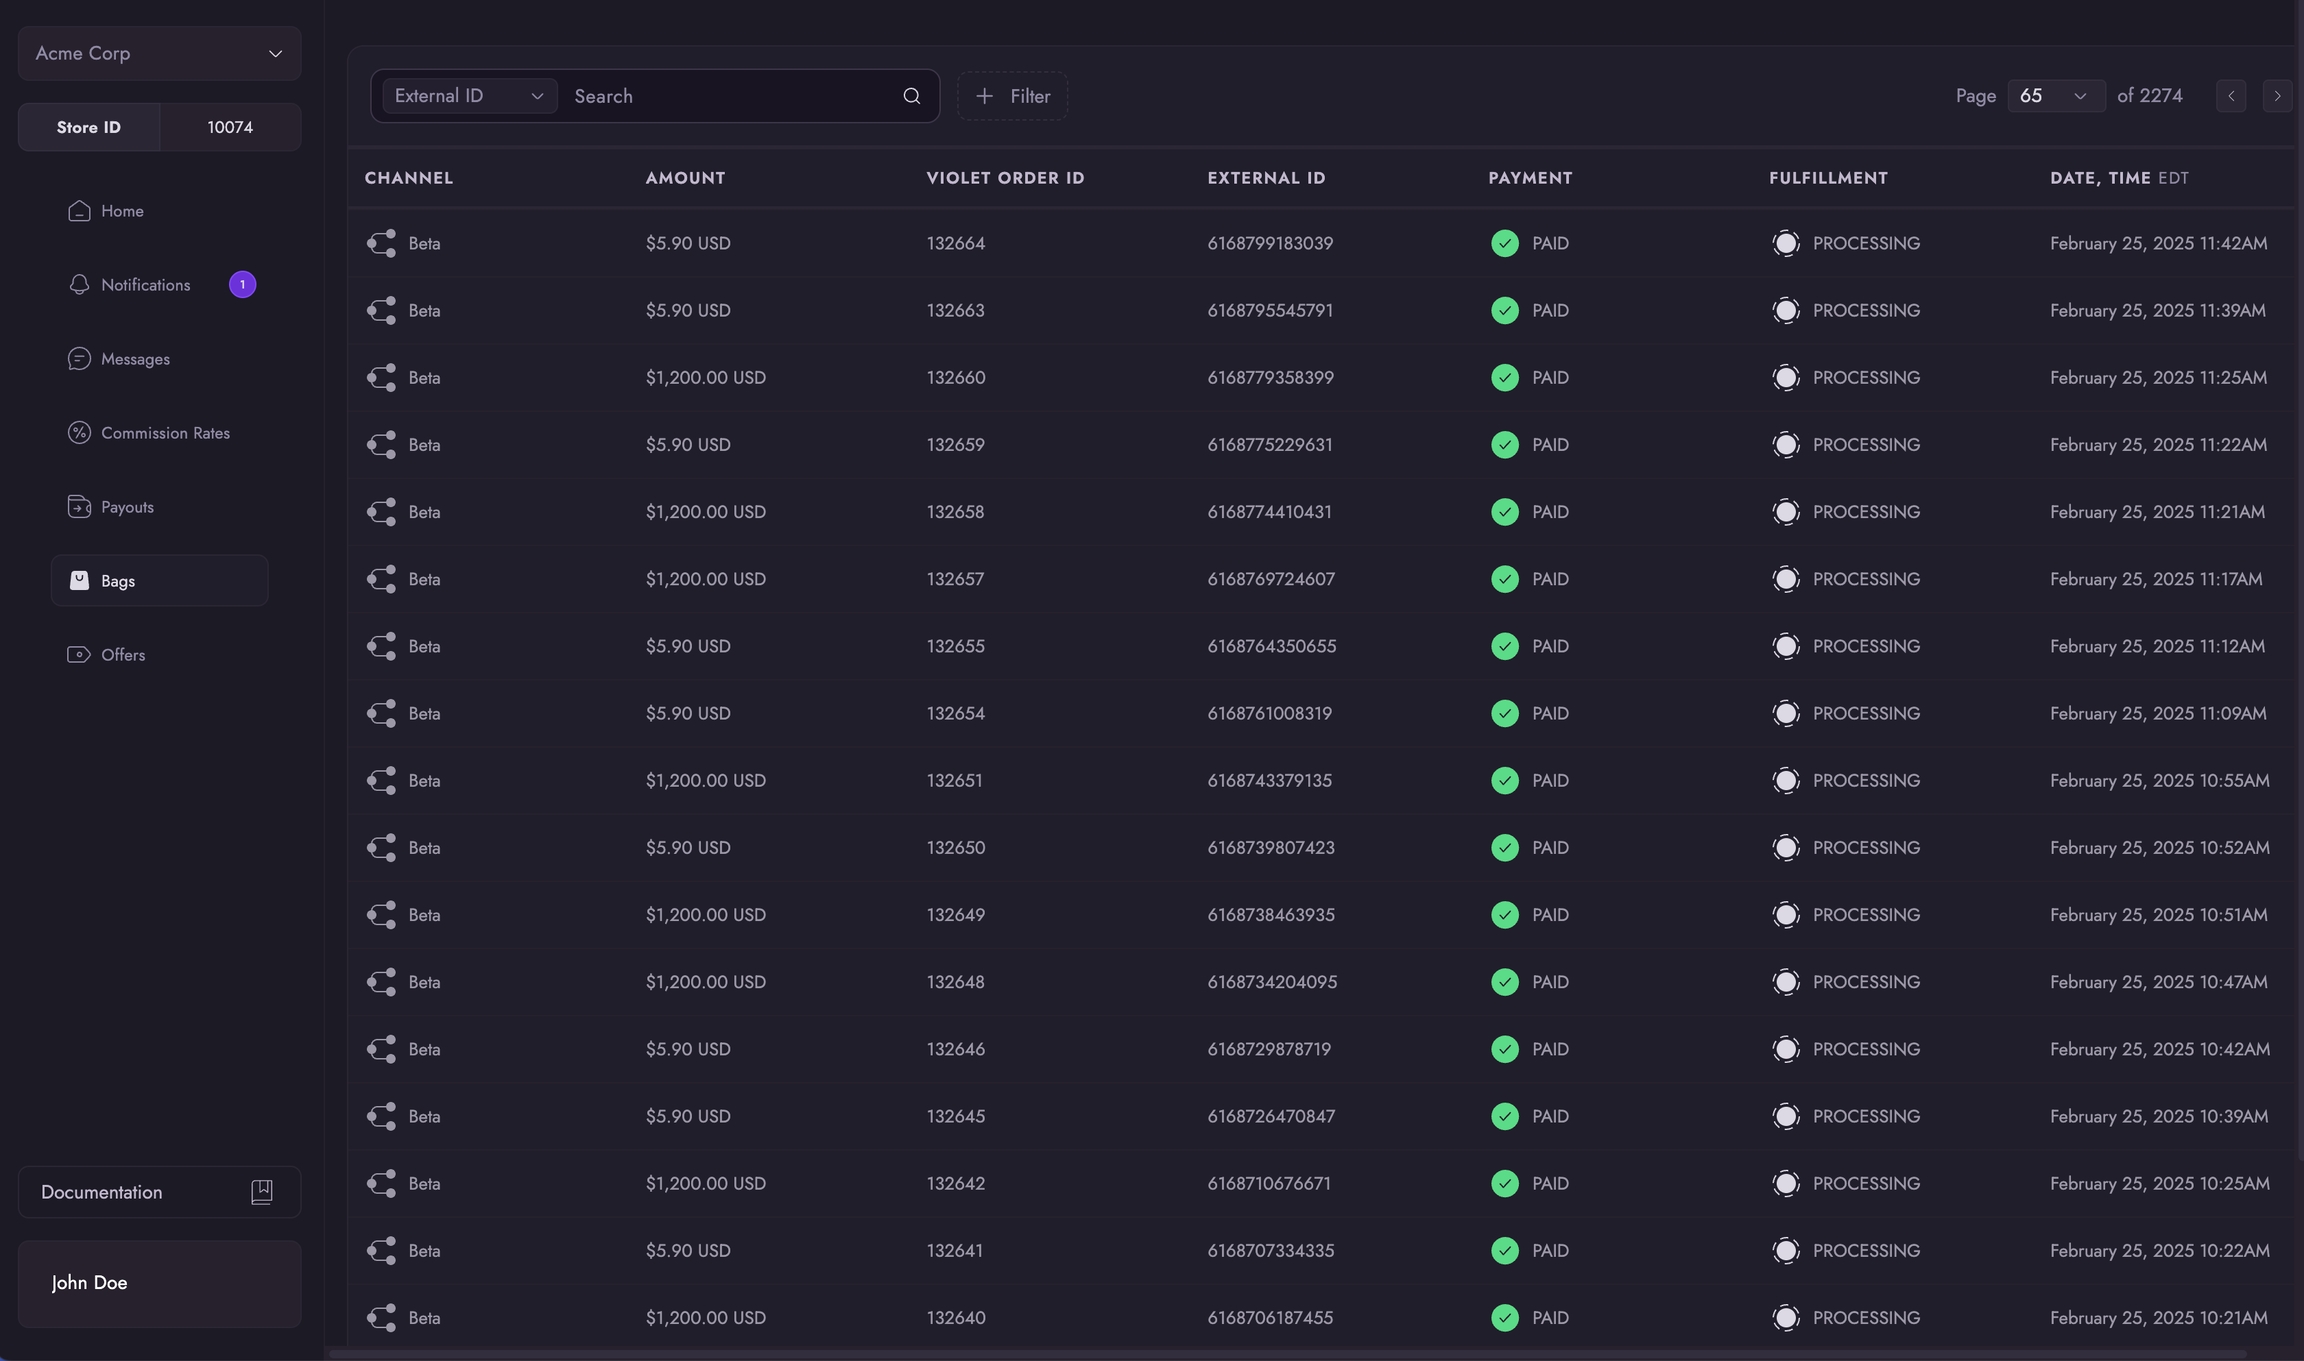
The Bags dashboard is where they can see all orders that have been placed through their integrations with Violet, including the state that they are in.
The Offers page is where they can see all the products that they have synced into Violet. Here they can Publish or Unpublish offers to sell through your Channel.
To access and modify account settings, they can click on “Violet User” in the bottom left corner and click Settings.
Here, you can navigate to the payouts tab to manage your payout account settings. For more information on how to setup and manage payout accounts, please see .
This guide is intended for Magento 2 merchants who are connecting their store to Violet. During this process, the merchant will install and configure the Violet extension through their Magento 2 admin dashboard and then generate and provide credentials to Violet through the Violet Connect onboarding tool. Total time for completion is around 10 minutes.
In this step you will obtain the Violet extension and install install it in your Magento store.
From the Magento Extension Marketplace grab the free

The Ecwid platform, as a rule, does not allow for an order placed via the API, as Violet does, to be refunded in the same way that an order placed on the storefront may be refunded. This means that for Violet Orders, the Ecwid interface refund button that can typically be used to start a refund is not able to be used.
Instead, simply mark any Violet orders as refunded or cancelled when the order is refunded and Violet will treat it as a full refund.
Manage your payments:
View payout history in your Merchant Dashboard
Update payout account settings
Track distributions across orders
Export financial data for accounting
Onboarding
Violet-hosted
Self-managed
Custom schedules: Available for high-volume merchants
Setup Complexity
🟢 Simple
🟡 Moderate
Dashboard Access
Express Dashboard
Full Stripe Dashboard
Best For
New merchants
Existing Stripe users
Cross-border
✅ Supported
❌ Limited
Order Placed → Commission Calculated → Stripe Processing → Bank Transfer
     ↓              ↓                       ↓               ↓
Instant Instant 2-3 Days 1-2 DaysOnce KYC is complete, the account becomes eligible for activation
Click on the "Inactive" pill and select the option Make Active
Note: This option will be disabled if the account is not eligible for activation (i.e. KYC is not complete)
A modal will appear to confirm the switch
On confirmation, this action will immediately deactivate the currently active account
All future earnings from the app will be routed to the new account
\
Bags
Offers

In the following steps you will be using a terminal to connect to your Magento store and install the extension. If you are not familiar with this process you can learn more about it in the Magento Documentation.
Open your terminal and connect to your Magento store.
Navigate to the root of your Magento installation.
Add the Violet extension to Composer and install it:
Install from the Magento Marketplace:
composer require violet/violetconnect:1.2.0
Install from Packagist:
composer require violetio/magento2
Enable the Violet extension:php bin/magento module:enable Violet_VioletConnect
Update the database schema to include Violet:php bin/magento setup:upgrade
Deploy static files:php bin/magento setup:static-content:deploy -f
Flush the Magento cache:php bin/magento cache:flush
The Violet extension is now installed in your Magento store.
Violet requires the use of long-lived access tokens when interacting with your stores backend systems. If you are running Magento 2.4.4 or newer you will need to enable these tokens. For older versions these tokens are enabled by default.
Navigate to your Magento admin dashboard and sign in.
Navigate to Stores → Configuration → Services → OAuth.
In the selector labeled Allow OAuth Access Tokens to be used as standalone Bearer tokens, select Yes.
Click the Save Config button.
Violet requires API credentials to authenticate requests when interacting with your stores backend systems.
Navigate to your Magento admin dashboard and sign in.
From the left sidebar click Violet.
Click the Create API Credentials button.
A new API user with the necessary access scopes has now been created. You will provide these credentials to Violet in the next step.
Store URL This is the fully formed URL to where you have Magento installed. If you provide an incorrect URL the credentials will be rejected until the correct one is provided.
API Key This key is used in combination with the API Secret to verify and authenticate certain actions or events.
API Secret This key is used in combination with the API Key to verify and authenticate certain actions or events.
Once entered, click the Connect button to validate the credentials and complete the connection between your store and Violet. If the credentials are invalid you should check for any spaces or other copy/paste errors and try again.
Upon success you will be redirected back to the channel who first sent you to Violet.
Salesforce Commerce Cloud is not a whole ecommerce platform. Merchants typically attach an Order Management System (OMS) and Inventory Management System (IMS) to their SFCC store to create a whole solution. Violet is unable to access these OMS and IMS platforms through the SFCC API so we must integrate directly with these tools as well. We ask that merchants share the name(s) of their OMS and/or IMS tools with the channel they are connecting with so that Violet can ensure that it covers those tools with direct integrations.
This guide is intended for Salesforce Commerce Cloud merchants who are connecting their store to Violet. During the connection process, the merchant will configure their store to connect it to Violet. Total time for completion is around 20 minutes.
From the account manager you will create and configured a new API Client for use by Violet. You can learn more about API Clients in the Salesforce Commerce Cloud documentation. The API Client should be created while you are logged into the account who's email address you will be sharing with Violet.
Navigate to the and sign in. The email address used to sign in is the Account Manager Email Address value in Violet Connect.
From the left sidebar menu click API Client.
Click the Add API Client button.
Enter a display name that will help you identify this API client with Violet.
mail
roles
tenantFilter
profile
openId
Enter the following in the redirect URL field: https://admin.us01.dx.commercecloud.salesforce.com/oauth2-redirect.html.
In the Token Endpoint Auth Method selector select client_secret_post.
In the Access Token Format selector select JWT.
Next you will configure the . This will require you to enter the following code snippets into the OCAPI configuration area of your system for both the and API’s.
Navigate to Administration → Site Development → Open Commerce API Settings.
In the Type selector, select Data.
In the Context selector, select Global.
Click the Save button to save the Data/Global settings.
In the Context selector, select the value that matches the site you are connecting to Violet. This is the Site ID value in Violet Connect.
In the Type Selector select Shop.
Next you will generate an Access Key which acts as a password with access limited only to the OCAPI. Violet will use the key when accessing your system through the OCAPI.
In the top right corner of the business manager, click the User Profile icon.
Click the Generate Access Key button, a modal will open.
Select the Agent User Login and OCAPI scope and click the Generate button. Note: If the Agent User Login and OCAPI is not listed it means there is already a key generated with this scope. If you have that key available, you are done with this section. If not you must responsibly delete the existing key and generate a new one.
Next you will configure a new payment method that will be utilized by Violet when submitting orders back into your system. This will involve creating a new Customer Group, Payment Processor, and Payment Method, each of which will only be utilized by Violet.
Navigate to Merchant Tools → Customers → Customer Groups.
Click the New button to create a new customer group for Violet customers.
Select Static as the type.
Enter VIOLET_API
Through the OCAPI connection that was configured in the previous steps Violet will be able to provide end-to-end commerce functionalities for the channels connected to your store. There are a few functionalities though that are not available in the OCAPI and can only be enabled through the SCAPI. These include the following:
Marking an Order as ready for export.
Marking an Order as paid.
Marking an Order as confirmed.
If the automation of these actions is important to your operations than you will need to perform the following additional steps.
Navigate to Administration → Site Development → Salesforce Commerce API Settings.
If no Short Code is present, click the Request Short Code button. This is the Short Code value in Violet Connect.
Following the Short Code is the Organization ID. This is the Organization ID value in Violet Connect.
From the account manager you will create and configured a new API Client for use by Violet. You can learn more about API Clients in the Salesforce Commerce Cloud documentation. The API Client should be created while you are logged into the account who's email address you will be sharing with Violet.
Next you will create a new API Client. Unfortunately SFCC does not allow us to use the same API Client that was created for OCAPI when interacting SCAPI. You will be performing the same actions you did when configuring the OCAPI Client, but with slightly different Roles and Scopes.
Navigate to the and sign in.
From the left sidebar menu click API Client.
Click the Add API Client button.
Enter a display name that will help you identify this API client with Violet.
mail
roles
tenantFilter
profile
openId
In the Allow Scopes field enter the following vaues:
sfcc.shopper-baskets-orders.rw
sfcc.orders.rw
sfcc.catalogs.rw
sfcc.products.rw
Enter the following in the redirect URL field: https://admin.us01.dx.commercecloud.salesforce.com/oauth2-redirect.html.
In the Token Endpoint Auth Method selector select client_secret_post.
In the Access Token Format selector select JWT.
The Ecwid platform, as a rule, does not allow for an order placed via the API, as Violet does, to be refunded in the same way that an order placed on the storefront may be refunded. This means that for Violet Orders, the Ecwid interface refund button that can typically be used to start a refund is not able to be used.
Instead, simply mark any Violet orders as refunded or cancelled when the order is refunded and Violet will treat it as a full refund.
As there is no concept of refunds in both the OCAPI and SCAPI, Violet is unable to be notified of refunds or access any refund data. As a temporary workaround, you will need to perform one of the following steps.
Option 1: Mark Order as Cancelled
This option requires the least amount of effort. Simply mark any Violet orders as cancelled when the order is refunded and Violet will treat it as a refund.
Option 2: Notify Violet of Refunds This option will likely require the involvement of your engineering team. When a refund occurs, you will need to send information about the refund to Violet so that it can process the refund accordingly. If you choose this option, the integration documentation will be shared with you by Violet or the channel that onboarded you.
Whats Next Violet will begin integrating with the order management systems that you connect to your Salesforce Commerce Cloud stores. Once we have an integration with the OMS you use you will be able to remove/skip the above fallback options as Violet will be able to discover refunds automatically.
The below ONLY applies to orders placed before 2024-04-22. All orders placed afterward can be refunded via the standard process.
See our for more details.


Enter a secure password. This is the OCAPI Client Password value in Violet Connect.
Ensure that Access Control is Enabled.
Add your organization to the client.
If you are testing with a Sandbox store follow these steps:
a. Search for the Sandbox API User role and select the role.
b. To assign the role to the API client, click Add.
c. Select the filter icon to specify the role scope.
d. In the Add Instance Filters tab, select your organization.
e. Enter the names of the instances to which you want the API client to have access.
f. Select the instances.
g. Click Add.
In the Default Scopes field, enter the following values:
Click the Save button.
As the new API client is created, an ID will be generated. Keep track of this value as it will be used in the next step. This is the OCAPI Client ID value in Violet Connect.
Replace the CLIENT_ID_FROM_PREVIOUS_STEP_HERE with the ID of the API Client you created in the previous step.
Add the Violet client by entering the following code snippet into the textarea. If the area is currently empty you can copy/paste the entire snippet. If there is already something entered in the textarea you should should only copy the individual client piece and add to the list of clients already present.
Replace the CLIENT_ID_FROM_PREVIOUS_STEP_HERE with the ID of the API Client you created in the previous step.
The access key will be exposed in plain text just one time, be sure to store this value for later use. This is the Access Key value in Violet Connect.
Click the Save button.
Navigate to Merchant Tools → Ordering → Payment Processors.
Click the New button to create a new payment processor for Violet orders.
Enter VIOLET_API as the ID then click the Apply button to save it.
Navigate to Merchant Tools → Ordering → Payment Methods.
Click the New button to create a new payment method for orders created by Violet.
Enter VIOLET_API as the payment method ID and Violet as the payment method name.
Ensure that the Enabled column is set to Yes.
In the details section, click the Edit button next to the Customer Groups label.
Select the VIOLET_API customer group and click the Assign button to apply it to the payment method. This will limit the payment method to only orders created by Violet.
In the Payment Processor selector, select VIOLET_API .
Click the Apply button to save the payment method.
f_ecom_[Realm ID]_[Instance ID]. As an example, if your Organization ID is f_ecom_aaaa_001 your Realm ID is aaaa and your instance ID is 001. These are the Realm ID and Instance ID values in Violet Connect.Enter a secure password. This is the SCAPI Client Password value in Violet Connect.
Ensure that Access Control is Enabled.
Add your organization to the client.
Under Roles perform the following steps:
a. Search for the Salesforce Commerce API role and select the role.
b. To assign the role to the API client, click Add.
c. Select the filter icon to specify the role scope (the scope is required by the Salesforce Commerce API).
d. In the Add Instance Filters tab, select your organization.
e. Enter the names of the instances to which you want the API client to have access.
f. Select the instances.
g. Click Add.
In the Default Scopes field, enter the following values:
Click the Save button.
As the new API client is created, an ID will be generated. Keep track of this value as it will be used in the next step. This is the SCAPI Client ID value in Violet Connect.
As there is no concept of refunds in both the OCAPI and SCAPI, Violet is unable to be notified of refunds or access any refund data. As a temporary workaround, you will need to perform one of the following steps.
Option 1: Mark Order as Cancelled
This option requires the least amount of effort. Simply mark any Violet orders as cancelled when the order is refunded and Violet will treat it as a refund.
Option 2: Notify Violet of Refunds This option will likely require the involvement of your engineering team. When a refund occurs, you will need to send information about the refund to Violet so that it can process the refund accordingly. If you choose this option, the integration documentation will be shared with you by Violet or the channel that onboarded you.
Whats Next Violet will begin integrating with the order management systems that you connect to your Salesforce Commerce Cloud stores. Once we have an integration with the OMS you use you will be able to remove/skip the above fallback options as Violet will be able to discover refunds automatically.
In the event that an order is still undergoing processing and has not yet been shipped, initiating a refund can be accomplished by canceling the order.
Step 1: Go to Actions
Step 2: Cancel Order
Step 2.5: Confirm Cancel
Previously Fulfilled Order
Once an order has been dispatched, it is necessary to unfulfill it before you can proceed with initiating a refund by canceling the order.
Step 1: Go to Actions
Step 2: Unfulfill Order
As soon as you select the option Mark as fulfilled, the order status will promptly be updated to UNFULFILLED. You can see this below:
Step 3: Follow Steps from Unfulfilled Order above.
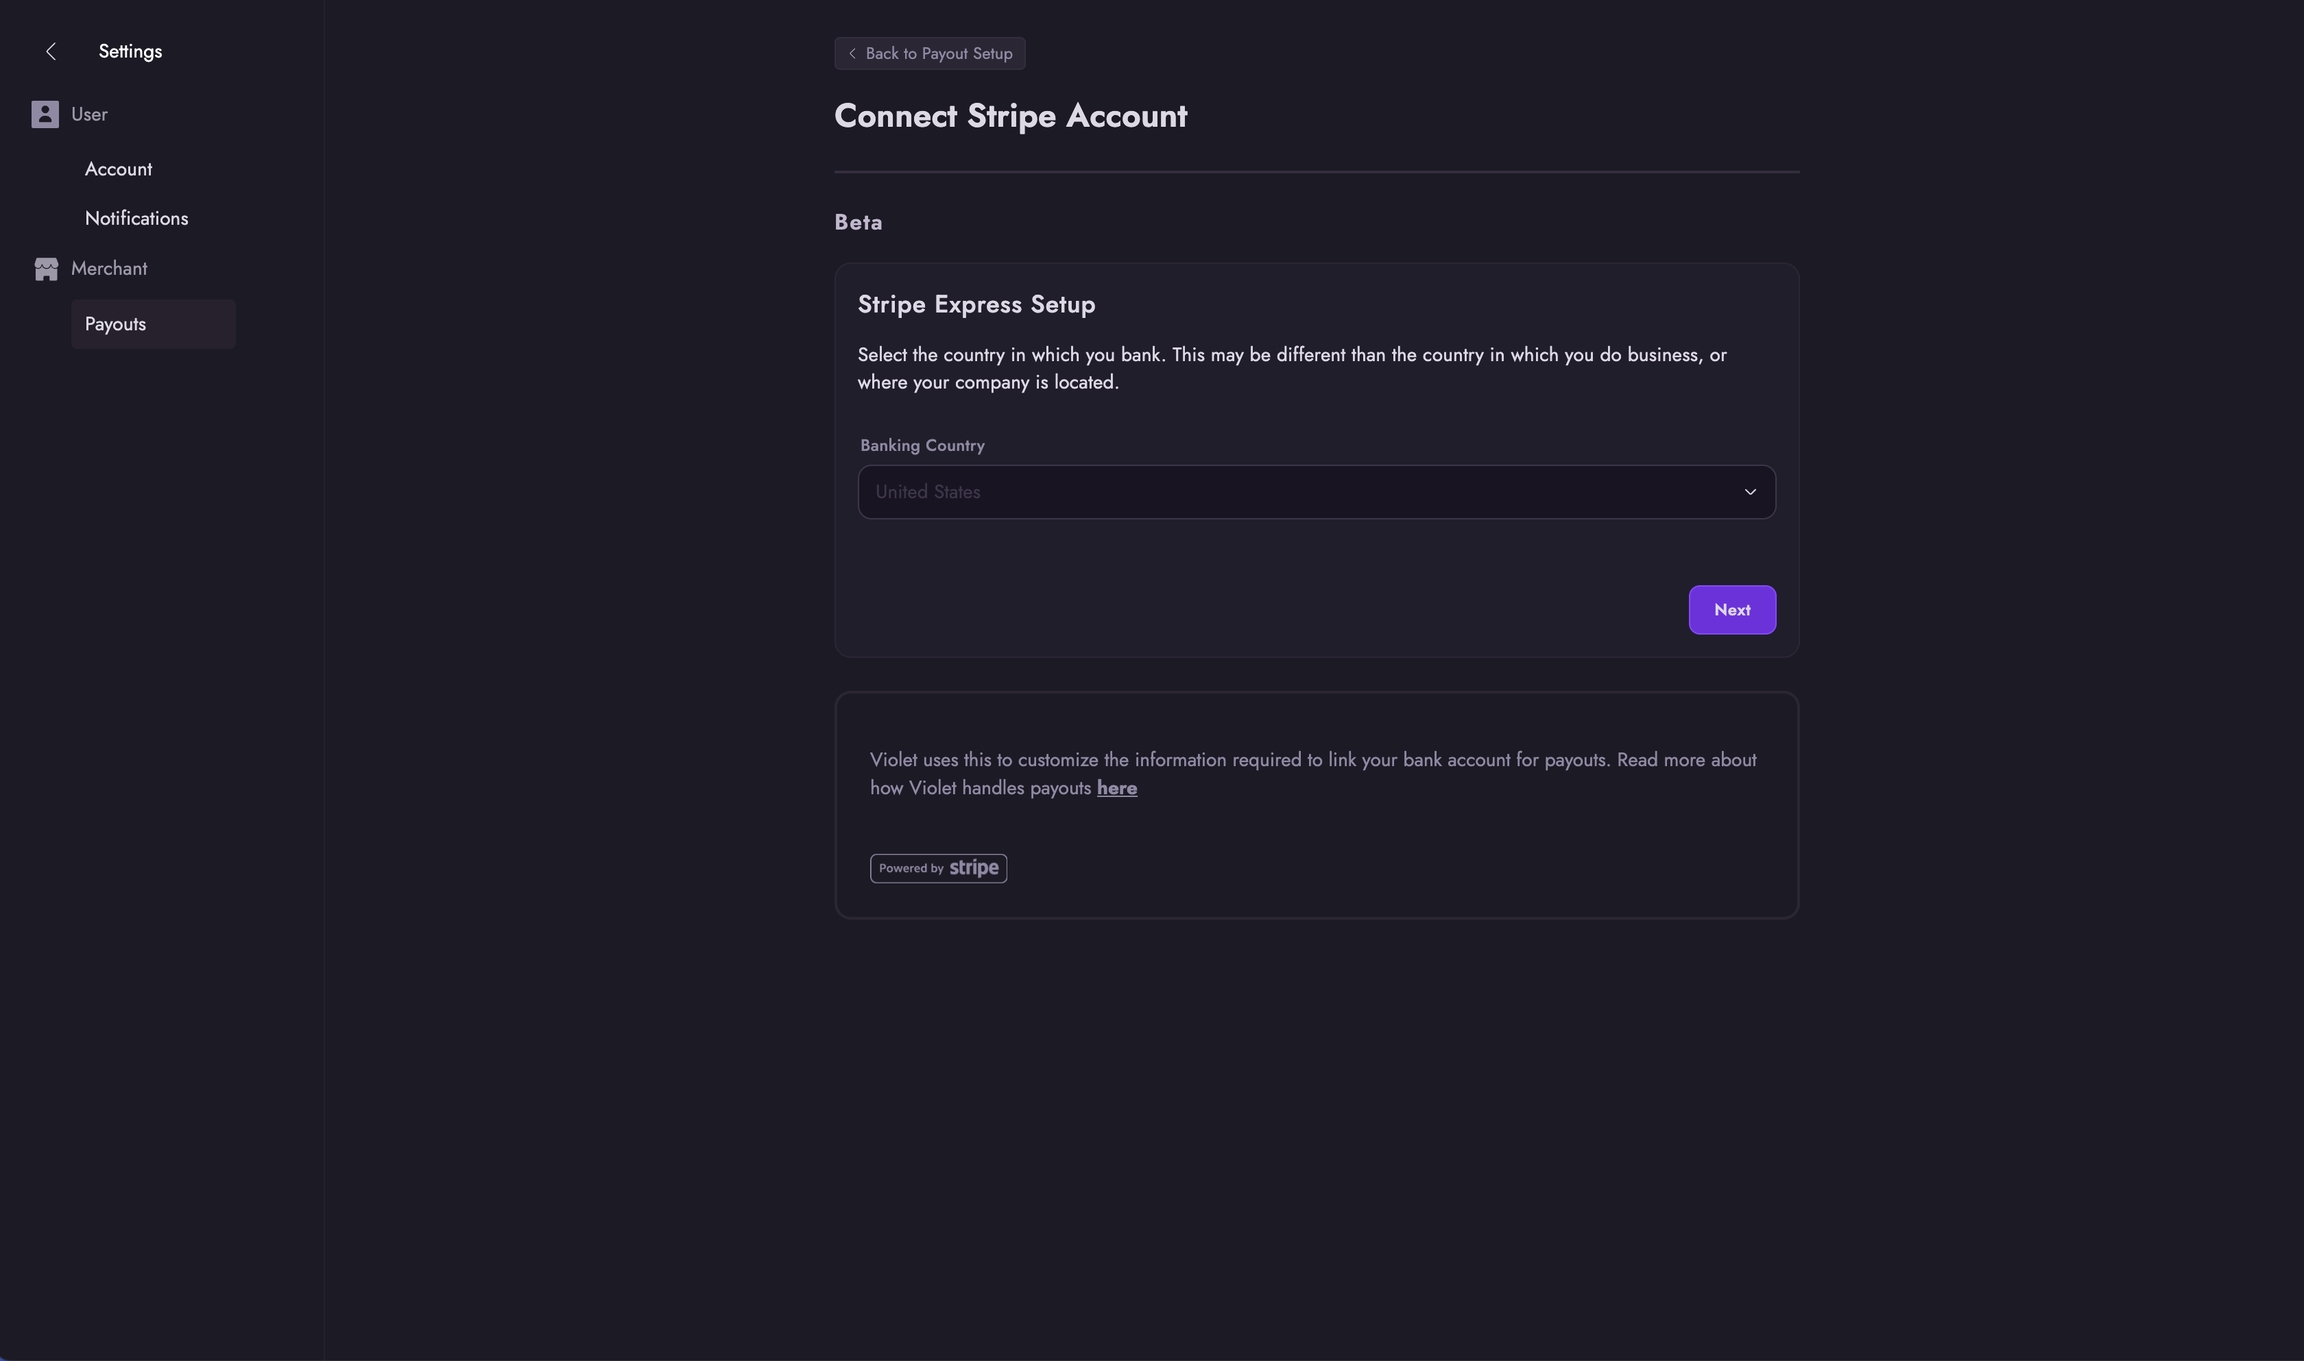
{
  "_v": "23.1",
  "clients": [
    {
      "client_id": "CLIENT_ID_FROM_PREVIOUS_STEP_HERE",
      "resources": [
        {
          "resource_id": "/ocapi_configs/*",
          "methods": ["get"],
          "read_attributes": "(**)",
          "write_attributes": "(**)"
        },
        {
          "methods": ["get", "post", "put", "patch", "delete"],
          "read_attributes": "(**)",
          "write_attributes": "(**)",
          "resource_id": "/**"
        }
      ]
    }
  ]
}{
"_v": "23.1",
"clients": [
{
"client_id": "CLIENT_ID_FROM_PREVIOUS_STEP_HERE",
"resources": [
{
"methods": ["get", "post", "put", "patch", "delete"],
"read_attributes": "(**)",
"write_attributes": "(**)",
"resource_id": "/**"
}
]
}
]
}
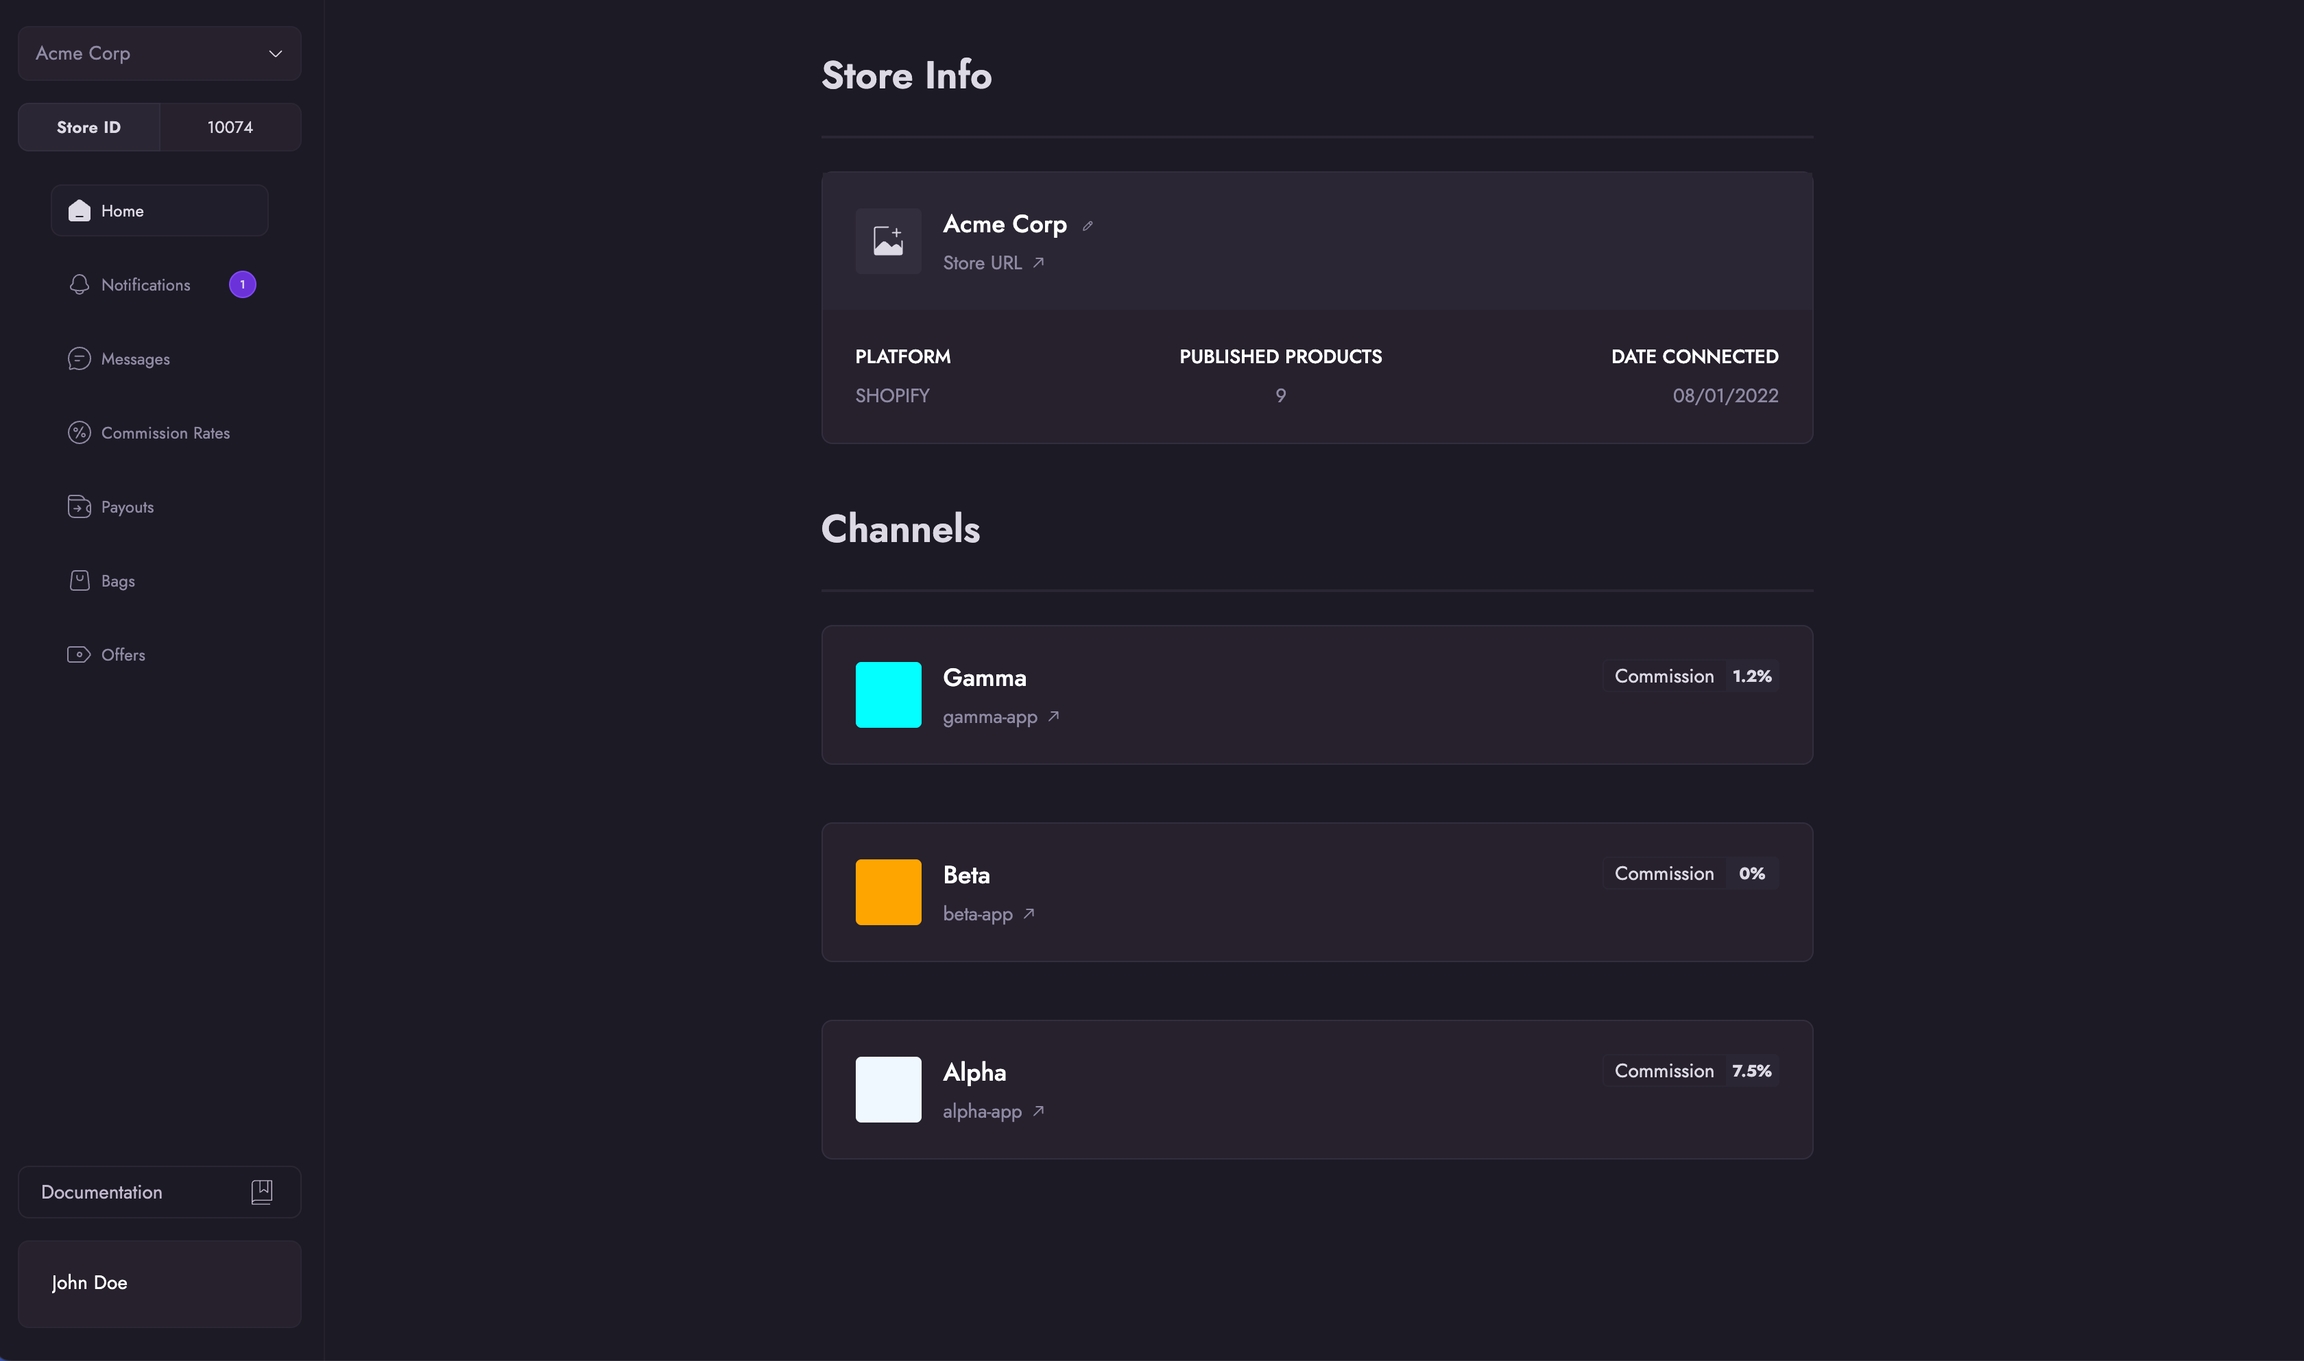


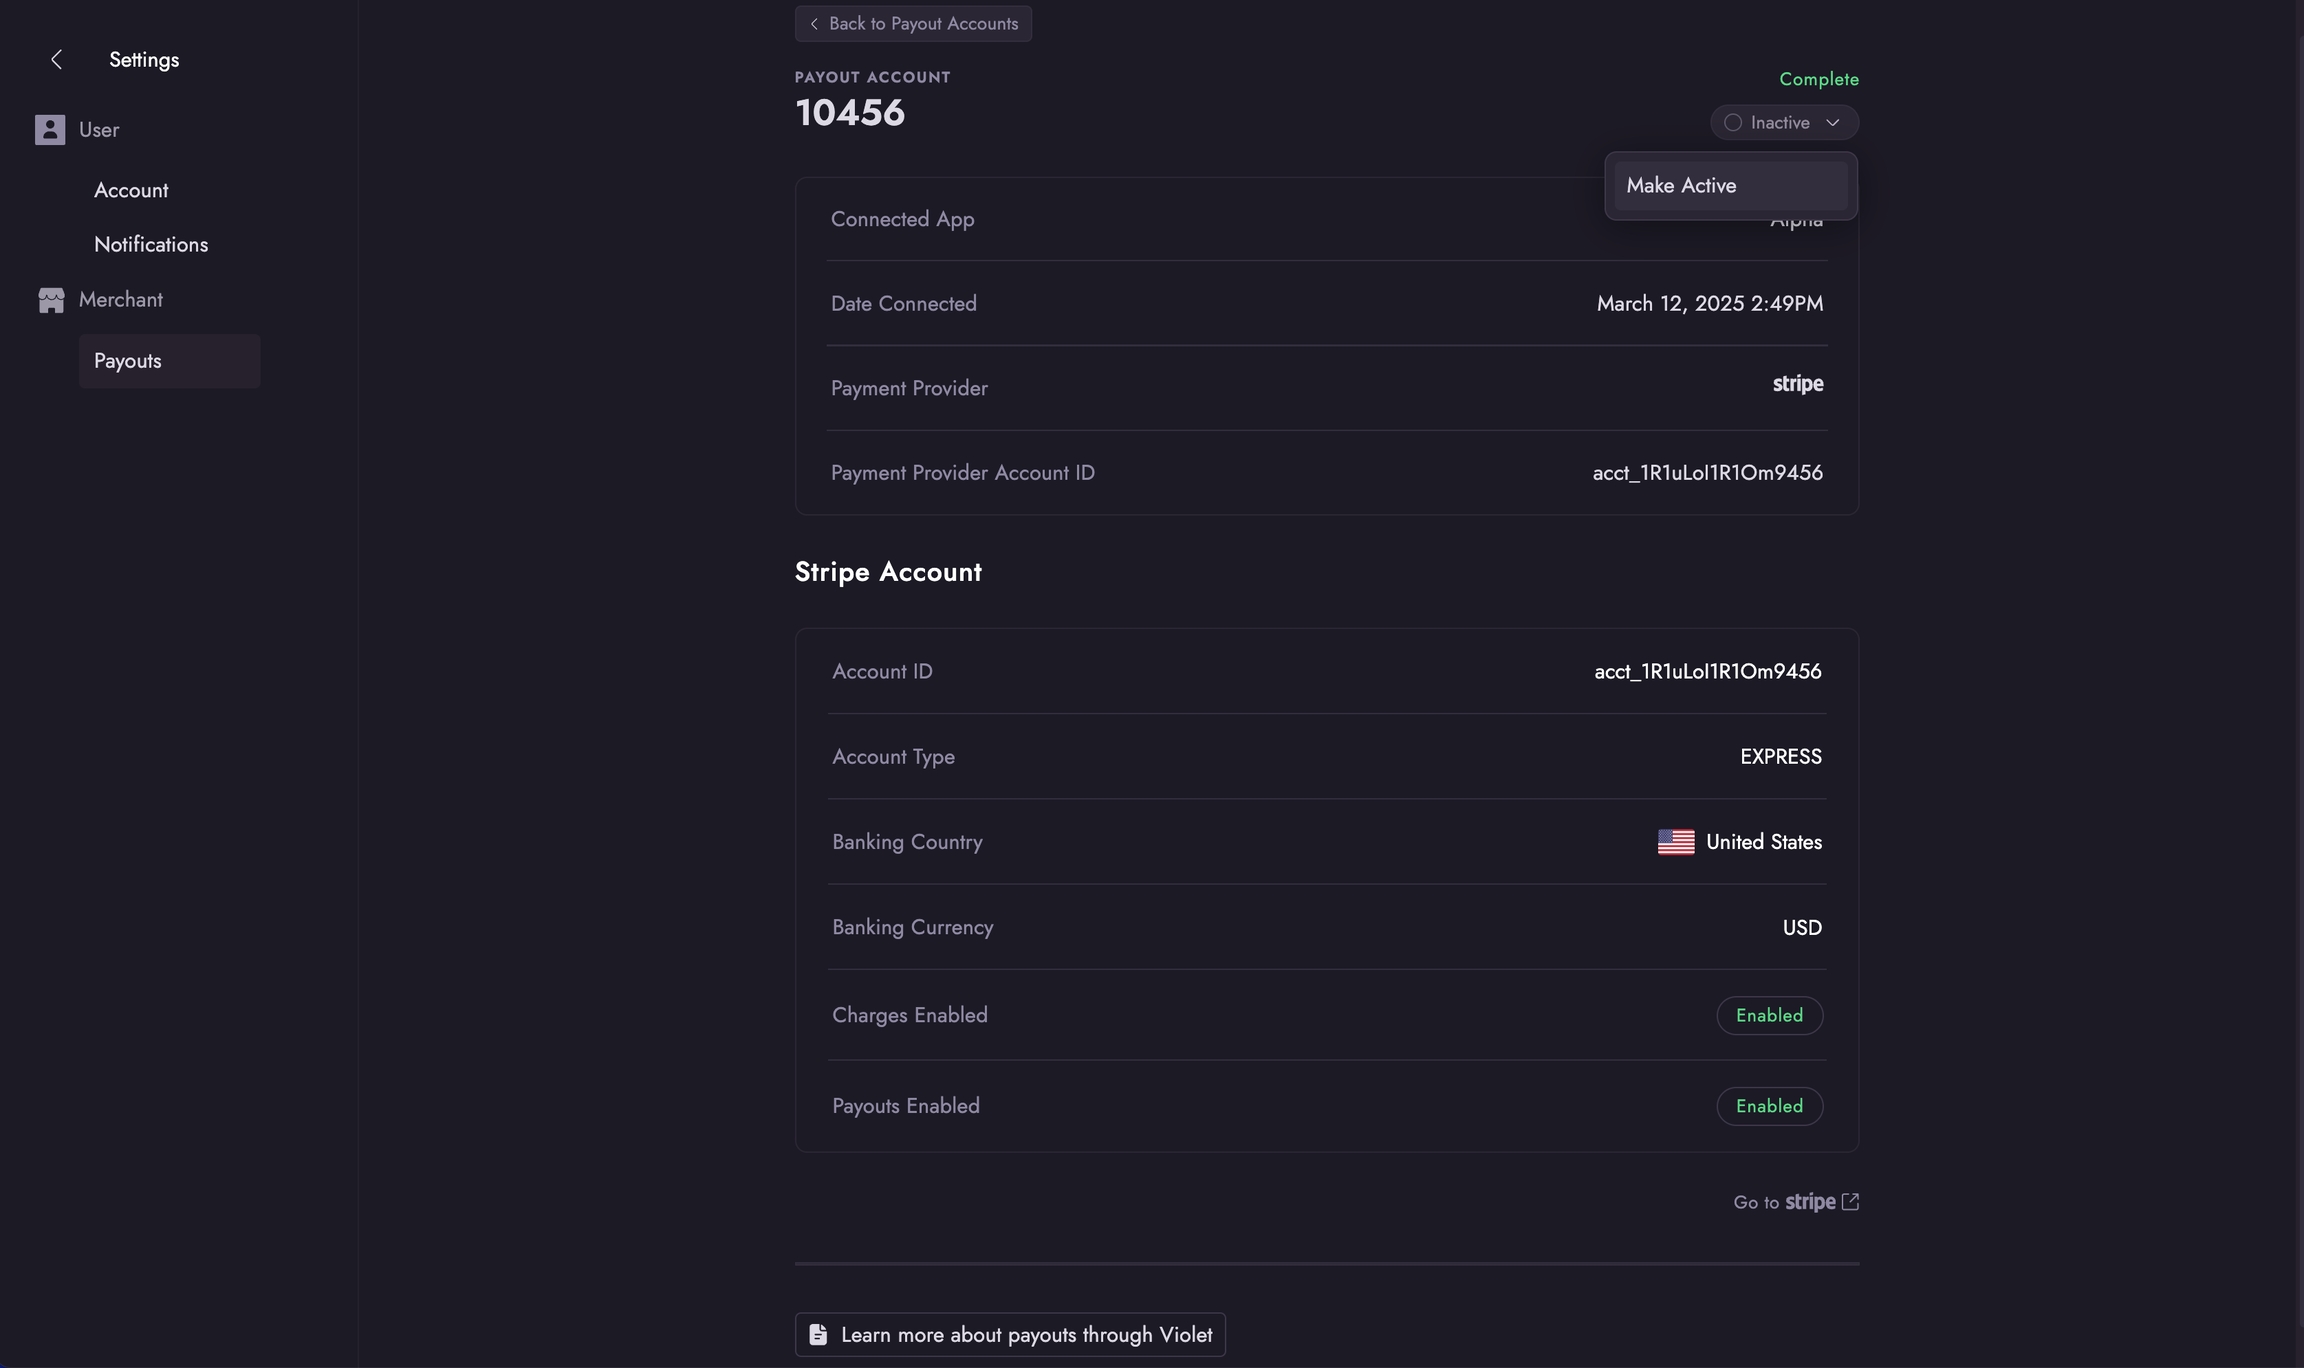

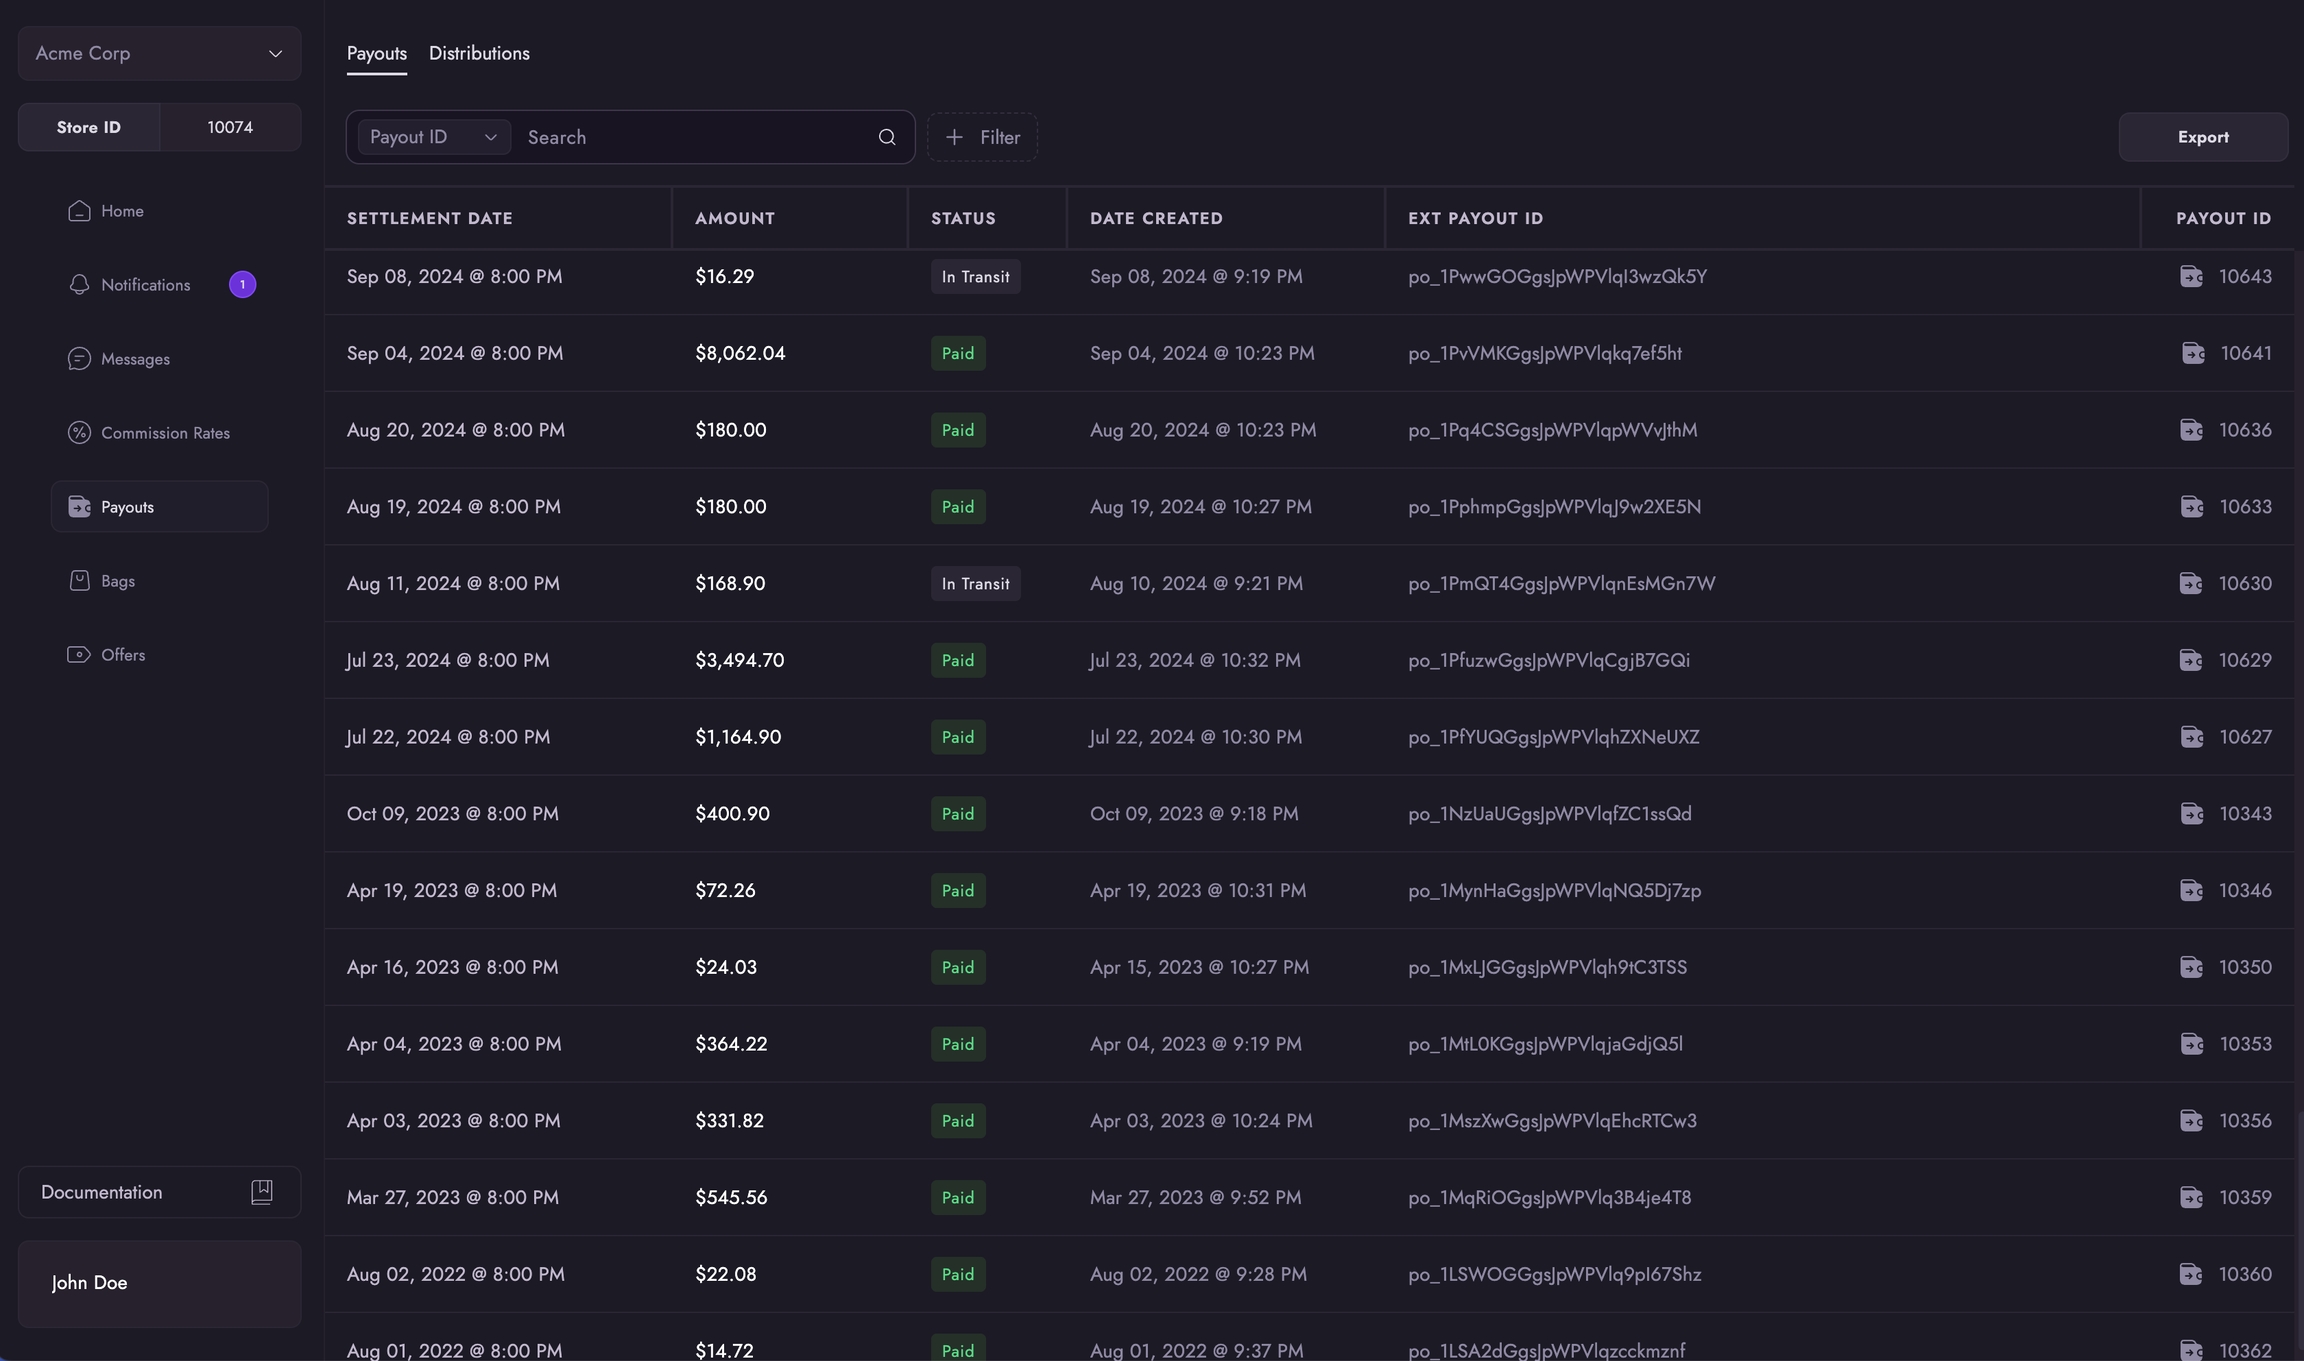
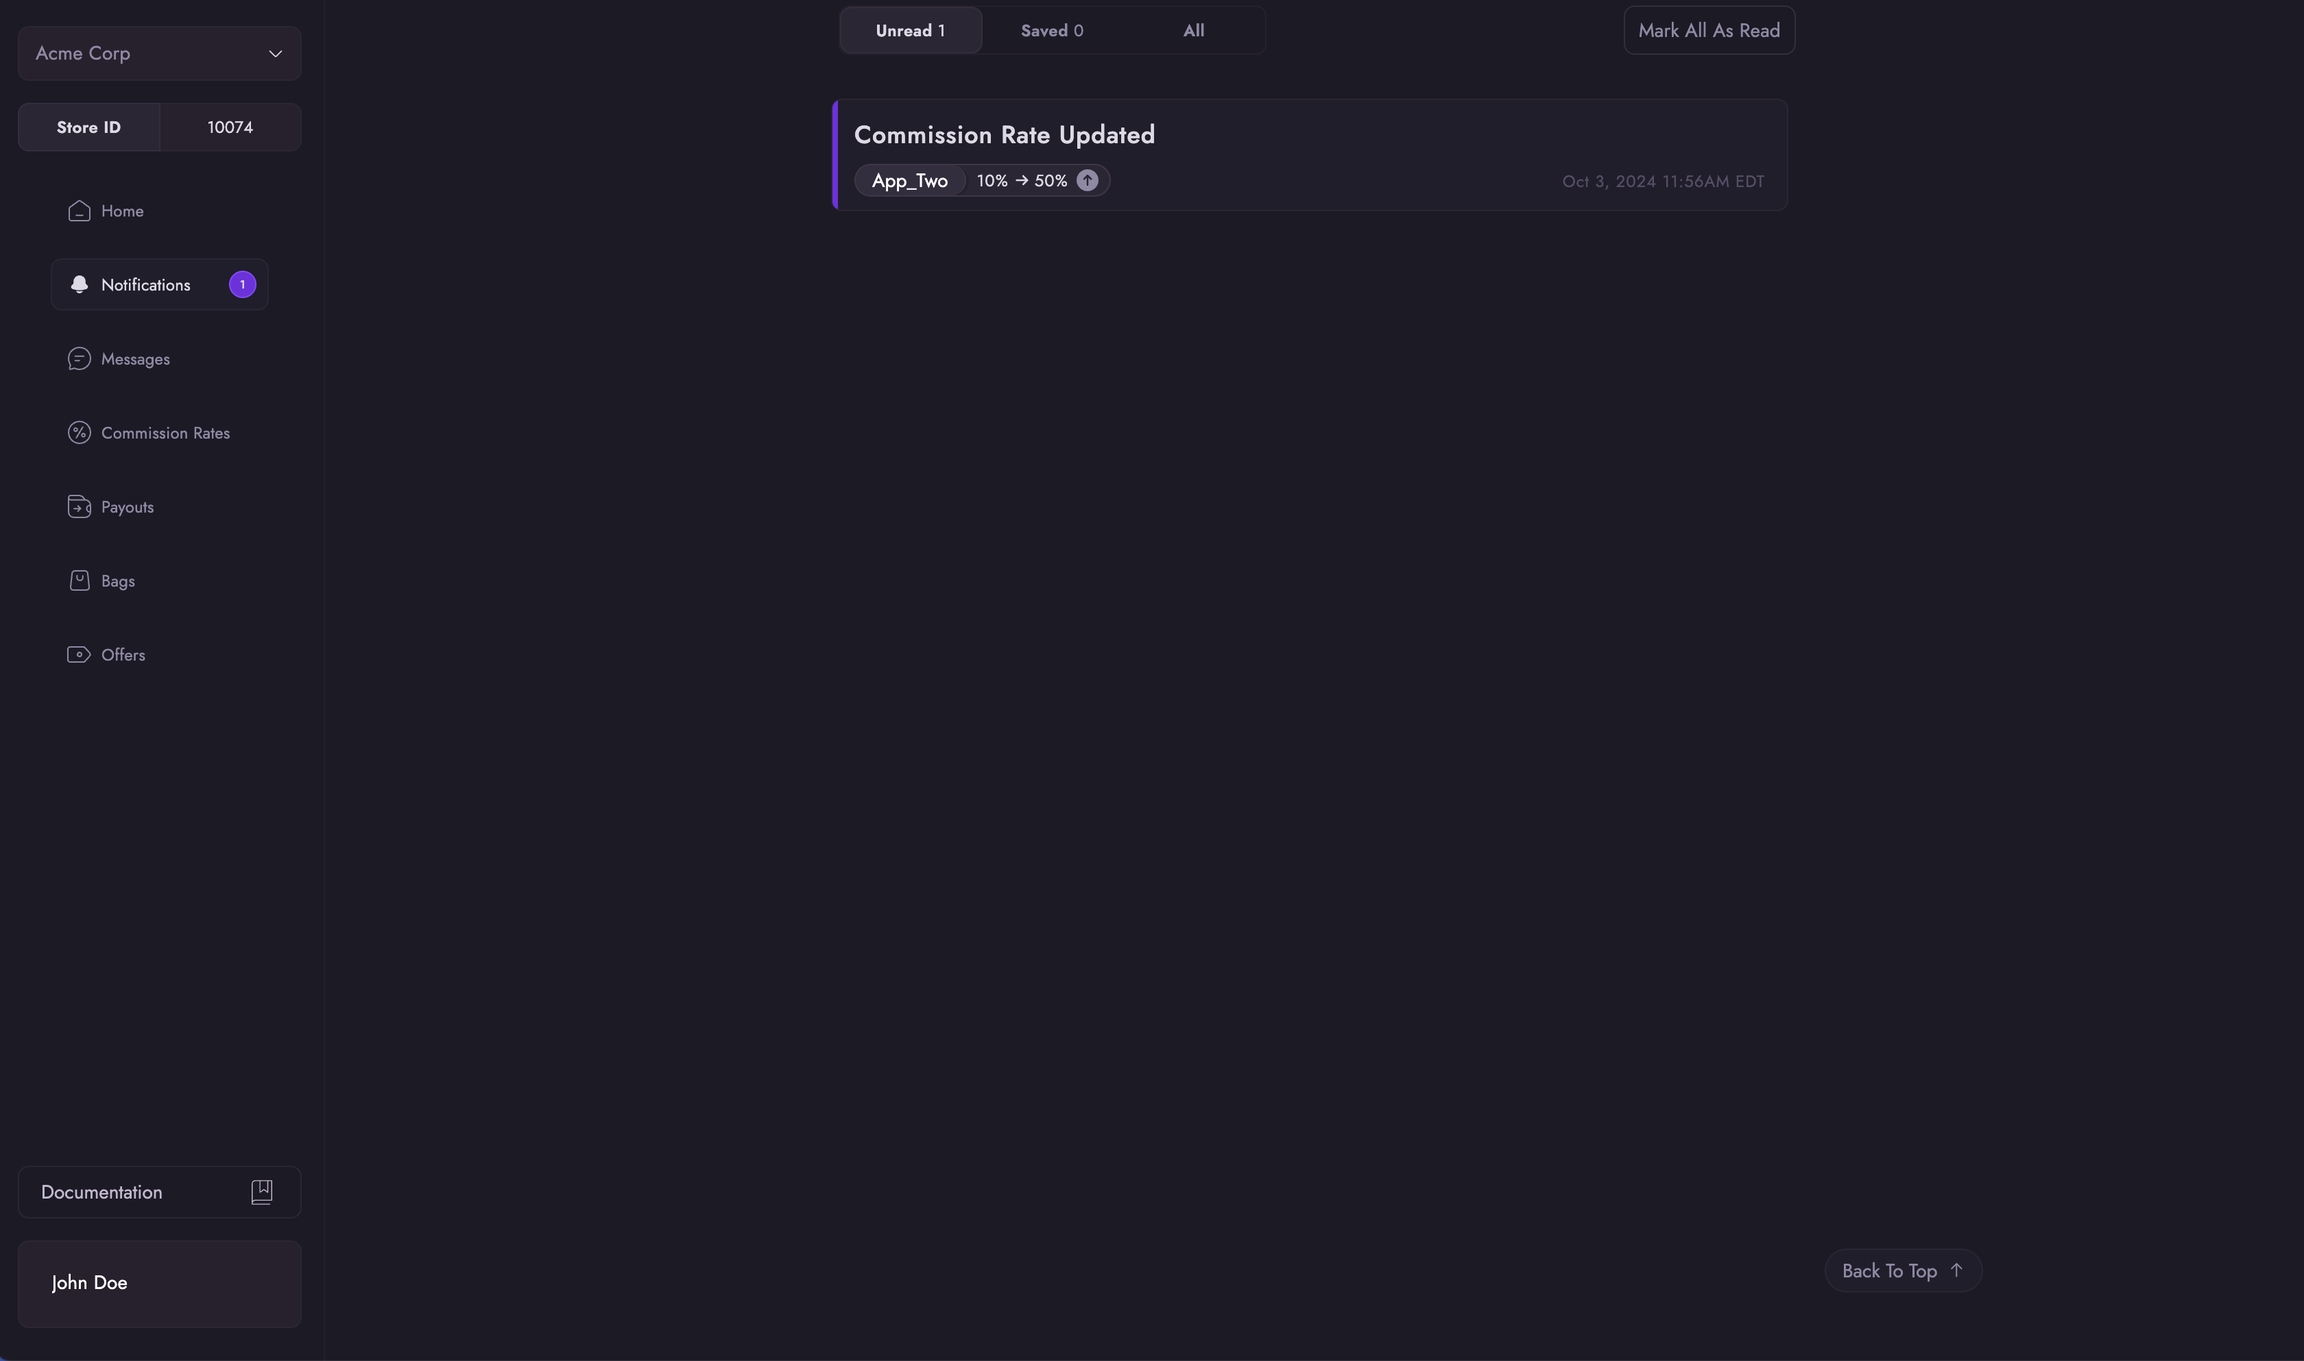
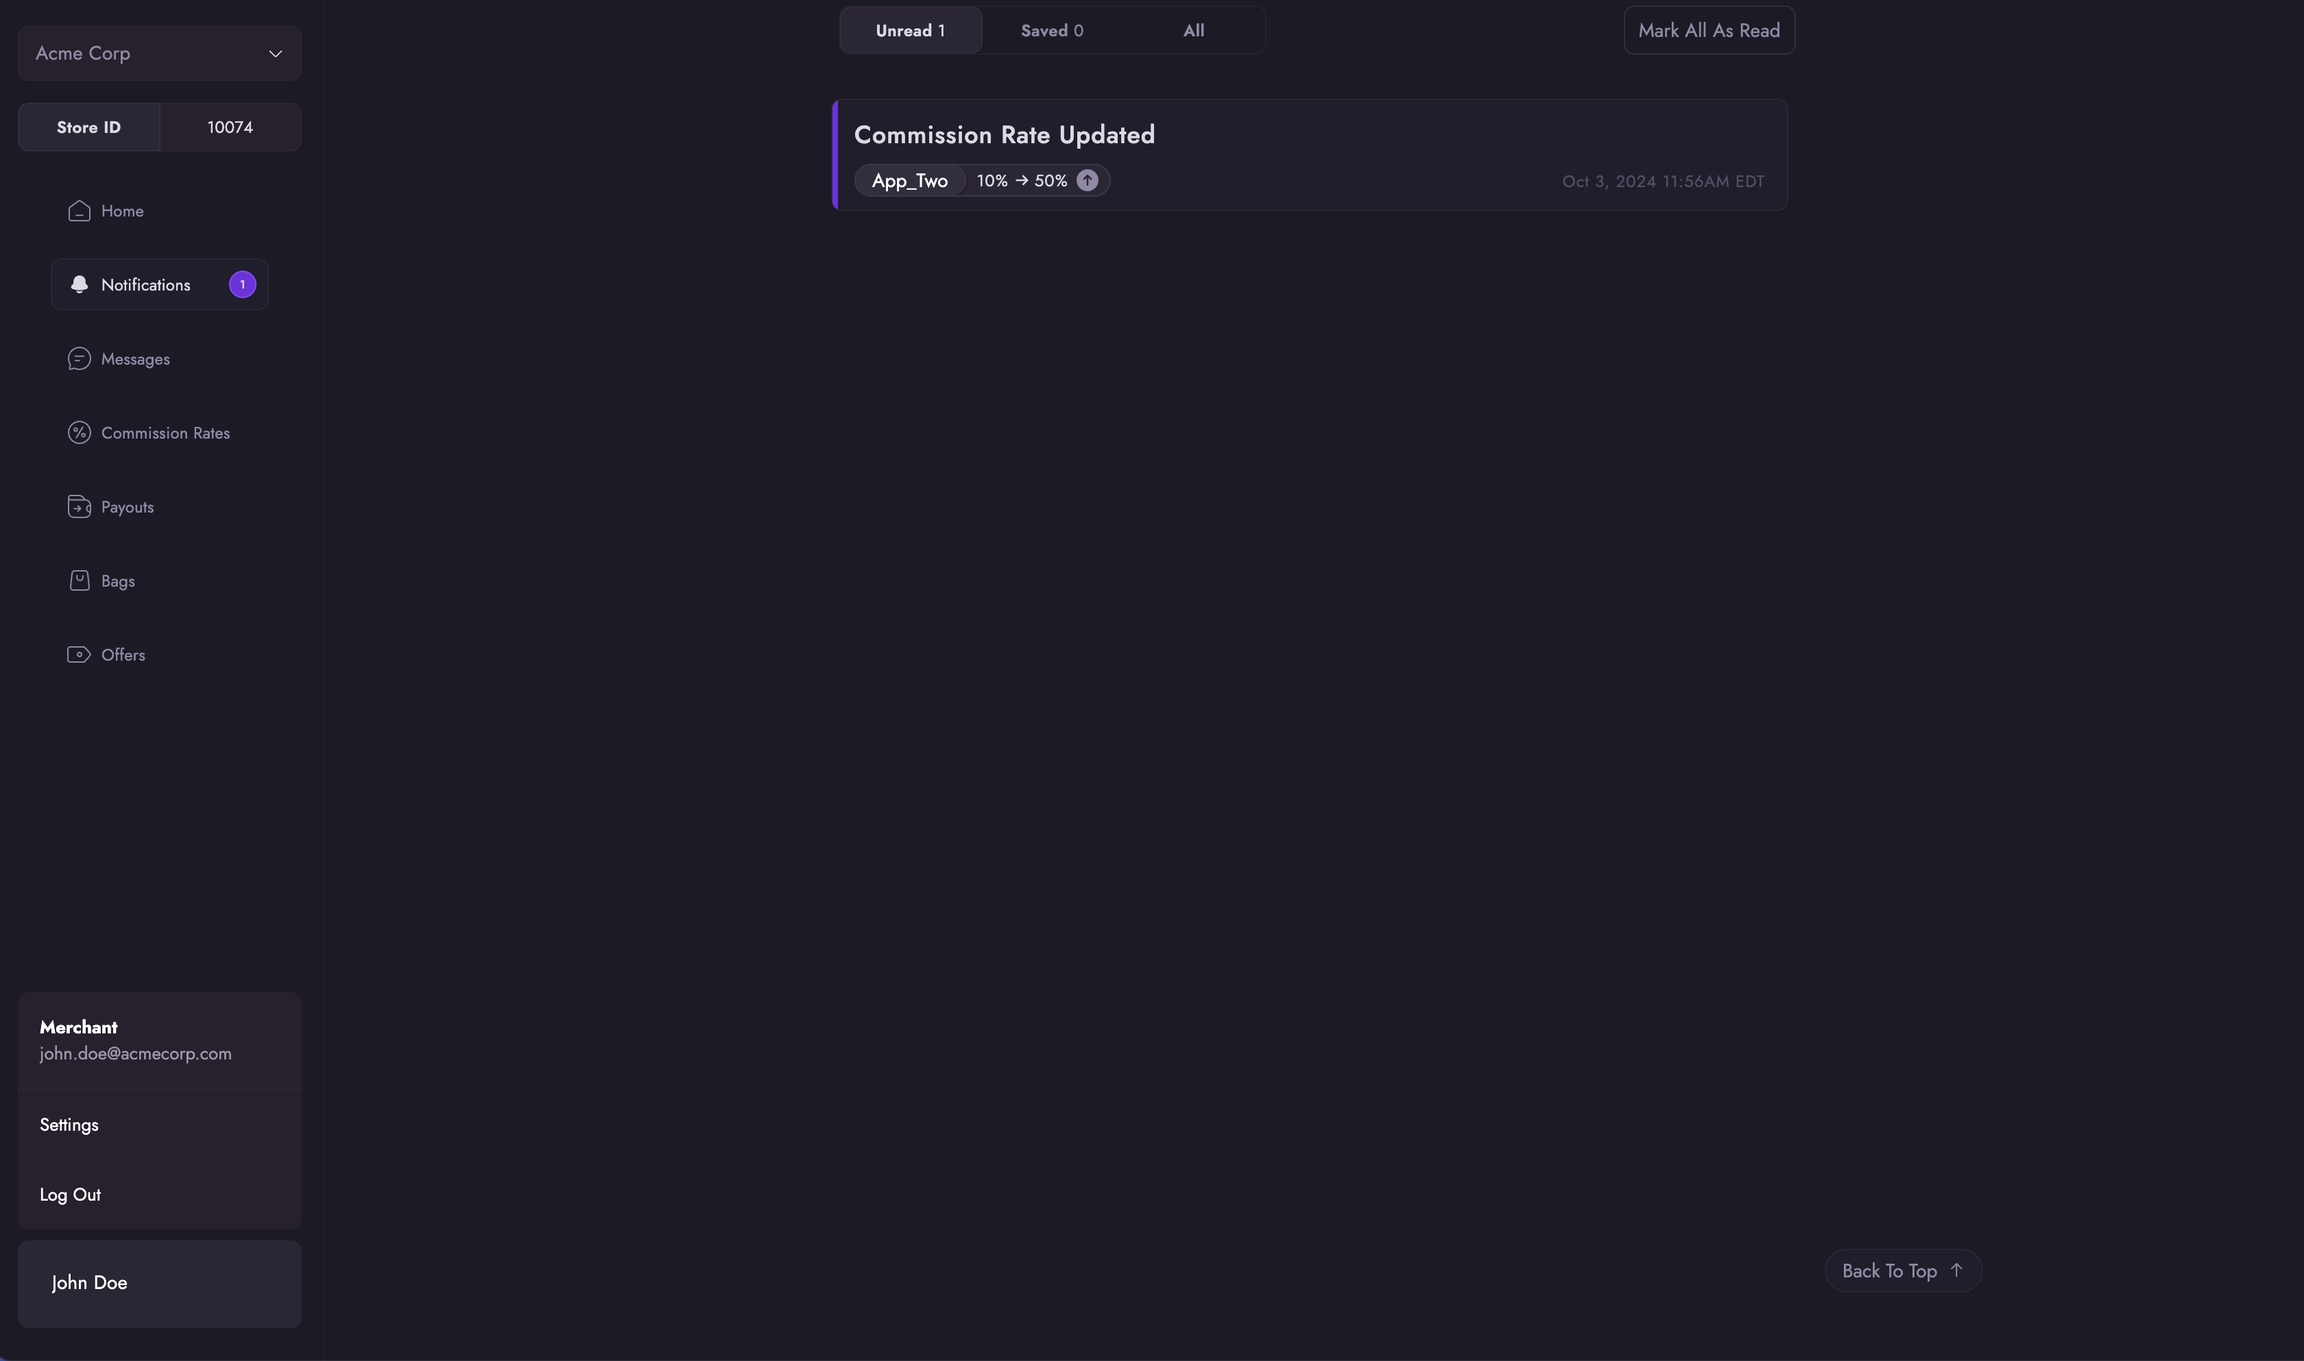
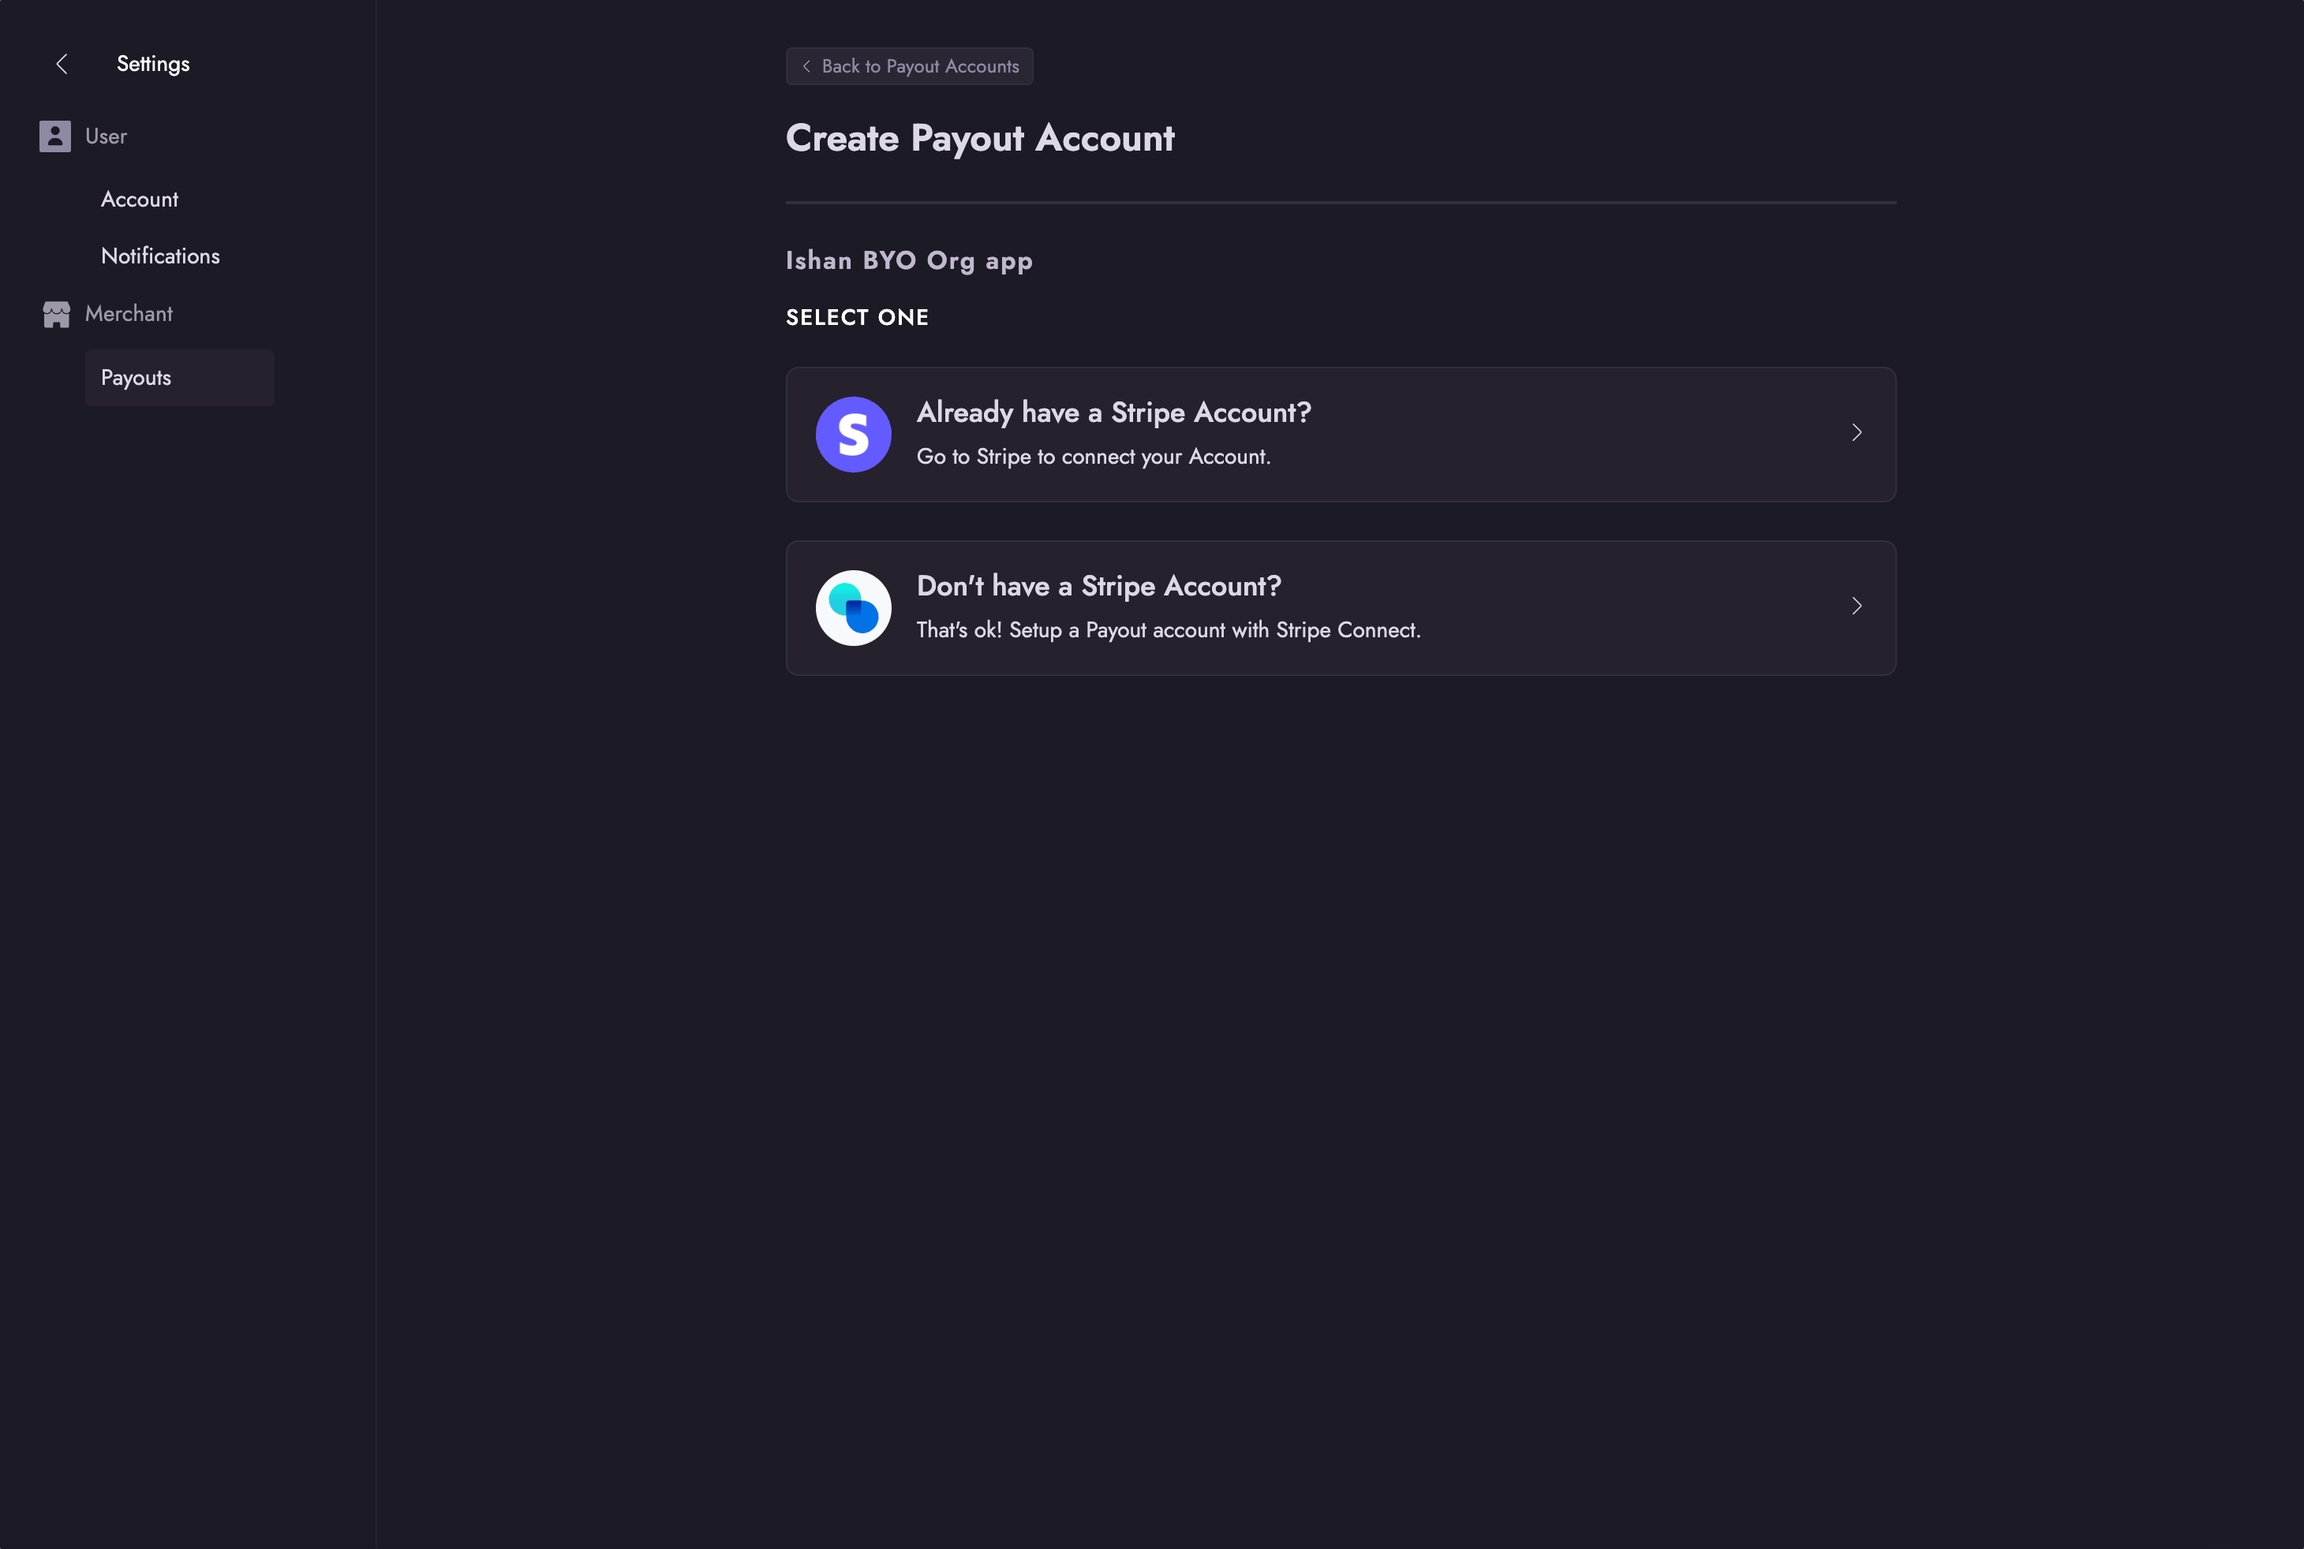

This guide is intended for Prestashop merchants who are connecting their store to Violet. During this process, the merchant will install and configure the Violet plugin through their Prestashop dashboard and then generate and provide credentials to Violet through the Violet Connect onboarding tool. Total time for completion is around 10 minutes.
From Violet Connect select Prestashop.
In a separate tab, open the admin dashboard of the Prestashop site.
Download the .
From the left sidebar, locate the Improve section.
From the left sidebar, locate the Configure section.
Click Advanced Parameters then Webservice.
Click the Add new webservice key button near the top-right corner of the page.
Locate and click the Generate button near the Key field.
Store URL This is the fully formed public URL to your Prestashop store. If you provide any other URL the credentials will be rejected until the correct one is provided.
The standard URL format is:
Replace `yourdomain.com` with your actual PrestaShop store domain.
This is the base endpoint for the PrestaShop Webservice API, which is used for most integrations.
API Token This is the webservice key created in Step 2.
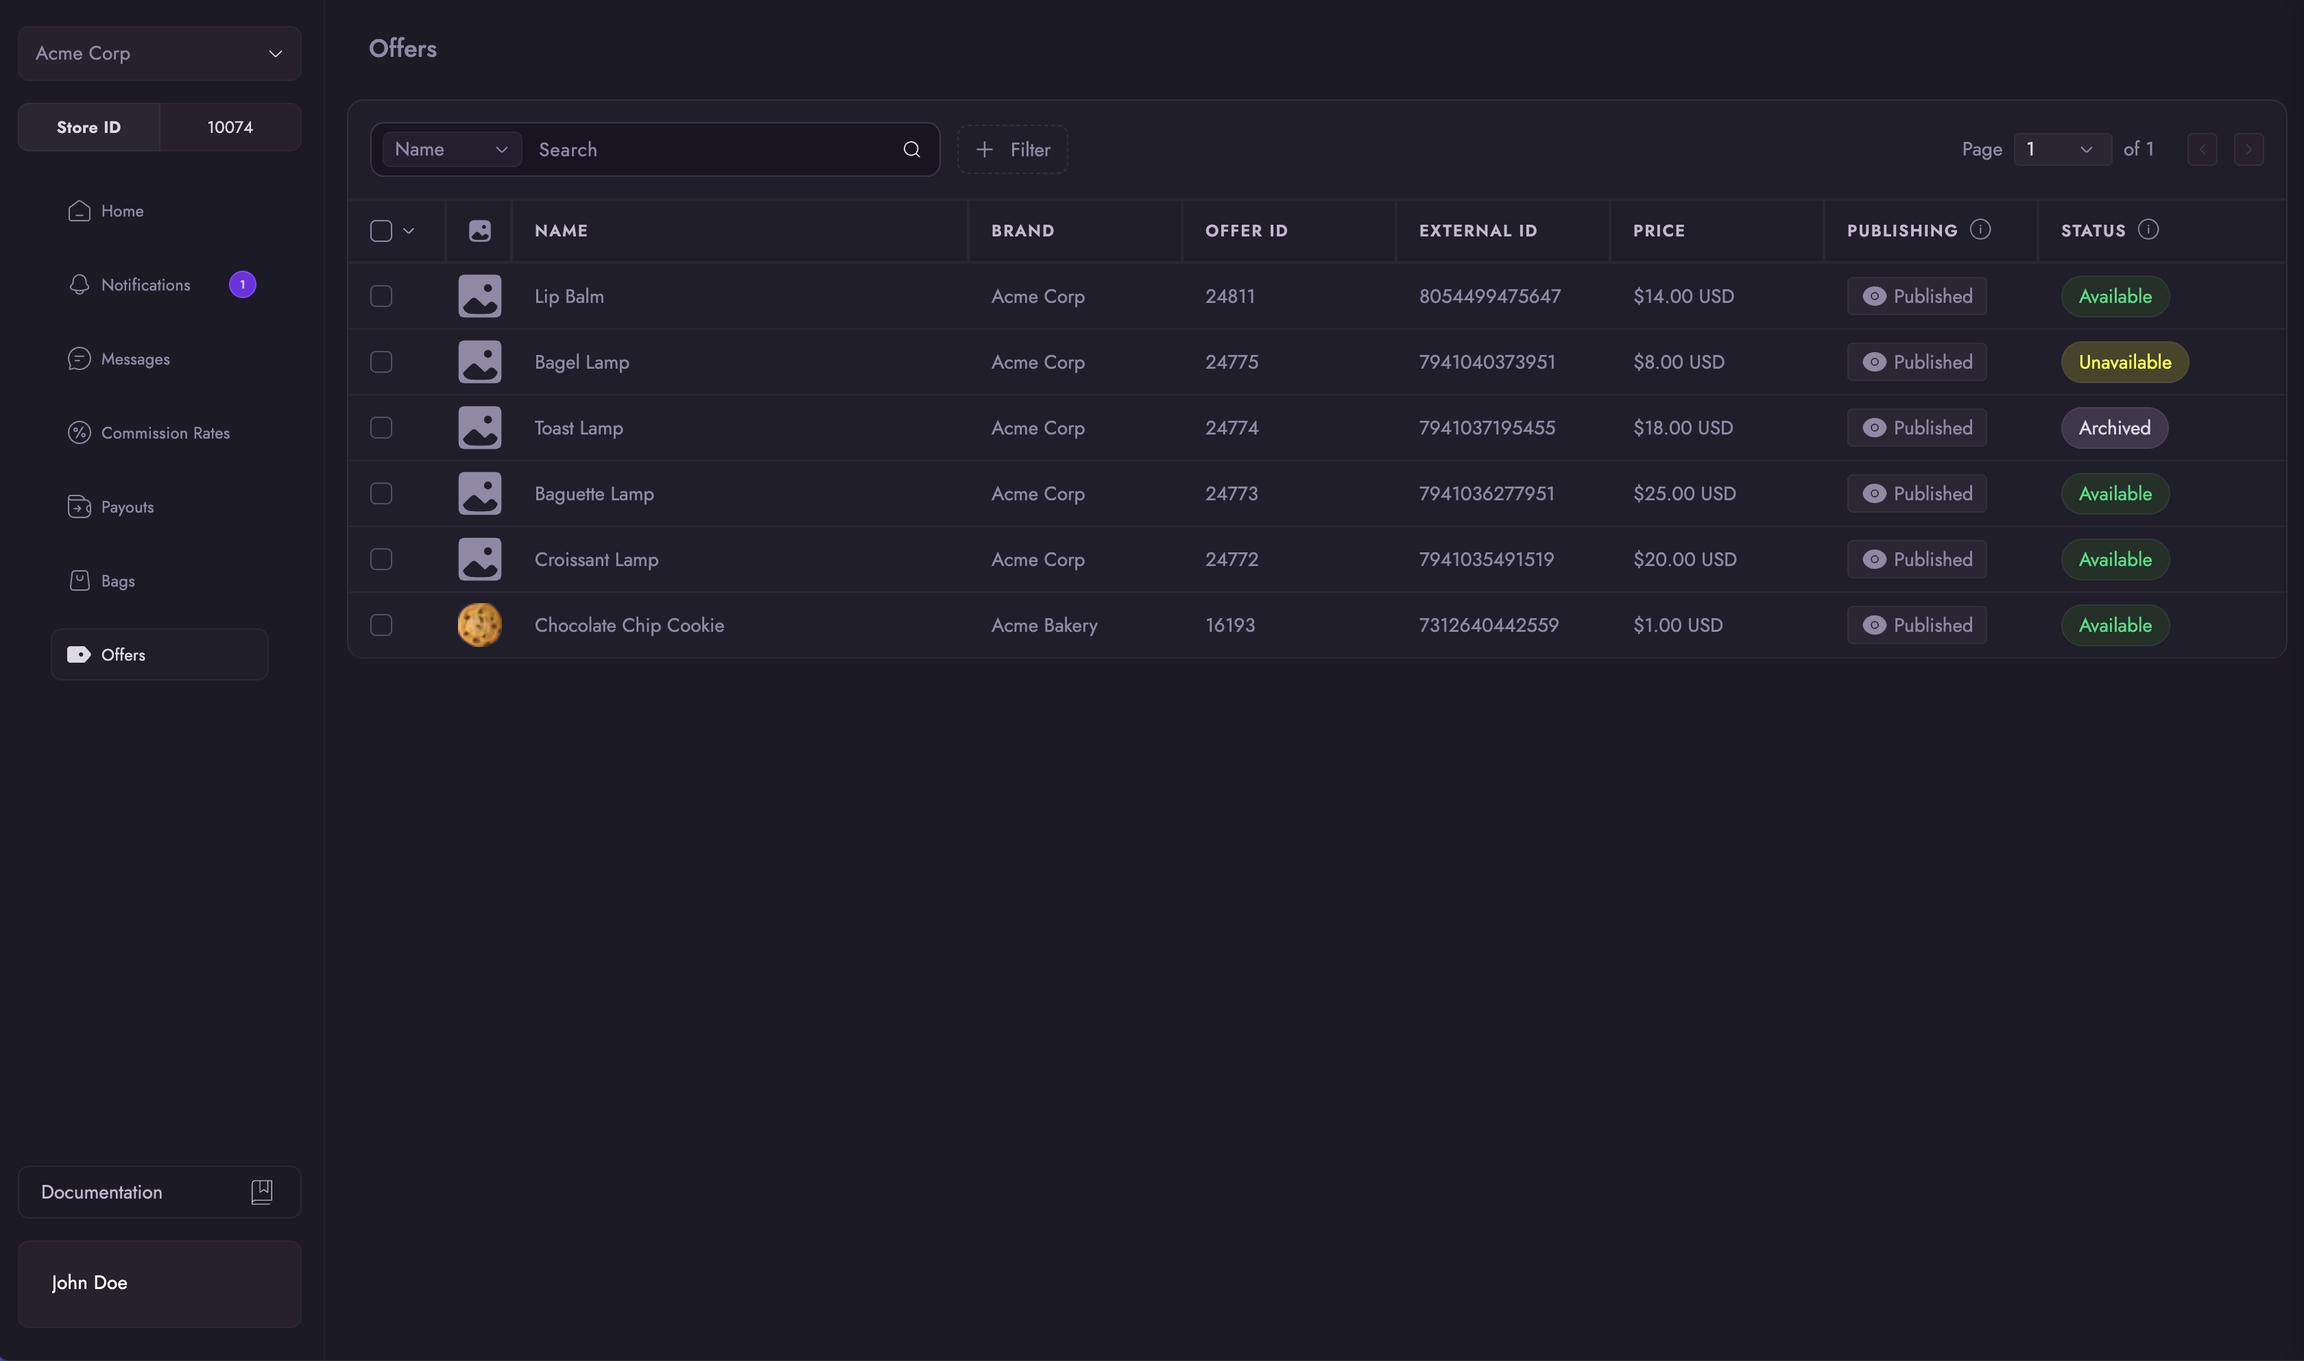
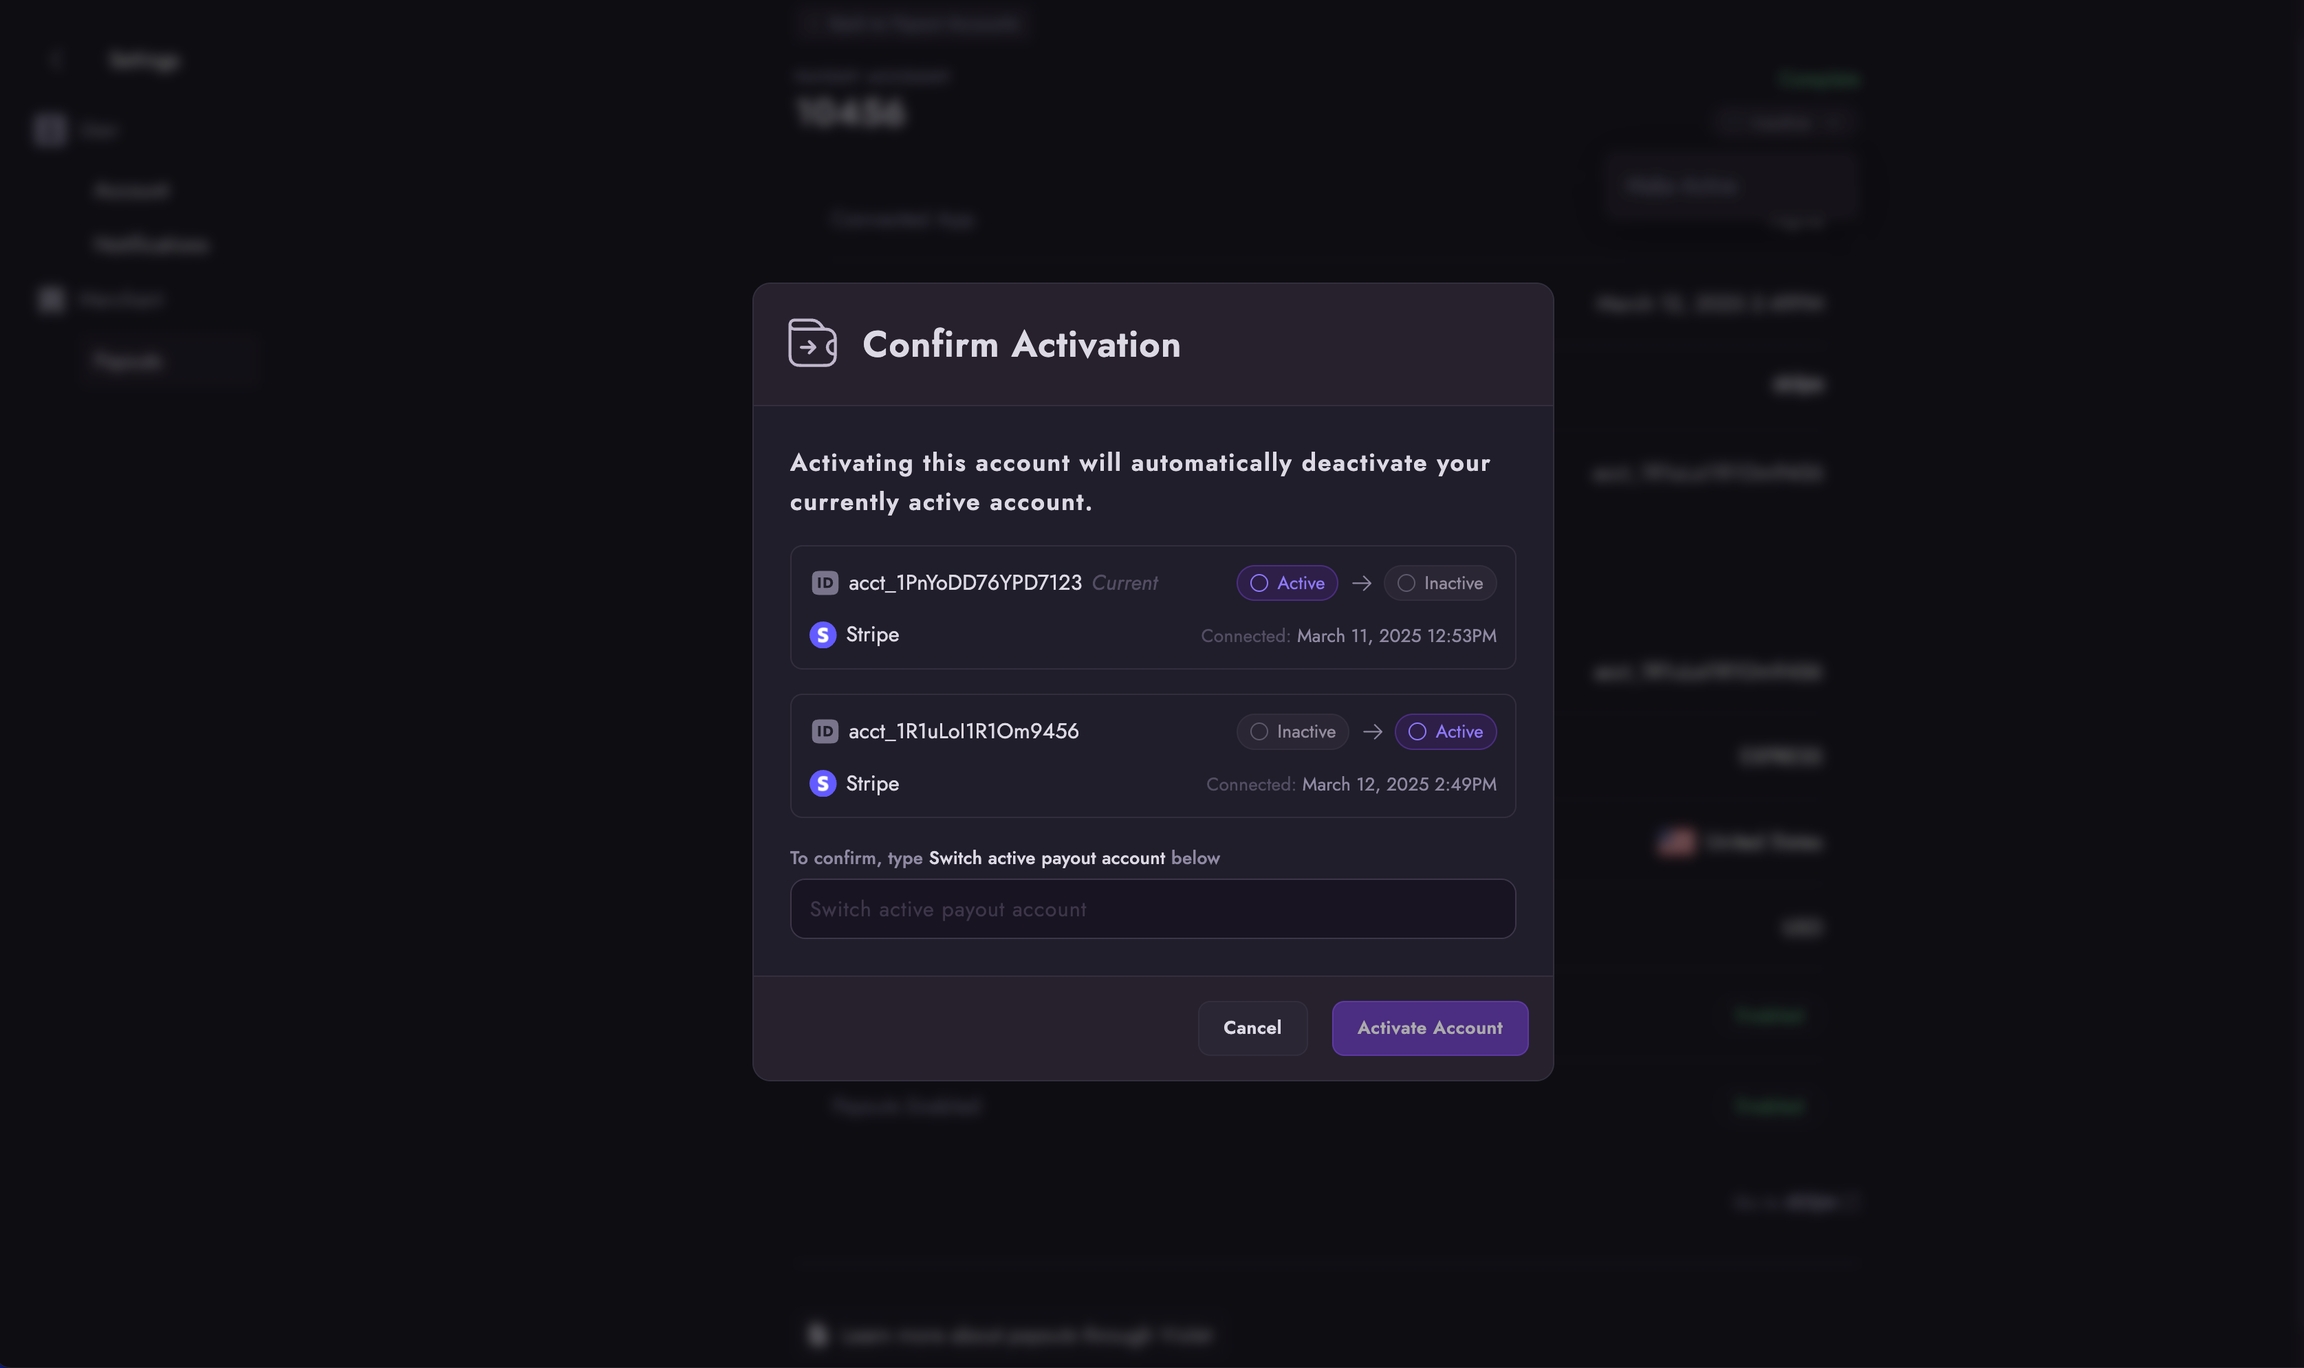
Click Modules then Module Manager.
Click the Upload a module button near the top-right corner of the page.
The upload modal should now be open.
Click Select File and select the violet.zip file that you downloaded in the first part of this step.
Once selected the plugin will begin installing.
Enter a key description that will help identify that this key is used by Violet.
Ensure that the webservice key is enabled.
Configure the permissions so that they match the following values:
✔
carts
✔
✔
✔
✔
categories
✔
combinations
✔
configurations
✔
contacts
✔
content_management_system
✔
countries
✔
currencies
✔
customer_messages
✔
✔
✔
✔
customer_threads
✔
customers
✔
✔
✔
✔
customizations
✔
deliveries
✔
✔
✔
✔
employees
✔
groups
✔
guests
✔
✔
✔
✔
image_types
✔
images
✔
languages
✔
manufacturers
✔
messages
✔
order_carriers
✔
order_details
✔
✔
✔
✔
order_histories
✔
✔
✔
✔
order_invoices
✔
✔
✔
✔
order_payments
✔
✔
✔
✔
order_slip
✔
✔
✔
✔
order_states
✔
✔
✔
✔
orders
✔
✔
✔
✔
price_ranges
✔
product_customization_fields
✔
product_feature_values
✔
product_features
✔
product_option_values
✔
product_options
✔
product_suppliers
✔
products
✔
search
✔
shop_groups
✔
shop_urls
✔
shops
✔
specific_price_rules
✔
specific_prices
✔
states
✔
stock_availables
✔
stock_movement_reasons
✔
stock_movements
✔
stocks
✔
stores
✔
suppliers
✔
supply_order_details
supply_order_histories
supply_order_receipt_histories
supply_order_states
supply_orders
tags
✔
tax_rule_groups
✔
tax_rules
✔
taxes
✔
translated_configurations
✔
violet_cart*
✔
✔
✔
✔
violet_config*
✔
✔
✔
✔
warehouse_product_locations
✔
warehouses
✔
weight_ranges
✔
zones
✔
addresses
✔
carriers
✔
cart_rules
https://yourdomain.com/